• Steel Soldiers now has a few new forums, read more about it at: New Munitions Forums!

  • Microsoft MSN, Live, Hotmail, Outlook email users may not be receiving emails. We are working to resolve this issue. Please add support@steelsoldiers.com to your trusted contacts.


M35A3 Rim Restoration and Tire Swap Project (Picture-Heavy)

HDN

Well-known member
1,938
4,648
113
Location
Finger Lakes Region, NY
I'm in the midst of swapping the old 365/80R20s on my M35A3 to some pre-loved 395/85R20s. This swap has successful results documented throughout the Steel Soldiers forums, so I decided to take the plunge. I would've liked to stick with 365s because I like the look of them, but I was able to purchase and ship six Michelin XZL+ 395/85R20s from CSM Army Tires for less than the price of two brand new Pirelli or Continental 365/80R20s. Plus my wife likes the look of the bigger tires! Amazing how much difference 3" more inches of diameter makes!

I would've liked to just break the rim down, replace the seals, slap the tire on, and bolt it back together to get back on the road. But these rims are a bit rusty and can definitely use a cleaning and a new coat of paint! The stud threads were also pretty gnarly and needed to be chased.

Here I will document what I did and the results. Once I get the process down with the first wheel, I plan to take a few videos while I work on the second wheel to show what I'm doing with moving pictures! So far I've done all this work myself with the following tools:

3/4" drive socket set
1/2" drive socket set
2" adjustable wrench
Two 36" pry bars
1" drive 1:64 torque multiplier (a Chinese tool from Amazon.com) with 10-amp geared hammer drill (without running the hammer) and custom-made adapter
Tap and die for 3/4"-16 threads
A cheap hydraulic floor jack for getting the beadlock insert out (could've probably just used a third pry bar instead)
Chain
Wire brushes (angle grinder, drill, Dremel, hand brushes)
4x4 and larger wood blocks
4-ton bottle jack to jack up truck
6-ton jack stand (big one needed for the height of the axle)
A wooden pallet to help me keep my work out of the dirt and grass

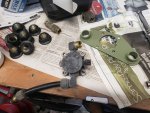
Paint includes both Rustoleum and Krylon products. Permatex rust treatment is also being used, along with Permatex thread sealer for the air pipe and connections to the CTIS hardware. I plan to never-sieze the lug nuts as I do with my other vehicles, but I don't think I will do that with the nuts holding the rim together. Note that these rims are painted with CARC and that proper safety precautions need to be taken when doing anything that'll turn the paint into an airborne powder! For that I have a 3M respirator with P95 cartridges. Safety glasses, goggles, face shield, and so on to protect your eyes, steel-toe shoes, and other common-sense PPE is important for a job like this!

I hope to be done with this project by August 🤞The first wheel's taken me a long time because it's been a huge learning process for me as well as waiting to get the tools I need to get the job done. I don't think the subsequent ones will take me as long!

So first thing's first: New-to-me tires! These were purchased from CSM Army Tires down in Alabama. The owner, Philip, worked with me and my budget and set me up with 75%+ tread Michelin XZL+ 395/85R20 tires. Like he says on his website, there's no dry rot! It's hard for me to tell how old these tires are, but they look like they're in great shape. They were shipped right to my home via Estes freight. A lift gate and a powered pallet jack got both 700-lb pallets from the van to my work area.
tires just delivered from csm army tires - cropped.jpg


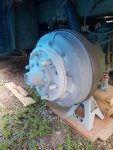
Stone cover on... Stone cover off! There are some old bug nests under the cover. The cover itself has some surface rust and chipped paint that'll be taken care of.
stone cover on.jpgstone cover off.jpg


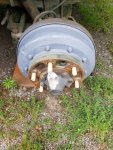
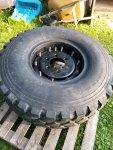
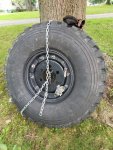
Almost ready to take the wheel off. The CTIS valve and air lines were removed per the instructions in the TM. The lug nut studs were treated with copper never-sieze, probably from when the Army last serviced the axles and brakes on the truck over 11 years ago. The TM says to deflate the wheel before removing. The tire had a hole in it so it was already deflated. The rubber in the tread is thick enough that it will roll around with squishing. I removed the wheel using tips from @simp5782 by carefully using a prybar between the ground and the wheel to make sure the wheel clears the wheel studs without scraping and damaging their threads, and scooching the wheel away from the truck. The wheel weighs probably about 300 lbs with no air in it or any CTIS hardware mounted.
all ctis hardware removed.jpg


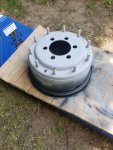
The brake drum has plenty of surface rust on it. You'll notice it was originally painted green, but I'm betting the paint wasn't temperature-resistant and probably degraded rapidly because of brake drum heat. I plan on wire brushing, priming, and painting the drum in-place, taking care to use the appropriate heat-resistant paint. The drums will be black this time because I can't find flat green paint that would be appropriate for this application.
front passenger brake drum.jpg


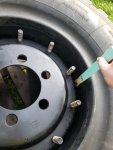
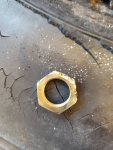
Here's the torque multiplier at work. I gave each nut several turns with the hand crank to bust them loose. There was a ton of resistance to the torque multiplier because everything was stuck so hard! One thing I will do with the next wheel is chase the rim stud threads with a die before trying to get the nuts off. It'll probably make the job a little easier! Note that I have a 1-1/2" socket over the wheel's air pipe to keep the pipe from getting destroyed by the torque multiplier's reaction arm.
torque multiplier loosening rim nuts.jpg


Here's a close-up of the torque multiplier I used as well as the big DeWalt hammer drill. To speed up the torque multiplier, I custom-printed a solid ABS plastic adapter that let me interface a 1/2" drive from my drill with the 1" drive on the torque multiplier. I connected the drill to the torque multiplier and ran the drill in low gear, no hammer, and it zipped the nuts right off the studs.
torque multiplier and dewalt hammer drill.jpg


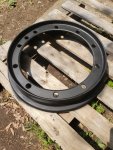
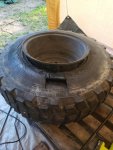
Once the nuts were off, I used my two prybars to work the beadlock flange off the rim. Then I got a few wood blocks just big enough to set the wheel on only by the rim, and used the prybars again to slide the tire off the rim. No tire soap was used to do this, although it probably would've made life easier.
main rim popped out.jpg


Yay! The tire's off the rim! Now to pull out that beadlock insert...
rim split apart.jpg


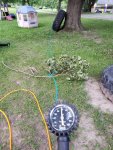
This took me awhile to do. I broke a light-duty ratchet strap trying to do this (they weren't kidding when they said it was rated for only 70 lbs 😖). I ended up wrapping a chain around the insert, linking it to a floor jack I had sitting atop a wood block on the tire's side wall. I used the jack handle and the jack as a big lever to pull the rubber insert out of the tire, with two other prybars assisting. The insert is an inch thick and weighs about 40 lbs. I am going to reuse it in the replacement tire.
bead lock insert removed.jpg


More pictures to come!
 

HDN

Well-known member
1,938
4,648
113
Location
Finger Lakes Region, NY
I got the rim on the bench in the shop. It's a heavy sucker! I'm guessing the big part of the rim weighs around 70 lbs, and the beadlock flange that bolts to the rim weighs around 30 lbs. I got it on the bench and chased the threads on the rim studs with a die. The threads were pretty trashed, so I needed to use a breaker bar to turn the die (going between T-handle and full bar). It cleaned right up, but I really felt like I should've had Popeye arms by the time I finished! This probably took me an hour and a half to do. I also examined the rust on the rim, most of which formed in the visible area and the gap between where the flange meets the rim. The o-ring sealing surface is in pretty good shape.
cleaning rim studs.jpg


After chasing the threads, I washed the rim parts with Dawn dish soap and a drill brush that's used for cleaning bathtubs and vanity counters. WD-40 got on the front of the rim while I was trying to break the rim nuts loose. It stained the paint, but it's all going to be painted in a fresh coat of black anyway!
done washing rim.jpg


After letting the rim dry, I wirebrushed all the rust I could find with a drill brush, angle grinder brush, and a Dremel brush. I was in my coveralls and wearing my P95 respirator doing this outdoors since I didn't want to take my chances with any CARC dust I might kick up. Satisfied with my rust cleaning, I brought the rim back inside and coated the rust spots with Permatex rust treatment, which turns black after reacting with the rust.
permatex rust treatment applied.jpg


Today I painted a new set of rim nuts black and the air tube olive drab. The air tube on this rim was actually painted olive drab, whereas the rest of the rim was painted black. Rim painting to happen next!
 

cattlerepairman

Well-known member
Steel Soldiers Supporter
3,167
3,070
113
Location
NORTH (Canada)
@HDN Looking good! I just did my two piece rims. I used a 3/4 Milwaukee impact to spin the nuts off. They were on tight. I suppose you will be using new O-rings as well. How do you plan on sealing the beads for re-inflation?
 
  • Like
Reactions: HDN

HDN

Well-known member
1,938
4,648
113
Location
Finger Lakes Region, NY
@HDN Looking good! I just did my two piece rims. I used a 3/4 Milwaukee impact to spin the nuts off. They were on tight. I suppose you will be using new O-rings as well. How do you plan on sealing the beads for re-inflation?
I borrowed my father-in-law's DeWalt 1/2" cordless impact and it couldn't bust the nuts loose at all. The torque multiplier and drill adapter I made gently eased them off yet not at a snail's pace. Electric-powered torque multipliers exist, but they seem to be for structural steel applications and cost thousands of dollars. I made my electric torque multiplier with 6 hours combined design and print time and maybe $3 in plastic and power for the printer :)

I have a new set of o-rings for the rims and the valve stems, as well as a new set of valve stem nuts. The old rim o-ring is absolutely smushed and doesn't look like it can be re-used. I wasn't planning on re-using o-rings and seals anyway so I got new ones from Erik's. He was kind enough to work with me on shipping via USPS flat rate, which was a bit less expensive than the other options he and others advertise.

As for sealing the beads, the TM doesn't specify that anything special needs to be done. From what I can tell, the beadlock insert should help with that part, allowing the tire bead to be squeezed against the main rim by tightening the beadlock flange, so I'll just give that a try and see what happens.

Speaking of tightening the rim, I got a new set of rim nuts from Big Mike's in NJ after I unwittingly trashed the old ones by cleaning the threads with a tap. Of course I cleaned all the threads, even the distorted ones that make the nut a lock nut :doh: 
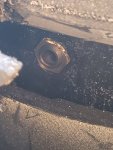
Can't reuse those now, so I got a new set. I won't be making that mistake again!
 
Last edited:

cattlerepairman

Well-known member
Steel Soldiers Supporter
3,167
3,070
113
Location
NORTH (Canada)
I found that just tightening the two piece rim did not seal the beads sufficiently to allow the tire to inflate. Mind you, I am using the Canadian two-piece rims that look very much like the A3 rims, but there is no additional "insert" in addition to the two rim pieces. Maybe that is a difference?

I do not have one of those bead seaters (the "blast" tank with the nozzle and ball valve) so I had to resort to packing the circumference of the rim with tire soap on both sides. I then inflated with the valve core removed to allow quicker seating of the beads. At times I had to slap some more soap onto certain spots. When reaching 10 or 15 psi in the tire I screwed the valve core in and inflated the rest of the way. Worked ok. I went through two buckets of tire soap for seven tires (had to re-do a couple because of other leaks).

I was wondering about the often touted usefulness of the two piece rim for on-the-truck tire changes. Yes, they tend to kill one a bit less frequently than the split ring ones. On the other hand, the touted ability to simply spin off the nuts, take off the outer part of the rim and quickly change the tire with the rim on the truck appears to be much easier on paper than it is in real life. If that rim is on the truck, good luck getting a sufficient seal to be able to inflate the tire without an air blaster.
Yes, sure, one can spray starting fluid and light it all on fire and that works in 68.4% of cases without torching the tire or truck, but what is the right technique to use? Smear the beads with mud and dirt and hope for the best?
 
Last edited:

HDN

Well-known member
1,938
4,648
113
Location
Finger Lakes Region, NY
I recently made a thread in the Conversations board asking for recommendations for brush-on automotive paint. I've been using rattle cans, which I'm now actually feeling better about considering all my painting is being done outside.

The hardest part for me was painting the deep dish side of the main rim. It looks blotchy, but my wife thinks it'll provide enough weather protection. I'm not really concerned about how the rim dish looks because you can't see it unless you take the wheel off the truck.

I'm using:
Rustoleum gray primer (Stops Rust it says on the can)
Rustoleum camo flat olive green
Krylon camo flat black

One picture has the wheel valve in it. I'm not going to rebuild and repaint it right now because I know it was holding air. I'll clean the dirt off it anyway.
 

Attachments

HDN

Well-known member
1,938
4,648
113
Location
Finger Lakes Region, NY
In the process of assembling the wheel! I started by installing the truck's stock bead lock in the new tire. To do this, I used:

  • Ratchet strap, 1000 lb capacity (~$8 at Harbor Freight)
  • 4-ton bottle jack
  • A knee and composite-toe boots
I tried a couple big prybars to help squeeze the bead lock between the beads, but in the end they proved useless. The bottle jack and boots won here!

I cinched the insert with the ratchet strap, using my knee to help the process. I used the bottle jack to help spread the beads apart so that I could insert and rotate the insert into place. I then removed the bottle jack and released the ratchet strap.

20210719_190459.jpg20210719_190505.jpg20210719_190533.jpg20210719_190708.jpg

At this point the insert was still oval and uncentered in the tire, so I kicked at it a little bit and tried using pry bars to pull and force the insert into place. I found that I needed the jack again to spread the bead apart to help center the insert.

20210719_194703.jpg

This took me about 30 or 40 minutes to figure out how to do it. Maybe it'll go faster on the next wheel!
 

rtk

Well-known member
Steel Soldiers Supporter
1,181
417
83
Location
Lockport N.Y.
I went the other route , took the wheels off , picked them up with the John Deere , put them on my trailer and took them and the new tires to the tire shop in town . He does HD equipment tires and had them all done in a day with new o rings . Easier on my old body . I also picked up a tire dolly , made lining up the tire and axle easy . You are doing a great job , take your time and do it right as you only want to do it once !!! stay safe
 

HDN

Well-known member
1,938
4,648
113
Location
Finger Lakes Region, NY
I went the other route , took the wheels off , picked them up with the John Deere , put them on my trailer and took them and the new tires to the tire shop in town . He does HD equipment tires and had them all done in a day with new o rings . Easier on my old body . I also picked up a tire dolly , made lining up the tire and axle easy . You are doing a great job , take your time and do it right as you only want to do it once !!! stay safe
Thanks @rtk ! I hope we'll some day get our trucks to meet at a show :)

Brake drum cleaned and painted! I didn't care much about the paint overspray as long as the hubcap was black to match the rim. I painted the hub green to match what it looked like when I took the wheel off.

I used two different primers: heat-resistant for the drum and normal for everything else. I painted the hubcap twice because the first black I used (Krylon grill paint) was glossier than its can cap let on. I sprayed Krylon flat black over it.
 

Attachments

HDN

Well-known member
1,938
4,648
113
Location
Finger Lakes Region, NY
I have the wheel bolted together and the CTIS valve piped in! It took a lot of wrenching but got the clamp ring torqued down. Here's what I did:

Very first thing: I made sure the o-ring flange on the rim was clean.

1) I installed the rim using a @simp5782 method where I leaned the tire against something, aligned the slot in the bead lock insert with the air pipe hole, and worked the rim into the tire. I had to use a prybar to get the bead edge over the air pipe nut on the rim. After some shoving, the rim slipped right in. No tire soap was used.

2) I set the tire on its side resting the back of the rim on a couple wood blocks to make it easier to seat the o-ring and clamp ring (or bead lock). I rubbed silicone grease all over the o-ring and seated it with my hand and a paint stirring stick.

3) I seated the clamp ring and started tightening it down. I started with the second nut CW from where the counterweight was going to be installed and manually tightened the lock nuts down evenly. I did this until I couldn't tighten them more with a 3/4" drive ratchet without a cheater pipe.

4) I torqued the clamp ring to spec, which is between 425 and 475 ft lbs. I used a torque multiplier to help me do this in two steps to get to 450 ft-lbs using a 1/4" drive torque wrench on the input shaft. That meant I had to not only calculate ft-lbs input, but also convert ft-lbs to in-lbs:

450 ft-lbs / 2 / 64 = 3.5 ft-lbs
3.5 ft-lbs + 15% (torque multiplier losses) = 4 ft-lbs
4 ft-lbs * 12 in-lbs / ft-lb = 48 in-lbs input

I torqued the lock nuts to 225 ft-lbs first, then 450 ft-lbs with a maximum input torque of 96 in-lbs :)

5) I piped in the CTIS valve per the TM picture and bolted it to two rim studs. The TM doesn't specify a torque value for this mount, so I assumed 80 ft-lbs like specified for the stone shield.

Now I need to fill it with air and hope it doesn't leak!
 

Attachments

HDN

Well-known member
1,938
4,648
113
Location
Finger Lakes Region, NY
I inflated the tire last night using truck air from the emergency gladhand. I bought a longer hose to go between my pressure gauge and air chuck since the wheel TM recommended that I stand at least 10 feet off to the side from the tire in case the rim explodes.

It's also suggested that the wheel be placed in a cage while inflating for the first time. I don't have a cage, so I wrapped a couple chains around the rim and the tire. The chains might not be strong enough to contain an explosion, but they'll slow the clamp ring down a little bit if it tries to fly away. Either way, I had the wheel leaning against a tree and the face of the wheel pointed where it wouldn't hurt anyone if something bad happened, like a big gun.

Anyway I inflated the tire to 50 psi and let it sit overnight. This morning I checked the pressure and it's down to 48 psi. The ambient temperature is also about 10F cooler than when I inflated it, so maybe thermal expansion of air is at play? I'm going to keep checking it throughout the day.
 

Attachments

HDN

Well-known member
1,938
4,648
113
Location
Finger Lakes Region, NY
The chain thru the wheel works , just use a heavy chain and make a few loops Air it ip and let it sit for a day or so , just to make sure it holds air , easier to fix now then when it's on the truck . stay safe BK:tank:
I just remembered that the gauge I've been checking it with reads a little lower than the one I fill with. I'll give it another day and see how it goes (y)
 

HDN

Well-known member
1,938
4,648
113
Location
Finger Lakes Region, NY
After a day spent on another project, I mounted the wheel onto the truck. I actually mounted it twice because the first time I had the hollow stud too far away from the CTIS valve. I'm going to try not to do that again! I learned that the hollow stud needs to be one stud CW from the CTIS valve.

Just like any other wheel, I evenly hand-tightened the lug nuts, then tightened them down with a 3/4" drive ratchet as far as I could without a cheater pipe. I then torqued the lug nuts with a torque multiplier and a 1/4" drive torque wrench in two stages. The first stage I torqued everything to the spec for the hollow stud, which has a much lower spec than the solid studs. The second stage I torqued the solid studs to where they needed to be.

For reconnecting the CTIS, I used Permatex thread sealer on all air connections except for the plastic one (Permatex said it can't be used on plastic). I reused the old connections and compression fittings and tightened everything down with a wrench. I made sure to hold the stiff rubber hoses while doing this to preserve their orientation.

I let the truck sit on the tire overnight with a jack stand set just below the axle in case an air leak developed. The tire held air, so I put the stone cover on. Note that the stud cover fasteners all have torque specs. Make sure the cover goes on with the hole over the Schrader valve on the CTIS valve in case you want to manually air the tires up or down.

Now I'm calling this one done :clinto:

Five more to go!

20210728_190711.jpg
 

HDN

Well-known member
1,938
4,648
113
Location
Finger Lakes Region, NY
I hit a snag with the front driverside wheel. The tire bead is hung up on the air pipe nut in a way that the nut and end of the pipe are embedded into the bead, like trying to poke your fingers through a deflated balloon.

No amount of prying, diesel fuel, or chipping away at that bead is helping. I'm down to the runs of wire that go through the bead with little prying surface remaining. I'm going to try the Sawzall next.

The first tire was much easier for some reason. I was able to get a couple pry bars in that area and work the bead around the nut. But this is just gnarly o_O I just hope that if I have to disassemble the rim with the new tire on it that I don't have to resort to cutting it off aua
 

HDN

Well-known member
1,938
4,648
113
Location
Finger Lakes Region, NY
Tire is almost off. I don't have to worry about the air pipe anymore, though.

I worked the rim enough out of the tire so that the air pipe nut was just past the bead lock insert. I cut a big rectangular hole in the sidewall with the Sawzall and got a wrench in there to get the nut off.

This tire leaked all the time, and like @glcaines says, these nuts and grommets aren't usually tightened enough. I think it's because they're too flat to fit in a typical socket and jump out. This is the second nut I've seen with evidence of being chiseled on with a screwdriver and hammer, and it took just one wrench turn to loosen it enough to get it off with my fingers. Un-freakin-believable!

FYI - the sidewalls of a Michelin 14.5R20 XL are about a half-inch thick and have little wires running parallel to the circumference throughout. I don't consider that very thick. No wonder it's so easy to damage these sidewalls!

Now the rim is just hung up on the bead for some reason. Hope to finally get it off tomorrow!
 

Attachments

glcaines

Well-known member
Steel Soldiers Supporter
3,834
2,393
113
Location
Hiawassee, Georgia
I replaced all of the brass nuts when I did my wheels / tires. I also took a socket and ground the edges so that they got a good grip on the nut. There is almost no way to torque those brass nuts to 45-60 ft-lb without using a modified socket. Once the socket slips off the nut, the nut is toast.
 

HDN

Well-known member
1,938
4,648
113
Location
Finger Lakes Region, NY
I replaced all of the brass nuts when I did my wheels / tires. I also took a socket and ground the edges so that they got a good grip on the nut. There is almost no way to torque those brass nuts to 45-60 ft-lb without using a modified socket. Once the socket slips off the nut, the nut is toast.
I trashed one of the new air pipe nuts trying to tighten it without a modified socket. I ground the socket down enough that the rounded inner edges didn't mess anything up. I reused the old one and torqued it properly with the modified socket.

20210805_200408.jpg

Anyway, I FINALLY got the rim out of the tire. While it was upside down resting on my block tower with the rim partially out, I sprayed tire soap around the exposed rim and around the tire bead. I propped up the wheel and sprayed the visible bead lock insert surface too, and slid the rim back into place. Then I laid the wheel right-side up like a bridge between my first take-off tire and a couple jacking blocks and jumped on the rim until it popped out through the back of the tire.

Finally my desk jock weight is useful for something :naner:

20210805_195454.jpg

It took me about five minutes to use a ratchet strap to get the rubber bead lock insert out. The hole I cut in the side of the tire helped with that!

Next I'm going to test out the new pressure washer and clean the rim before de-rusting 👾
 

Mullaney

Well-known member
Steel Soldiers Supporter
Supporting Vendor
7,251
18,795
113
Location
Charlotte NC
I trashed one of the new air pipe nuts trying to tighten it without a modified socket. I ground the socket down enough that the rounded inner edges didn't mess anything up. I reused the old one and torqued it properly with the modified socket.

View attachment 841704

Anyway, I FINALLY got the rim out of the tire. While it was upside down resting on my block tower with the rim partially out, I sprayed tire soap around the exposed rim and around the tire bead. I propped up the wheel and sprayed the visible bead lock insert surface too, and slid the rim back into place. Then I laid the wheel right-side up like a bridge between my first take-off tire and a couple jacking blocks and jumped on the rim until it popped out through the back of the tire.

Finally my desk jock weight is useful for something :naner:

View attachment 841705

It took me about five minutes to use a ratchet strap to get the rubber bead lock insert out. The hole I cut in the side of the tire helped with that!

Next I'm going to test out the new pressure washer and clean the rim before de-rusting 👾
.
I like the socket adjustment to make it fit the air pipe nut better!

That sort of thing used to drive me crazy - until I started going to yard sales and buying up old boxes of tools. Found out that I didn't feel as guilty if I needed to hack up a socket or a wrench and weld or grind on it. Now I have a small bag of special made tools. For all those odd things that a store bought wrench or socket or ratchet just won't fit. Guess I need to make myself one of those!

Hope the pressure washer will knock off some rust and scale on the rim.
Maybe some purple stuff in the water will help degrease it in preparation for painting...
 
Top
AdBlock Detected

We get it, advertisements are annoying!

Sure, ad-blocking software does a great job at blocking ads, but it also blocks useful features of our website like our supporting vendors. Their ads help keep Steel Soldiers going. Please consider disabling your ad blockers for the site. Thanks!

I've Disabled AdBlock
No Thanks