• Steel Soldiers now has a few new forums, read more about it at: New Munitions Forums!

  • Microsoft MSN, Live, Hotmail, Outlook email users may not be receiving emails. We are working to resolve this issue. Please add support@steelsoldiers.com to your trusted contacts.

HMMWV Half Shafts

twisted60

Well-known member
617
250
63
Location
Jupiter, Florida
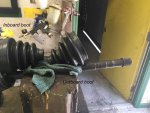
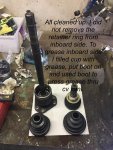
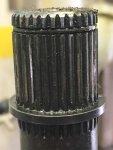
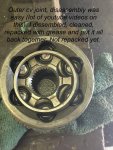
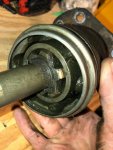
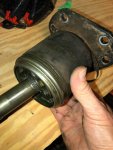
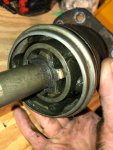
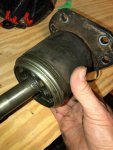
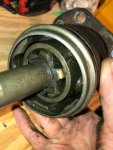
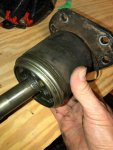
Today was a good tinker day, disassembled a half shaft to clean, inspect, repack and put new boots on. Lot of videos on how to remove half shaft so I wont get into that. Once I removed the half shaft I placed it in a vice. I removed the clamps on the boots (small screw driver works good). Cleaned as much old grease out of boots and cv joint as possible. While half shaft is still in vice a little love tap with a big hammer will pop the outboard end off the axle (careful of the retaining ring near the end of axle). Then went to the parts cleaner to get the rest of the grease out. Once everything was clean I did a little light sanding to prep for a new paint job. While paint was drying I completely disassembled the out board cv joint (lot of video on you tube), inspected and repacked with cv grease. Hint do not fill the cup too full of grease before putting the star and ball bearings in, about half the cup is enough (you'll put more in later). I did not fully dissemble the inboard side as I do not have a replacement retainer and what I've read it has to be pressed on. Repacking the inboard side was not bad, I filled the cup with cv grease, put the boot on, pushed boot all the way down and pulled up on axle to push grease thru cv joint (do this a few times to get a good pack) remember grease is your friend. After everything was greased, I put the outboard boot on (inboard was already on, used to push grease thru inboard cv joint), put the outboard cv joint on shaft, check that the retainer clip is still on shaft make sure splines are lined up and tap the outboard cv joint on. Once all that is good it's time to put the boots on the cv joints and clamp them on, easy right ? Well if you kept things clean as you went then yes, if the boots and cv joints have grease on them not so much. Hint before fighting with boots make sure they are clean and you can get a good grip on them. I applied a thin bead of RTV in retention groove on joints and slid boots into place. I used the clamps you have to squeeze on (ear clamps I believe they are called). Now you're done with the repack. Have fun installing the half shaft. Here are a few pics.
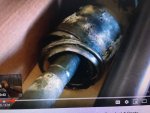
IMG_1191.jpgfullsizeoutput_1a7d.jpg581182613.362762.jpgfullsizeoutput_1a7e.jpgfullsizeoutput_1a7f.jpgIMG_1199.jpgfullsizeoutput_1a80.jpg
 

Tanabi

Member
44
3
8
Location
Raleigh, NC
Hey guys ...

I've been looking everywhere but I can't find a clear answer. Can you directly replace 7700 half-shafts with 10k halfshafts? How do you actually tell what kind you have? One of my half-shafts looks like it is about 3.5 inch in diameter, the other one seems like it's a little thicker, maybe 3.75 inch diameter. Mine are so rusted and crusted I can't see any markings on them anymore.
 

Coug

Well-known member
Steel Soldiers Supporter
2,976
4,359
113
Location
Olympia/WA
Hey guys ...

I've been looking everywhere but I can't find a clear answer. Can you directly replace 7700 half-shafts with 10k halfshafts? How do you actually tell what kind you have? One of my half-shafts looks like it is about 3.5 inch in diameter, the other one seems like it's a little thicker, maybe 3.75 inch diameter. Mine are so rusted and crusted I can't see any markings on them anymore.
As I understand it, the 7.7k and 10k half shafts use the same ends, as the 7.7k failed they got replaced with a 10k shafts. you have to replace the gears inside the hubs to go up to the 12k half shafts.
 

HMMWV ARKANSAS

New member
3
0
1
Location
Paron, ar
FOr anyone doing this..fyi, the military does not use nord locks, they are used on the civ trucks. No harm no foul.
also, the bolts are metric...not inch. The head is not what a normal American metric head is..so you have to order them from a vendor,who sells them for a Hummer H1.
factory AMG bolts have a pre-applied thead locker on them....on the end bolts, use #8 grade bolts and lock washer as well as locktite. A broken lock washer will destroy the bearing basket....will work fine till you remove the upper spit hear and all the roller bearing fall all over the place.
Hey can you walk me through how to replace the halfshaft boots on a Humvee? No one seems to know how to take it apart. Thanks for your help!
 

Attachments

HMMWV ARKANSAS

New member
3
0
1
Location
Paron, ar
Last night I finished a rear axle replacement and rebooted the one that I removed. Even with a lift and everything coming apart pretty easy, I had almost 4 hours into the replacement and rebooting. My left rear axle had the outer boot torn on arrival.
How are you taking them apart? I have removed the halfshaft from Humvee but can not figure out how to take it apart so I can replace boot. Thanks for any help. Here are some pictures of mine.
 

Attachments

HMMWV ARKANSAS

New member
3
0
1
Location
Paron, ar
Today was a good tinker day, disassembled a half shaft to clean, inspect, repack and put new boots on. Lot of videos on how to remove half shaft so I wont get into that. Once I removed the half shaft I placed it in a vice. I removed the clamps on the boots (small screw driver works good). Cleaned as much old grease out of boots and cv joint as possible. While half shaft is still in vice a little love tap with a big hammer will pop the outboard end off the axle (careful of the retaining ring near the end of axle). Then went to the parts cleaner to get the rest of the grease out. Once everything was clean I did a little light sanding to prep for a new paint job. While paint was drying I completely disassembled the out board cv joint (lot of video on you tube), inspected and repacked with cv grease. Hint do not fill the cup too full of grease before putting the star and ball bearings in, about half the cup is enough (you'll put more in later). I did not fully dissemble the inboard side as I do not have a replacement retainer and what I've read it has to be pressed on. Repacking the inboard side was not bad, I filled the cup with cv grease, put the boot on, pushed boot all the way down and pulled up on axle to push grease thru cv joint (do this a few times to get a good pack) remember grease is your friend. After everything was greased, I put the outboard boot on (inboard was already on, used to push grease thru inboard cv joint), put the outboard cv joint on shaft, check that the retainer clip is still on shaft make sure splines are lined up and tap the outboard cv joint on. Once all that is good it's time to put the boots on the cv joints and clamp them on, easy right ? Well if you kept things clean as you went then yes, if the boots and cv joints have grease on them not so much. Hint before fighting with boots make sure they are clean and you can get a good grip on them. I applied a thin bead of RTV in retention groove on joints and slid boots into place. I used the clamps you have to squeeze on (ear clamps I believe they are called). Now you're done with the repack. Have fun installing the half shaft. Here are a few pics.
View attachment 766876View attachment 766878View attachment 766877View attachment 766879View attachment 766880View attachment 766881View attachment 766882
I have been trying to figure out how to take my halfshaft apart and thinking I needed to take the inner side off, but you are saying take the outer side off? Your pictures and description are the best I have seen yet on the style of shaft I have which I guess is the 7k. Thanks for the description!
 

Attachments

privatevince

Member
30
5
8
Location
Germany
Gotta pull off the retaining clips... See link, lubetube, google. ect

sorry, but on that pictured halfshaft from HMMWV ARKANSAS (that i have too) is no inner retaining ring, that you can pull of. there is an outer ring, that keeps the whole assembly within the housing.
i don't get this apart either.
i would tackle on the outer joint of the halfshaft but that seems even harder to get apart. did they forge the housing around the balls?! :mad: or is it really worht trying to hammer on it?
and that boot spreader is not an option, seems to damage the boots more than it helps...
 

Mogman

Moderator
Staff member
Moderator
Steel Soldiers Supporter
6,938
9,600
113
Location
Papalote, TX
The 7K half shafts do not come apart like the 10K shafts there is no retaining clip to remove, I have heard some say you can beat them apart but that is something I would not do, again I would just get the Autozone shafts, but I have also seen people stretch the new boots over the shafts, if that was the way I was going to go I would get the air driven tool for about $100, it LOOKS simple.
Also I think the 7K boots are different than the 10K boots but maybe someone else can confirm or deny that.

 
Last edited:

privatevince

Member
30
5
8
Location
Germany
alright, i tackled it!
only way is to work on the outer joint (the one on the geared hub side).
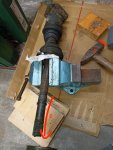
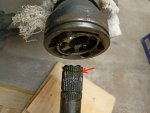
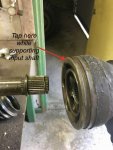
as shown in figure 1, where i used tool A in a almost straight motion parallel to the shaft to hit against the fragile but sturdy flange of the joint internals. the outmost ring seems to compress a little in his grove. useful to clamp the whole shaft in a vice, also to rotate it between several hits.
i hope it locks again, after i'm done with the boot exchange. what could possibly go wrong...

Schraubstock Kopie.jpg
IMG20220130231935 Kopie.jpg
 

Mogman

Moderator
Staff member
Moderator
Steel Soldiers Supporter
6,938
9,600
113
Location
Papalote, TX
How are you going to re-install that retaining clip INSIDE that joint? looks like toast to me.
 

privatevince

Member
30
5
8
Location
Germany
How are you going to re-install that retaining clip INSIDE that joint? looks like toast to me.
...which brings us to the question how that whole part was assembled when there is no way to disassemble it.

i didn't see it at first, but one half of it fell down while cleaning. the other half is still missing... maybe still inside the joint stuck to the grease. i'll find out when degreased.

now to the hard part:
i think the whole construction only works just because the ring is somehow compressable. vendors for halfshaft lock rings always declare to choose a ring by the outer diameter of the shaft, not the grove.
so i think the ring compresses in the grove and extends again after it passes the joint piece. then sits losely inside the grove, but still keeps the shaft from falling out.
i'll let you know...
 

Mogman

Moderator
Staff member
Moderator
Steel Soldiers Supporter
6,938
9,600
113
Location
Papalote, TX
...which brings us to the question how that whole part was assembled when there is no way to disassemble it.

i didn't see it at first, but one half of it fell down while cleaning. the other half is still missing... maybe still inside the joint stuck to the grease. i'll find out when degreased.

now to the hard part:
i think the whole construction only works just because the ring is somehow compressable. vendors for halfshaft lock rings always declare to choose a ring by the outer diameter of the shaft, not the grove.
so i think the ring compresses in the grove and extends again after it passes the joint piece. then sits losely inside the grove, but still keeps the shaft from falling out.
i'll let you know...
I don't think so... I think it was put into a press to reduce the dia to trap the parts in the hub, can you remove the balls, the race and inner piece? or just the shaft after breaking the snap ring off of the end? if not you have not actually disassembled it.
 

privatevince

Member
30
5
8
Location
Germany
you're right, that wasn't a way to start a disassembly... still, no one seems to know how to properly do it.

i have a buddy who tested the process on an old rusty halfshaft. in and out without breaking the snap ring. so i can say: one of two breaks. i've got new rings on the way. as far as i can see there wasn't anything else damaged and the snap ring is a pretty cheap victim for not having to change out the entire halfshaft because of a slit boot.
 

Mogman

Moderator
Staff member
Moderator
Steel Soldiers Supporter
6,938
9,600
113
Location
Papalote, TX
you're right, that wasn't a way to start a disassembly... still, no one seems to know how to properly do it.

i have a buddy who tested the process on an old rusty halfshaft. in and out without breaking the snap ring. so i can say: one of two breaks. i've got new rings on the way. as far as i can see there wasn't anything else damaged and the snap ring is a pretty cheap victim for not having to change out the entire halfshaft because of a slit boot.
The reason nobody knows how do it is because it was not designed to take apart in the first place, it was a throwaway part, later shafts were designed to be taken apart, do whatever you are comfortable with, but if it comes apart while you are driving I can guarantee you, you will wish you ponied up for a $125 Autozone halfshaft.
 

privatevince

Member
30
5
8
Location
Germany
The reason nobody knows how do it is because it was not designed to take apart in the first place, it was a throwaway part, later shafts were designed to be taken apart, do whatever you are comfortable with, but if it comes apart while you are driving I can guarantee you, you will wish you ponied up for a $125 Autozone halfshaft.
well, please have a look at my location, then you'll see why these are $500-700 instead of $125
do you have reference numbers for the halfshafts? are they also in use on other vehicles?
 

Mogman

Moderator
Staff member
Moderator
Steel Soldiers Supporter
6,938
9,600
113
Location
Papalote, TX
well, please have a look at my location, then you'll see why these are $500-700 instead of $125
do you have reference numbers for the halfshafts? are they also in use on other vehicles?
Ok, well if it was me then I would try stretching the boots over the shafts, tons of you-tube vids out there, you can go to the Autozone website and look up 1995 HUMMER for the part number, unfortunately they were only used on the Humvee/Hummer line.
One would think there would be a crap load of spare parts in western Europe, God knows we sent a bazillion of them over there.
 

privatevince

Member
30
5
8
Location
Germany
i suppose, nowadays there's not so many parts "falling off the truck" like they did in the 70ies vietnam era...
there's ITAR and the internet and everything is traceable... so some parts are readily available while others aren't. everything that's heavy has the extra cost of shipment on it. shipment costs went through the roof in the last 10 years...
i'll try the part number search to at least have an extra set. but it's always the other parts that break, not the ones you stock.
 
Top
AdBlock Detected

We get it, advertisements are annoying!

Sure, ad-blocking software does a great job at blocking ads, but it also blocks useful features of our website like our supporting vendors. Their ads help keep Steel Soldiers going. Please consider disabling your ad blockers for the site. Thanks!

I've Disabled AdBlock
No Thanks