• Steel Soldiers now has a few new forums, read more about it at: New Munitions Forums!

  • Microsoft MSN, Live, Hotmail, Outlook email users may not be receiving emails. We are working to resolve this issue. Please add support@steelsoldiers.com to your trusted contacts.

Third's Build Discussion

chucky

Well-known member
Steel Soldiers Supporter
6,622
18,965
113
Location
TN .
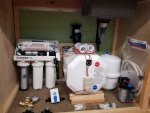
Good looking water treatment stuff if i run across a filter system like that i can afford i will go that direction im using the light blue in line water filter now u get at walmart !
 

chucky

Well-known member
Steel Soldiers Supporter
6,622
18,965
113
Location
TN .
Yeah.

But I need to sort out where. My assumption is from the ass-end of the line back towards the tanks/drain. And I need to incorporate an air fitting.
mount the filters and pump up high on the wall with the water falling back to the tank and falling back to the shower/bath so you cand open all your water fixtures for self draining and unscrew and remove all the filter bowls and use a air hose to push thru from where you put the water into the truck should get enough out of the system to protect everything .
 

Third From Texas

Well-known member
2,766
6,498
113
Location
Corpus Christi Texas
mount the filters and pump up high on the wall with the water falling back to the tank and falling back to the shower/bath so you cand open all your water fixtures for self draining and unscrew and remove all the filter bowls and use a air hose to push thru from where you put the water into the truck should get enough out of the system to protect everything .
Yep, everything (including the heater) is above the drain port on the tank and drain.

And at the back of the truck (at the entry/deck) I have a cold water outlet with one of those little outside shower head/coiled hose (for washing sand off dawg and feet). It's standard hose thread and I'm thinking I could air flush the system from that end back towards the (lower) drain). I could just make a screw-on adaptor with an air nipple on it. Of course it would have to be regulated air to winterize. I'm just not sure about it because it wouldn't blow the hot water line to the shower. But I don't think it will be an issue as long as I drain the heater (it should pull any water from the lines which will be higher).

I had a '73 Winnie Brave and I don't think I ever had to winterize it in all the years I drove it down here (to include a few ski trips to CO).
 

chucky

Well-known member
Steel Soldiers Supporter
6,622
18,965
113
Location
TN .
Yep, everything (including the heater) is above the drain port on the tank and drain.

And at the back of the truck (at the entry/deck) I have a cold water outlet with one of those little outside shower head/coiled hose (for washing sand off dawg and feet). It's standard hose thread and I'm thinking I could air flush the system from that end back towards the (lower) drain). I could just make a screw-on adaptor with an air nipple on it. Of course it would have to be regulated air to winterize. I'm just not sure about it because it wouldn't blow the hot water line to the shower. But I don't think it will be an issue as long as I drain the heater (it should pull any water from the lines which will be higher).

I had a '73 Winnie Brave and I don't think I ever had to winterize it in all the years I drove it down here (to include a few ski trips to CO).
Yea just a couple shots of air but dont try to pressurise the line with air .
 

chucky

Well-known member
Steel Soldiers Supporter
6,622
18,965
113
Location
TN .
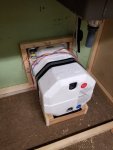
Water heater is cradled and strapped.

Ain't goin' no where....View attachment 875340
We may have already spoke on this im not sure but on your sink/shower drains are you going to try to collect it or let it hit the ground ? Im letting mine hit the ground but if you do plumb it to a grey tank put a t valve inline to be able to dump onto the ground when available like all the sandy spots your in no need to fill up tanks with clear water .
 

Third From Texas

Well-known member
2,766
6,498
113
Location
Corpus Christi Texas
We may have already spoke on this im not sure but on your sink/shower drains are you going to try to collect it or let it hit the ground ? Im letting mine hit the ground but if you do plumb it to a grey tank put a t valve inline to be able to dump onto the ground when available like all the sandy spots your in no need to fill up tanks with clear water .
Yeah, until I settle on a tank build it's going to ground. I'll only have gray water discharge with a 5 gal tank (won't settle on location until I do my underbed boxes on the sides of the rig). The toilet will be a Laveo, so no black tank (but for now I just have a portable camp crapper for mockup).

I already have the dump station outlet and the cap has a hose fitting. Once it's all in place, the drain will remain open unless I'm in a park or someplace that forbids such (in which case it's only open at night when the rangers sleep). ;p
 

Third From Texas

Well-known member
2,766
6,498
113
Location
Corpus Christi Texas
Starting to lay out my pex runs....

Need to strap the main water tank
Need to run in a temp 12v and 24v
Need to cut the two vents for the fridge
Need to cut out rear external water outlet (outside shower/hose)
Need to cut out the three drain holes (tank, sink, shower)

Fish are calling and my buddy has been slaying monster trout in the surf at sunrise, and I'm hoping to head out Monday for a few days but I don't think I'll get the gas stove plumbed in time (I might try and run it off a little screw-on bottle, I have a couple of those somewhere). And the drinking water won't be ready (they shorted me one of the cradles and straps and there's a lot of leak testing to do it right).

btw: the regulator and gauge won't actually go there, it just screws on outside with the hose

But progress....


20220809_193824.jpg
 
Last edited:

Third From Texas

Well-known member
2,766
6,498
113
Location
Corpus Christi Texas
Man, those little plastic check valves are junk. Snapped on in half just handling the section of PEX that it was installed in "No problem, I'll just order another pair". Then I snapped the second one in half just picking up the other 12" run.

So off to fetch some nice sturdy brass check valves to replace the plastic China crap.

I needed to make a materials run anyway (got right at another $100 of fittings I need to wrap up the water system). Seems I way under estimated the number of elbows and pex clamps I need. And I changed some straight fittings to 90 degrees for clearance.
 

Mullaney

Well-known member
Steel Soldiers Supporter
Supporting Vendor
7,716
19,766
113
Location
Charlotte NC
Man, those little plastic check valves are junk. Snapped on in half just handling the section of PEX that it was installed in "No problem, I'll just order another pair". Then I snapped the second one in half just picking up the other 12" run.

So off to fetch some nice sturdy brass check valves to replace the plastic China crap.

I needed to make a materials run anyway (got right at another $100 of fittings I need to wrap up the water system). Seems I way under estimated the number of elbows and pex clamps I need. And I changed some straight fittings to 90 degrees for clearance.
.
That is the only drawback. You can buy and entire ROLL of PEX for less than a big bag of fittings. Sad as it is to say, the brass check valves are expensive - but they "beat the stuffins" out of CPC (Cheap Plastic Crap). Waking up to wet feet because the plastic busted generally won't make a good start to your day...
 

chucky

Well-known member
Steel Soldiers Supporter
6,622
18,965
113
Location
TN .
Starting to lay out my pex runs....

Need to strap the main water tank
Need to run in a temp 12v and 24v
Need to cut the two vents for the fridge
Need to cut out rear external water outlet (outside shower/hose)
Need to cut out the three drain holes (tank, sink, shower)

Fish are calling and my buddy has been slaying monster trout in the surf at sunrise, and I'm hoping to head out Monday for a few days but I don't think I'll get the gas stove plumbed in time (I might try and run it off a little screw-on bottle, I have a couple of those somewhere). And the drinking water won't be ready (they shorted me one of the cradles and straps and there's a lot of leak testing to do it right).

btw: the regulator and gauge won't actually go there, it just screws on outside with the hose

Looks impressive !
 
Last edited:

ramdough

Well-known member
1,554
1,729
113
Location
Austin, Texas
The heater is secured with an internal frame that's attached to the wall via rivnuts.

Tomorrow I'll build the cradle/base the heater sits on. It will then be held in place with banding strap and a layer of 1/8"neoprene rubber (same way the water tank will be secured).

I have two small vents to cut for the fridge, then I can start running my PEX. I have a ton of little hardware the land in the process, but it's a fairly simple system....

View attachment 875290

*I have a regulator that goes in-line on the city feed (before the strainer) that's not on then drawing

View attachment 875291

I left myself plenty of room under the kitchen countertop so that I can easily access the heater, regulator gauge, cutoffs, city/tank lever, all the strainers and drinking water filters.
I hope I am not too late….. Your strainer near the pump needs to go on the suction side of the pump. It is there to protect the pump and everything down stream.

Progress looks good. Keep up the good work.


Sent from my iPhone using Tapatalk
 

Third From Texas

Well-known member
2,766
6,498
113
Location
Corpus Christi Texas
Thanks.

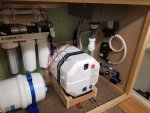
Yeah the drawing is pretty rough obviously and that previous picture was just a mockup. The tank strainer is before the pump (in this pic you can almost see it center/far right tucked behind that outlet silencer loop on the wall, but it's on the pump inlet feed). Most all of the clamps are not set yet, so I'm still free to adjust things.

All runs will actually be elevated above the tank drain port (the stuff laying on the floor will actually be 2" higher). It's still not perfect for winterization because the pump, accumulator, and silencer loops all step up above the runs then drop back down to the tank/drain. It was either wall mount them all for easy maintenance access or floor mount it all between the outer wall and tank (which is a pretty tiny space to work on anything). I went with the wall-mount. So I'm going to add one more small bypass valve and drain tube on that wall to the right here. *I was just going to open the strainers to drain into a pan but I may as well slip in a separate drain outlet while I'm at it. *I'd like to tap it into the drain downspout there.

Today I'm laying out the shower run and the shower-to-water heater return loop. I may add one more $20 check valve for the later I think, but it may not be needed as that line only ever charges if the return valve is opened.

Again, it's still a bit of a mockup but it's taking shape. I'm only going to assemble the main sections because it's all coming back out anyway.

Once I'm happy with the layout I'll pull it all out and cut my three drains (and the two fridge vents and rear shower outlet), seal the exposed foam (I settled on Flexseal since it was handy and didn't eat the foam when I tested it). I hate to gut the whole hab right now (I want to go fishing/camping next week) but it really needs to all come out and get sealed and painted before I go spend a week in the humidity. And if I'm going to do that, I may as well lay the floors and paint the walls/ceiling. Then the only items not framed and mounted at that point will be the overhead cabinets and the headboard stowage (that can come in later). So next week's fishing trip is looking like mid September.
:(

But, progress...


20220811_101619.jpg
 
Last edited:

chucky

Well-known member
Steel Soldiers Supporter
6,622
18,965
113
Location
TN .
Thanks.

Yeah the drawing is pretty rough obviously and that previous picture was just a mockup. The tank strainer is before the pump (in this pic you can almost see it center/far right tucked behind that outlet silencer loop on the wall, but it's on the pump inlet feed). Most all of the clamps are not set yet, so I'm still free to adjust things.

All runs will actually be elevated above the tank drain port (the stuff laying on the floor will actually be 2" higher). It's still not perfect for winterization because the pump, accumulator, and silencer loops all step up above the runs then drop back down to the tank/drain. It was either wall mount them all for easy maintenance access or floor mount it all between the outer wall and tank (which is a pretty tiny space to work on anything). I went with the wall-mount. So I'm going to add one more small bypass valve and drain tube on that wall to the right here. *I was just going to open the strainers to drain into a pan but I may as well slip in a separate drain outlet while I'm at it. *I'd like to tap it into the drain downspout there.

Today I'm laying out the shower run and the shower-to-water heater return loop. I may add one more $20 check valve for the later I think, but it may not be needed as that line only ever charges if the return valve is opened.

Again, it's still a bit of a mockup but it's taking shape. I'm only going to assemble the main sections because it's all coming back out anyway.

Once I'm happy with the layout I'll pull it all out and cut my three drains (and the two fridge vents and rear shower outlet), seal the exposed foam (I settled on Flexseal since it was handy and didn't eat the foam when I tested it). I hate to gut the whole hab right now (I want to go fishing/camping next week) but it really needs to all come out and get sealed and painted before I go spend a week in the humidity. And if I'm going to do that, I may as well lay the floors and paint the walls/ceiling. Then the only items not framed and mounted at that point will be the overhead cabinets and the headboard stowage (that can come in later). So next week's fishing trip is looking like mid September.
:(

But, progress...


View attachment 875521
Good clean work !
 

Third From Texas

Well-known member
2,766
6,498
113
Location
Corpus Christi Texas
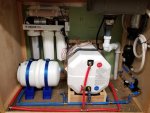
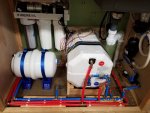
Got everything under the counter up to the actual level it will be assembled. Added my hot water return from the shower (missing the check valve), added cutoffs for the sink lines (yeah, that one red handle on the blue line triggers my OCD). LOL

Went ahead and cramped the assembly together into main sections (I can now pull it out with it falling into a million bits). Just need to snip out a 3" section for the last check valve (I'll pick that up next time I go for supplies).

20220811_181438.jpg

I'm gonna go thru everything and document a few details tomorrow, then label everything and gut the entire hab

Cut the last of the holes for drains, etc, then shift to electrical.

Delete the wires I have ready to pull, delete the last overhead fixture, add the 12/24 run from the OEM battery box to the electrical closet. Two outlets to rewire (were the phone drops, one will be USB charging port and one will be a spare GFI outlet above the sink) and three new drops to land (fridge 120v , microwave 120v, and water heater 120v).

Then it's time to prep for paint !
 

Third From Texas

Well-known member
2,766
6,498
113
Location
Corpus Christi Texas
The plan for the hot water pre-heat loop is this:

The system is basically a closed loop. Since no water is being released from the system, the main pump won't come on to circulate water thru the loop/heater.

Adding a solenoid diverter valve and a small pump to the loop should do the trick. When I want to take a shower, I turn on the heater and then activate the secondary pump/diverter. Water will then circulate thru the loop/heater until everything is at temp. I then turn off the small pump and good to go.

Seems like a lot of fuss to save a half gallon of water, but on an extended stay it would add up.
 
Top