• Steel Soldiers now has a few new forums, read more about it at: New Munitions Forums!

  • Microsoft MSN, Live, Hotmail, Outlook email users may not be receiving emails. We are working to resolve this issue. Please add support@steelsoldiers.com to your trusted contacts.

LDS-465-1A inframe headgasket job pictures

joec

New member
787
1
0
Location
Vincentown,NJ
heads

Best way to make sure u have no cracks. Is to send them to get magnafluxed to check for cracks. Everytime we pulled a engine apart it is worth the money to ensure that a hairline crack you don't detect will stand out when done...!

You would be amazed at what you can't see after you pull valves out and springs.


my.. 2cents
 

tarheel

New member
67
0
0
Location
catawba nc
RE: heads

also, when ya take out your pushrods, make sure the tappets stay in place. if not, just remember to re-seat them before putting the heads back on.
and the new style head gaskets do not require any sealant or a hot engine re-torque. plus the torque requirements are different then from the manual, according to the rebuild kit i got from memphis. im finishing mine up this weekend.
 

mightyhammer

New member
141
3
0
Location
Lewiston, ID.
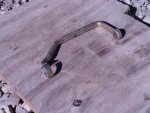
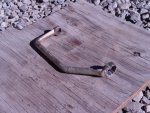
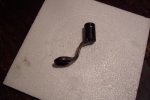
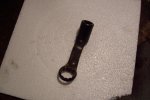
By the way... Does anyone have a good picture of the actual required wrench adapter for the short stud nuts? I made an adapter, it worked out well. I compared torque specs using the homemade wrench and just a socket and they ended up being close so it wasn't hard to adjust for the lower nuts.
 

clinto

Moderator, wonderful human being & practicing Deuc
Staff member
Administrator
Super Moderator
Steel Soldiers Supporter
Supporting Vendor
12,596
1,133
113
Location
Athens, Ga.

mightyhammer

New member
141
3
0
Location
Lewiston, ID.
I actually took a good quality 7/8" wrench. I heated it up at each end and bent the open end 90 degrees to match the bend I made on the closed end so I was right over the top of the nut. I welded a 1/2"dr. impact socket to the top of the open end, re-tempered the wrench and away we went. I had to massage the closed end some so it would fit over the nut easier. I only had to remove the injectors, not any of the hoses or anything on the driver side. There was no significant difference in torque values(my torque wrench is a snap-on guage wrench not a clicker)from the top bolts that I used a socket on. I was wondering...I haven't heard anybody that has done this say that they chased the threads on all the studs and nuts. This is a very important step in getting proper torque values along with oiling the threads and washers. Just thought I'd throw that in there. COOP
 

mightyhammer

New member
141
3
0
Location
Lewiston, ID.
ok....ok....I'm getting to that soon 'nuff. I am a Hunters Ed instructor so all my spare time these days is spent in the classroom with the youngsters. "Bear" with me(get it?) I'll get some more posted. Does anyone want to see the wrench adapter that I made? COOP
 

desertfox

Member
281
4
18
Location
Aztec, NM 87410
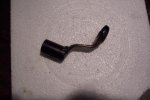
DSC01096.jpg

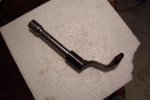
DSC01097.jpg
Photos of the wrench
In addition, COOP is correct when he say chase all threads as well as anything that requires torque. The reason for this is: if there is a rough thread or debris on the stud, bolt or threads in the head or block it will not give an accurate torque reading. I am also an advocate of using anti-seize compound on all threads. Especially head, exhaust and intake.
 
Last edited:

jeepin

Member
149
11
18
Location
Vermont
Question for DesertFox, doesn't the anti-sieze change the torque specs on the fasterner, making it not seem as tight as it is (assuming torque specs were written for a "dry" fastner)?

Just wondering if you compensate for that...
 

Jake0147

Member
782
18
18
Location
Panton, VT
I think torque spec's for the head bolts specify engine oil.

Absolutely nothing should be applied to the threads until the head is set in place. Oil or other lubricants will prevent the head gasket from getting the proper "traction" on it's mating surfaces.

I'm a little sketchy on using anti-sieze on anything that might contact the engine oil, including under the valve cover. The primary component of that is ground up metal filings. Granted it's a soft(ish) metal, but it's metal filings none the less...
 

mightyhammer

New member
141
3
0
Location
Lewiston, ID.
I use clean engine oil for components that require a specific torque setting on internal engine components. The only place I personally usually use anti-sieze compound is on components that usually will corrode or oxidate or lock up due to dissimilarity or temp....like exhaust fasteners, lug studs, external u-joint contact surfaces(inside yoke rings), or anything that gets fastened that is not the same material....Not for anything inside an engine. COOP
 

mightyhammer

New member
141
3
0
Location
Lewiston, ID.
Thanks for the pix DesertFox . Looks pretty close to the wrench I made. I kinda went off the tm pix, but they are BW and grainy. Regardless...it worked fine and was inexpensive....most importantly....It didn't break. Not even close. I believe it could take 200+lbs. Coop
 

mightyhammer

New member
141
3
0
Location
Lewiston, ID.
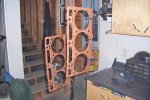
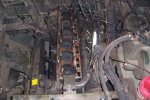
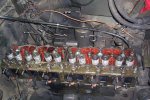
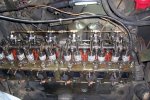
Update... More pictures!!!

OK, Finally got a few hours to get some more done on this. For you impatient souls out there bear with me, I work on this when I can. I have read through some other threads like this and noticed there are some whiners from time to time if you ain't postin and writin' every hour of every day. All I have to say to them is"BITE ME" I'm goin fast as I can!:grd:
 

Attachments

mightyhammer

New member
141
3
0
Location
Lewiston, ID.
This adapter I made is the second "refined" version. It works very well, even around injector lines(have to move 'em some, but not bad). I reccomend if you use this design you compare torque specs with it on your torque wrench and with your torque wrench and a socket on one of the upper head nuts. This one was within a few ft. lbs. of being right on. It fits under the rocker rail as well.
 

mightyhammer

New member
141
3
0
Location
Lewiston, ID.
Also, I noticed that I didn't get a picture of the prepped block surface...Take my word, it was sparkly clean and dry before I installed the gaskets and heads. COOP OUT for now...
 

ENCS_DEI

New member
24
0
0
Location
North Carolina
You can use the following fomula with the adaptor.

C=D(A/(A+b)) WHERE:
A=LENGTH OF TORQUE WRENCH
B=LENGTH OF ADAPTOR
C=TORQUE SETTING
D=REQUIRED TORQUE AT BOLT

Or just use the torque wrench at 90 degrees from the adaptor so that the length has no effect on torque.

Russ
 

mightyhammer

New member
141
3
0
Location
Lewiston, ID.
Thanks for the formula ENCS. I am sure it will be heplful for a lot of folks out there. I have a calibrated torque guage handy, so it is easy for me. Glad you have, and posted the formula. I am sure everyone will appreciate that very much, I know I did:-D. COOP
 
Top
AdBlock Detected

We get it, advertisements are annoying!

Sure, ad-blocking software does a great job at blocking ads, but it also blocks useful features of our website like our supporting vendors. Their ads help keep Steel Soldiers going. Please consider disabling your ad blockers for the site. Thanks!

I've Disabled AdBlock
No Thanks