• Steel Soldiers now has a few new forums, read more about it at: New Munitions Forums!

  • Microsoft MSN, Live, Hotmail, Outlook email users may not be receiving emails. We are working to resolve this issue. Please add support@steelsoldiers.com to your trusted contacts.

Wolverine Tech Duel Alts

LowTech

Active member
Steel Soldiers Supporter
949
111
43
Location
Arizona
Has anyone put in the Duel Alt kit from Wolverine Tech? Does anyone have a install instruction sheet?
Got the kit a little more than two weeks ago, it had a damaged part (the one that pulls air through it(?) ) that I said I would replace if it was sent to me, I also asked for an install instructions & a parts list. Two weeks later I'm still waiting . . . I hate waiting!

I'm already spending my vacation in the driveway waiting on Donkdonk's wheels and a list of other parts that seem like they went to far side of the earth before heading this way . . . what's up out there? Has the freight & shipping industry gone lame while I was working under the truck?

Can someone please send me some kind of instructions (NOT that kind!) so that I can put these things in.

LowTech
in the driveway, . . . w/ a camp fire & an ale.
 

Unforgiven

New member
675
18
0
Location
Las Vegas, NV
Wolverine sells a quality kit. The instructions are slim to none. I spent hours scratching my head ... square peg round hole kind of stuff w/o instructions. I ended up putting it on my own way. I don't think it's the way Wolverine intended, but it works good.

The kit works great. Call the Wolverine guy on the phone. I forgot his name, but he's very helpful. I'm sure he would explain anything you need to know in detail. And I'm sure if you had a defective part he would replace it immediately.

http://www.steelsoldiers.com/deuce-...off-switch-fuse-box-wiper-install-w-pics.html

Do yourself a favor and add a battery cutoff switch to the POSITIVE side of the batteries. Otherwise you might inadvertently have a 24 volt to 12 volt circuit completed that would ruin both the 24v & 12v batteries. Example: forget to shut off your headlights ... even with the engine off the 24v batteries will drain through the headlights via the 1-wire 12v alternator to the 12v batteries. It would be sufficient to put a kill switch on the 12v batteries, but while you're at it do the 24v's as well for security & to negate any 24v drains.
 

LowTech

Active member
Steel Soldiers Supporter
949
111
43
Location
Arizona
I finely got time to work on our 24V/ 12V alts replacement.

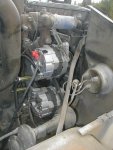
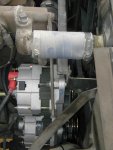
I started by mounting a replacement 24V, that was pretty much strait forward. I then mounted the lower mountings points on the 12V to the replacement adjusting bracket that was part of the kit. This was were we started into the unknown. The instructions sort of tapered off and I was left w/ a small collection of bracket pieces.
After playing w/ several methods of putting them together to create some kind of upper adjusting mount, I started looking at other ways of making such a mount. Now we need to remember at this point that I do not have much in the way metal fabbing tools, or skills. If I can't drill & bolt, or bend into shape, it's pretty much out of my skill level. So . . . my first things to look at were random mech parts that I had "laying around", including the the ones that were no longer needed in this change over.
I did have the upper mounting bracket from the stock 24V alt (the curved one). After checking a few points I decided that a bolt from the water outlet would be just fine for attachment. This let the bracket curve under the rad hose. All that was needed was to add a spacer (large nut that was the right size) and bolt through it all. (the mounting bracket IS bent, I will pound it out, add a larger spacer, and paint it)

Changes? If I had the ability I would have the mounting bracket's center slot cut out large enough that I could bolt from the back side into the threaded hole in the alt. That would prevent the problem of the bolt head hitting on the rad mount bracket. Which I will prob fix by getting a slightly longer belt so that the bolt is past the rad mount.
PB190004.jpg PB190005.jpg
 
  • Like
Reactions: DUG

tm america

Active member
2,600
23
38
Location
merrillville in
wouldn't it have fixed the clearance problem with the rad mounting bracket if he used the rear belt pulley for the top alt?it would have put it back another 3/4 of an inch or so?
 

LowTech

Active member
Steel Soldiers Supporter
949
111
43
Location
Arizona
So with this system, you have one belt running each alt?
That is true.


wouldn't it have fixed the clearance problem with the rad mounting bracket if he used the rear belt pulley for the top alt?it would have put it back another 3/4 of an inch or so?
That would prob do the trick. Will have to see if that's something I can change, and if I ran a longer belt I think I could include the 24V in both belts.

..my setup has two belts that drive the 24 volt alt and one for the 12 volt alt..what kind of warranty does he give on the alts?
That warranty thing . . . you guys are smart . . . I'll have to ask about that :oops:
 

tm america

Active member
2,600
23
38
Location
merrillville in
i didnt want to cause warranty issues so i provide the part numbers and the places with the best prices instead of having to ship it back to who you bought it from and wait for the manufacturer to send them a new one ...i get rid of the middle man ..you can purchase the alts locally and avoid possible down time and shipping charges if that is how you want to go..i also didnt like the complexity of that kit with no instructions..my kits come fully assembled you just bolt it to the engine and go.. pretty simple...
 

DUG

Senior Chief/Moderator
Super Moderator
Steel Soldiers Supporter
2,799
73
48
Location
Mesquite, NV
i didnt want to cause warranty issues so i provide the part numbers and the places with the best prices instead of having to ship it back to who you bought it from and wait for the manufacturer to send them a new one ...i get rid of the middle man ..you can purchase the alts locally and avoid possible down time and shipping charges if that is how you want to go..i also didnt like the complexity of that kit with no instructions..my kits come fully assembled you just bolt it to the engine and go.. pretty simple...
Simple? My 14 year old soldier B needed help with -

Reaming the original pulley (after the drill press broke)
Tightening the 24 volt alt lower bolts
Finding a spot to safely use the pry bar to tighten the 12 volt alt
Installing the short (factory length) belt

So, yeah, I would say it's a pretty simple, painless and low cost kit that gives you endless options.

Glad I went that way.
:cool:
 
Top