• Steel Soldiers now has a few new forums, read more about it at: New Munitions Forums!

  • Microsoft MSN, Live, Hotmail, Outlook email users may not be receiving emails. We are working to resolve this issue. Please add support@steelsoldiers.com to your trusted contacts.

HELP!! installing the rebuilt IP - MEP-002A Refurb Update

joesco

Member
442
1
18
Location
Hampstead, NH
First big public thanks to Carl from NH and Speddom for all the help thus far.

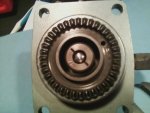
I bit the bullet and had to purchase a rebuilt Model 50 IP. I was told by the shop that the rebuilt IP does not have a timing button and I should remove the button from the old IP and install it in the rebuilt unit. The old IP was so gummed up that it two hours to remove the tappet. The rebuilt pump took about 5 minutes! See Pics!

Some additional background first. Both IP's are marked with the number (button code code) 47 which was found under the tappet. In addition, on the flanges, the old IP has a number 1 on the flange, which I believe is button code(???), the rebuilt unit has a number 13.

On the other side of the flanges, the old IP has a Port Closing Dimension (PC) of 1.088 and the new IP shows a PC of 1.090. Pretty darn close??? So my questions...

Can I assume I can reuse the old IP's timing button?

If so, how in the heck do I remove the dang button? I don't see a retainer ring.

When you look at both units, side by side and not knowing what a timing button looks like, does the new unit have one? (See pics)

Last question... If I figure out how to remove the old timing button, can I assume I can use timing Method 1?

Thanks folks!!!
 

Attachments

Speddmon

Blind squirrel rehabiltator
Super Moderator
Steel Soldiers Supporter
4,640
28
38
Location
Cambridge, Ohio
I can't help you much with getting the button out, other than there is some kind of internal retaining ring holding it in.

But for the button, the port closing dimensions and the button codes you have indicate you will need a new button thickness. The TM states

Port closing dimension of the old pump...1.088"

Add to this the button thickness of the old pump...Code 1 button, letter size "A"...thickness of 0.119"

1.088" + 0.119" = 1.207"

Subtract from this the port closing dimension of the new pump...1.090

1.207" - 1.090" = .117"

This is the thickness of your new timing button. The closest button to that is a code 2, Letter code "B" button with a thickness of 0.116".

Remember the tolerances inside these pumps are so tight that a button that is too thick will damage something. The shims stay with the block and the button is sized by the new pump. Since you know the port closing dimensions and button thicknesses, you do not need to flow time the pump. Once you install the correct button you should be fine to install the pump using the timing method #1
 
Last edited:

joesco

Member
442
1
18
Location
Hampstead, NH
Well I don't feel as bad as I am far beyond being over my head with this IP timing stuff, I am more like "LOST IN SPACE"!!

Prior to receiving the rebuilt IP, I spoke to three different shops (for quotes) and all of them said I could reuse my original IP's timing button because they sell rebuilt units without a button! Holy cow! Now another $100.00 going into Geny Old Iron for a timing button! My wallet is getting very thin on this project!

this stuff has ran way over my head... :cookoo::?:
 

joesco

Member
442
1
18
Location
Hampstead, NH
Thanks Isaac-1, printed that manual out last week and have read it about dozen times,
unfortunately it does not go into detail nor do the TM's on how to remove the actual timing button.

BTW, for those folks faced with the same IP issue like myself, be extremely careful removing the tappet as I almost broke
a tooth on the gear head using a screw driver.

Use a channel lock pliers with a thin rag wrapped around the tappet for a nice
tight grip. Then slowly move the tappet by holding the gear head moving the tappet
clockwise and counter clockwise as you are gently pulling it out.
 

joesco

Member
442
1
18
Location
Hampstead, NH
Thanks Speddmon, called Ambac and ordered the new button. They were very nice and provided me with a 25% discount and free overnight shipping. Cost of the button was $58.00. It must be solid GOLD!!!

I also spoke with tech support about installing it and they told me that the button is held in by a very tiny and thin JESUS clip/ring. I said JESUS clip??? And he said yes, because when you are installing the button and clip/ring, if you not careful the clip will go flying off your bench and then you can't find it and yell out Jesus C%^$& I CAN'T FIND THE the GD thing and end up calling them to order another one!

So the million dollar question... After I install and time the new IP, with OLD IRON fire up??????????????

I can't help you much with getting the button out, other than there is some kind of internal retaining ring holding it in.

But for the button, the port closing dimensions and the button codes you have indicate you will need a new button thickness. The TM states

Port closing dimension of the old pump...1.088"

Add to this the button thickness of the old pump...Code 1 button, letter size "A"...thickness of 0.119"

1.088" + 0.119" = 1.207"

Subtract from this the port closing dimension of the new pump...1.090

1.207" - 1.090" = .117"

This is the thickness of your new timing button. The closest button to that is a code 2, Letter code "B" button with a thickness of 0.116".

Remember the tolerances inside these pumps are so tight that a button that is too thick will damage something. The shims stay with the block and the button is sized by the new pump. Since you know the port closing dimensions and button thicknesses, you do not need to flow time the pump. Once you install the correct button you should be fine to install the pump using the timing method #1
 

Speddmon

Blind squirrel rehabiltator
Super Moderator
Steel Soldiers Supporter
4,640
28
38
Location
Cambridge, Ohio
Thanks Speddmon, called Ambac and ordered the new button. They were very nice and provided me with a 25% discount and free overnight shipping. Cost of the button was $58.00. It must be solid GOLD!!!

I also spoke with tech support about installing it and they told me that the button is held in by a very tiny and thin JESUS clip/ring. I said JESUS clip??? And he said yes, because when you are installing the button and clip/ring, if you not careful the clip will go flying off your bench and then you can't find it and yell out Jesus C%^$& I CAN'T FIND THE the GD thing and end up calling them to order another one!

So the million dollar question... After I install and time the new IP, with OLD IRON fire up??????????????
Sounds like you made out pretty good, free overnight and 25% off is a good deal.

I'm kind of surprised you never heard of the "Jesus" clip before...LOL I have hated dealing with those things for years!!!!!!

Don't forget when you install the new pump to use your old shims. Also remove the valve cover so you can make sure the #1 Cylinder in on the compression stroke when you line up the PC mark so you get everything timed OK.
 

PeterD

New member
622
6
0
Location
Jaffrey, NH
I've sometimes taken extreme measures to not loose the Jesus clips--such as covering the work area with a towel, or piece of clear plastic. Once it starts its airborne journey, the odds of finding it are remote at best, but if you do loosed it, use a magnetic pickup tool (bar type) and you have a better chance of finding it. :cool:
 

joesco

Member
442
1
18
Location
Hampstead, NH
Well got the new button (thanks Tom) installed with the "Jesus" clip this morning on the rebuilt ip. A suggestion that worked for me was to use a very small needle nose, in conjunction with a small screw driver and a magnetic pickup tool (small one). Squeeze the clip and slowly move the screw driver around the button until the clip seats. It bounced out once and the magnet snag it.

Proceeded to use Method 1 for timing, then installed the IP with the tip of a brazing rod (thanks Carl) inserted into the side of the IP and then bolted it up. Now I have to figure out how to get the screw back in on the side of the IP!!!!!!!!!!!!!!!!!!!!!!!!!!!! All the fuel lines were re-connected also.

When I removed the valve cover to view TDC, the gasket came apart. So I had call to Delks to order a new gasket and I also ordered battery tie downs too. So I have to wait for the gasket to arrive, before I can test. And after all the work on this piece of old iron, he better run like a dream!

Once running I will post all the mods, repairs and parts replaced on this MEP-002A. It been quite a process!

If anyone has a suggestion on how to get the dang screw back on the side of the IP, please share! WORK SMART NOT HARDER!
 
Last edited:

Speddmon

Blind squirrel rehabiltator
Super Moderator
Steel Soldiers Supporter
4,640
28
38
Location
Cambridge, Ohio
I would suggest you use a "Holding Screwdriver" to get your screw started back in the hole. Once you get it started, you can get in there with a long skinny screwdriver to tighten it up.

SK234-500x500.jpg


I'm sure you did it right, and it's just the way you wrote it up, but please reassure me for my own peace of mind. You did pull the valve cover and find TDC before you installed the pump...right??
 

Speddmon

Blind squirrel rehabiltator
Super Moderator
Steel Soldiers Supporter
4,640
28
38
Location
Cambridge, Ohio
I certainly hope this solves all of your troubles.

I'm kind of curious though, did the rebuild shops give you an estimate of how much it would cost to tear your IP apart and clean it up, rather than buying a rebuilt one? Then you could have used the same button and everything, just bolt it back up and go.

Or, for the trouble you've been going through, tear it down and clean it yourself?
 

joesco

Member
442
1
18
Location
Hampstead, NH
Tom,
The shop had three rebuilt injector pumps in stock, so it was going to less expensive (including the button) to purchase one off of the shelf than rebuilding the existing pump. In addition, the twelve point nut (delivery valve holder) was frozen solid and striped and no matter what I did I could not break it loose to get into the plunger assembly in the IP.

On a side note, the guy that I bought the genset from was nice enough to send me a take-off IP from one his scrap units for all my trouble. Have not received it yet as his mechanic has not had time to remove it. I will use my old pump for parts (if I ever get it apart) and the take-off IP as spare, as they seem hard to come by.

What is interesting and still baffling to me is that the shop I purchased the rebuilt pump from maintains that I could have re-used my timing button from my original pump. The tech from AMBAC disagreed! I was able to purchase the button from AMBAC for $58.00 shipped which included the "jesus" ring. They sent me a package of 10 rings, but I mailed 9 of them back today.

When it is all said and done, I will have about $2275.00 invested thus far (including the purchase price / shipping, parts, etc.) in Old Iron. Like I said, boy am I anxious to get him running!

Parts and upgrades included:

(2) New Wally World Batteries
(2) New Battery tie down brackets
(1) New Valve Cover Gasket
(3) New Fuel Pump Screens
(2) New Glow Plugs
(1) New Air Filter
(1) New Spin Oil Filter & Adapter
(1) Wix Spin-on Filter Adapter w/10 micron Filter/Water Separator
(1) Wix Spin-0n Filter Adapter w/ 10 micron Filter
(1) Rebuilt Model 50 Injection Pump

Other manuel labor included blowing out all the fuel lines and cleaning, cleaning and cleaning the fuel tank!

Found this wire wheel holder on C/L (see pic) for $30.00 to hold my 100' of electrical cable. Hope to mount it on the side of the trailer next week.


I certainly hope this solves all of your troubles.

I'm kind of curious though, did the rebuild shops give you an estimate of how much it would cost to tear your IP apart and clean it up, rather than buying a rebuilt one? Then you could have used the same button and everything, just bolt it back up and go.

Or, for the trouble you've been going through, tear it down and clean it yourself?
 

Attachments

Last edited:

joesco

Member
442
1
18
Location
Hampstead, NH
Tom,
Yes I did pull the valve cover and the gasket came all apart. I used a long screw driver to move the fly wheel so that cylinder one was at TDC, found my tdc mark on the fly wheel and installed IP with the rod still inside the little hole on the side of the pump. Felt it engage and bolted it on. Great idea about the "holding screw driver". Will pick one up tomorrow. Thanks!!!!

I would suggest you use a "Holding Screwdriver" to get your screw started back in the hole. Once you get it started, you can get in there with a long skinny screwdriver to tighten it up.

View attachment 228174


I'm sure you did it right, and it's just the way you wrote it up, but please reassure me for my own peace of mind. You did pull the valve cover and find TDC before you installed the pump...right??
 

Speddmon

Blind squirrel rehabiltator
Super Moderator
Steel Soldiers Supporter
4,640
28
38
Location
Cambridge, Ohio
well, while that rebuild shop may be good at rebuilding the pumps, they obviously didn't read any information about installing them or timing them. The only way you can re-use your old button is if the port closing dimensions are exactly the same.

On a side note as well....is there any kind of marking on the button indicating the size? Also, once you get the take-off pump from who you bought the set from, use the calculation I showed above to determine the new button size and you can get the proper button for that one and have it ready for a quickie swap-out if necessary.

The nice thing about having a ready spare is that you don't need to pull the valve cover off to make sure you're timed properly. Reason being, turn your engine over to the "PC" mark, and remove the screw on the existing pump. If the wire slides in the hole, then the "PC" mark is on the correct cylinder. Remove the pump, and put the wire in the hole of the new one and bolt it on. shouldn't take more than 1/2 hour or so since you've done it already.
 
Top