Finally got around to doing the front side markers into turn signals.
List of parts
14ga military prestolite wire
2 Packard "Y" connectors
2 packard female connectors
8 packard male connectors
2 24V relays with wiring harness
(I actually found some Y connectors on ebay with a male-male wire and a male-female wire that cost me less than I think I would pay for the components, so went that route)
Tools
wire stripper
wire crimper for insulated connectors
Packard crimper or soldering equipment (I used a propane torch set let and worked fine)
9/16 socket
7/16 socket
ratchet
Optional:
dielectric grease
noalox grease
Heat gun
Heat Shrink tubing
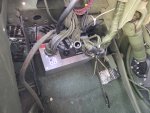
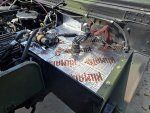
First thing to do is verify which contacts do what on the relay. They are mostly standardized, but occasionally you come across non standard ones.

In this case, 85 and 86 are the coil wire, and 30, 87, and 87A are the switched ones.
87 is normally open, and 87A is normally closed. I removed the wire for 87 from the harness as it's unnecessary, as this project uses the normally closed circuit to work properly.

85 and 86 get a packard male and a 3/8" ring terminal.

Okay, didn't take any more pictures but attached the female packard connector onto wire 30 as it will connect to the side marker light. Wire 87A got a male connector and will connect to the supply power wire for the marker.
The other 2 male connectors (or if you can find it a male-male fitting) goes into the Y (honestly, the Y is just a 3 way female connector, so it doesn't matter what wire connects where on it)
Now do this a second time with the second relay harness.
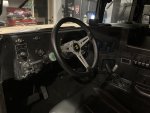
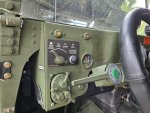
Remove the cover over the wire in the vehicle hood. Small metal panel in front of the hood at the corner where the side marker and the turn signal light are if you are unfamiliar. one side has 3 and other side has 4 7/6" head bolts holding on the cover.
The Y connector goes in line with the turn signal, I looked up the wire numbers, but once I was into the hood it was easier to just turn on the signal and see what wire disconnected made it turn off. The ring terminal goes to the bolt in the back of the wiring pocket. 9/16 head, easiest with a wobble tyle extension at least 4" long. I used a little bit of noalox grease on the bolt for better conductivity and less corrosion.
A little bit of dielectric grease on the outside of the male connectors will make install and future removal much easier.
Find the wire connector for the side marker light and plug in the other 2 leads from the relay into them. If you did everything right, now whenever the turn signal flashes in the front of the truck, the side marker light will go out momentarily, allowing people to either side of you to see them where before they could only be seen from the front.
Costs:
Total about $40-50 if you are buying all the parts and already have the tools or can improvise. Technically enough parts to make sets for 2 trucks for this price, just adding a couple more male packards and 3/8" terminal rings.
Cost could potentially be half this if you just buy a couple relays and do all the harness connectors yourself.
Could also go the posi-tap route, which eliminates the Y connector and the male-male wire connection, leaving a need for only 2 male and 2 female packard connectors (I don't like piercing wires in areas exposed to moisture, even though the posi-tap does seal the connection)
~$5 2 male packard connectors left over from previous purchases.
$16 for the relays with harness from Amazon. Came as a set of 5, but that just gives me spares for the future if needed. Relay says 40 amp, but 14ga wire for the harness is only good for 20 amps (which is still much more than needed for a single marker light)
$16.50 for the Y connectors plus wires needed from ebay. I took the long wire, cut in half, and connected to the 87A and 30 wires on the relay harness. I don't have a packard crimper, so rather than solder a bunch of connectors it was easier to do splices and heat shrink. Could have used the male-male from one of the extras to do the relay input power wire but would rather save them to do another set of these or whatever I need to tap into power for later on.
Vender appears to still have some but will not link here; not hard to find.
.jpg")
~ $10 for a cheap set of heat shrink crimp connectors, both butt splice and ring. Left over from other projects so I personally don't count it as an expense for this as I have lots of them around due to work.
 448.6 KB Views: 37