• Steel Soldiers now has a few new forums, read more about it at: New Munitions Forums!

  • Microsoft MSN, Live, Hotmail, Outlook email users may not be receiving emails. We are working to resolve this issue. Please add support@steelsoldiers.com to your trusted contacts.


1986 CUCV M1009 Decade after being wrecked.

cucvrus

Well-known member
11,274
9,601
113
Location
Jonestown Pennsylvania
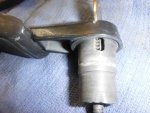
Today started out a lot colder than I wanted to work out in but I gave it a try. I worked my Honda tractor out of the garage and into the shed. That was move in the right direction. While it was cold and I had the time I unpacked and closely inspected my Taiwanese replacement outside mirrors. DSCF6966.JPGThey will do the job. The fasteners they send with the mirrors are very hokey DSCF6963.JPGDSCF6964.JPG
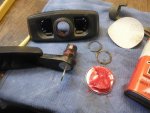
but I can use original hardware to fasten them. I scuff sanded the mirrors with 320 grit and can tell you that it is just a wash primer coating and they would rust solid in a year if installed without a final fish applied, DSCF6967.JPG I used 320 because I have a whole box of little 3" paper Velcro pads I found in a wrecked car. I also bought these tools at a yard sale. Not just these tools but a shoe box full for a $1. I saw a Snap-On pick and a Mac screwdriver in the box with a 14mm Snap-On socket. Well worth the $1. asking price. Anyone know what they are for? DSCF6965.JPGDSCF6965.JPGThank you for looking. Things did not go as planned today on my M1009 project. I will explain on my next post.
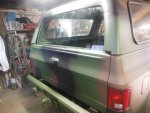
 

cucvrus

Well-known member
11,274
9,601
113
Location
Jonestown Pennsylvania
I did manage to find the 3" fiberglass slats that a member here needs for his HMMWV project. I must have sold these slats 3-4 times for $50 and no one ever showed up for them or provided any address or money. Tired of talking about them and cut them to fit for FREE. DSCF6968.JPGI still have many CUCV troop seat lower seat slats but I cut and used all the back rest ones. I had saved a complete set but they are gone now. DSCF6969.JPGTime to thin the hoard. The first thing I wanted to do was get the support cables on the M1009 gate. I am showing the springs in the picture that assist in getting the cable to fold into the gate jam. I see many M1009's that are missing the little springs and they are right and left springs. DSCF6970.JPGI I was slowed to a crawl by the guide tracks being bad. They were brand new 10 years ago and when I slid the glass inside today they just dissolved. DSCF6971.JPGNo problem. I am not sure why they used that poor excuse for a window guide. The door windows have rubber guides. That stuff in the gate is like the antique cars had. I opted for the Trim Lok seal. I scrapped them out and then wire brushed them by hand and moved onto the rotary wire wheel. I cleaned the entire track inside and out and used adhesive to apply the Trim Lok seal in the guide groove. I taped the seal with 1" tape and painted the guides. I know they will work and they will out last the felt runs. And at a fraction of the cost. These were just the time to do it. DSCF6972.JPGDSCF6973.JPGDSCF6974.JPGDSCF6975.JPGDSCF6976.JPGI also had a few issues with the outside crank. I will be disassembling that crank and lubing it well. Something I over looked. I found more crank parts that I was unaware I had. That is always good. Take Care and Be Safe. Thank you for looking. Tomorrow is another day. Maybe the weather will warm up a bit.
 

cucvrus

Well-known member
11,274
9,601
113
Location
Jonestown Pennsylvania
Well today I went right back at it. lost an hour and was late for everything again. Sneaky way of staying home. I found a really nice rear gate crank never been painted or beat on. It was completely intact and just required some R & R. I disassembled the entire crank assembly and cleaned everything with 3M scotch bright pad in white. I used grease and 3-1 oi to lube and clean everything. If you spray WD40 on things you may as well pour water on it. I cleaned everything thoroughly, lubed and reassembled it. I am NOT going to paint this crank it is an original survivor. I think it looks and after being lubed and reassembled it works better than a new one. Hey I hope this helps someone get that stubborn gate in shape. I think I can knock my gate out today. I hope to. I will keep you posted. DSCF6977.JPGDSCF6977.JPGDSCF6978.JPGDSCF6979.JPGDSCF6980.JPGDSCF6981.JPGDSCF6983.JPGDSCF6982.JPGDSCF6983.JPGDSCF6986.JPGDSCF6985.JPGIt was about a 20 minute job start to finish. But keep in mind my gate was apart. Good afternoon job to make your gate nice and smooth again. I have more of the "Trim Lok". Be Safe and Have a Great Day.
 

Attachments

cucvrus

Well-known member
11,274
9,601
113
Location
Jonestown Pennsylvania
After everything was greased and oiled I reassembled the crank and the thing works amazing. Remember to take your time clean thoroughly lube every part. These black gate latches are getting hard to come by. I was fortunate to find this but when I did I remembered I had it. I am uncovering many lost forgotten CUCV treasures in my stash. Thank you for looking. I hope I helped you. the hardest part is getting the big inner snap ring back on the driver and that was not all that hard. Take you time and Be Safe. DSCF6987.JPGDSCF6987.JPGDSCF6989.JPGDSCF6990.JPGDSCF6991.JPGDSCF6992.JPG
 

Attachments

cucvrus

Well-known member
11,274
9,601
113
Location
Jonestown Pennsylvania
After installing the crank onto the gate and reinstalling the rebuilt guides/tracks I was onto the regulator. The roller guides had been greased but the grease was dry like dirt /concrete. I scrapped and wire brushed everything clean.DSCF6993.JPGDSCF6994.JPGThe rollers of the regulator arms were seized DSCF6995.JPGDSCF6996.JPGand I was able to clean oil and grease them. The rollers spin freely now as they are supposed to do.DSCF6997.JPGDSCF7001.JPGI also scrapped the gears on the regulator arm and oiled and greased them. They work smooth and with little effort like they are supposed to. DSCF6999.JPGDSCF6998.JPGI hope this is helpful and motivational. I bought nothing but time and a small tub of wheel bearing grease and an oil can. No WD40 was used. waste of time and effort. I came in the eat chicken that I grilled outside. It was that nice out today. I think I will wash my truck with the hose before I finish the day. Be Safe. I did a test run with the glass down my new guides it was smooth and will work great.
 

cucvrus

Well-known member
11,274
9,601
113
Location
Jonestown Pennsylvania
My goal has been met. I wanted the gate glass in and everything in the gate operational and complete. It took a lot longer than I had planned but I hadn't planned or prepared myself for all the cleaning and rebuilding as I went. That's the only way to do it. No half fast work being done. Handle attached and looks great. DSCF7003.JPGDSCF7004.JPGThe regulator is installed and works nice. I worked it up and down without the glass a few times. Time to slide the glass in place. DSCF7005.JPGDSCF7006.JPGAfter I greased the sash guides I worked the window up and down and adjusted the side tracks in the gate. Now for the inner wiper and outer wiper. They were brand new when I installed them in 2007. I scrubbed and inspected them. they are genuine GM so I reused them. DSCF7007.JPGI had to tweak the clips a bit and slowly but surely they snapped in place. DSCF7008.JPGI think it looks great and I am happy with the progress I made today. I still have the roof seal to install. I will post that on another post today. Be Safe, thank you for looking. This was all easy work. Just time consuming. I cooked chicken outside on the grill while I worked on this project.
 

cucvrus

Well-known member
11,274
9,601
113
Location
Jonestown Pennsylvania
I was looking and cleaning some light dirt out of the bottom of the gate. I came across this spring from the driver and lock cylinder. DSCF7009.JPGDSCF7010.JPGDSCF7011.JPGI went back upstairs and dug out my second last GM rear window seal. I have 1 left for my Little Red M1009 project. DSCF7012.JPGThis seal fit like a glove after being in storage for 20 years. DSCF7013.JPGThe window cranked up tight but smooth. That is to be expected with all new seals and guides. I left the access cover off and everything else is complete on the gate. DSCF7015.JPGBy next month I should have this outside and in the sunlight. I want to make arrangements for the windshield installation I hope next weekend. I must prep and paint the VIN tag on the dash panel. I will just take this parting shot and leave it here for checking out. Until later. be Safe and Have a Great Week. DSCF7016.JPG
 

Attachments

Lostforwords

Member
48
45
18
Location
Ventura, CA
I was looking and cleaning some light dirt out of the bottom of the gate. I came across this spring from the driver and lock cylinder. View attachment 792255View attachment 792256View attachment 792257I went back upstairs and dug out my second last GM rear window seal. I have 1 left for my Little Red M1009 project. View attachment 792258This seal fit like a glove after being in storage for 20 years. View attachment 792259The window cranked up tight but smooth. That is to be expected with all new seals and guides. I left the access cover off and everything else is complete on the gate. View attachment 792261By next month I should have this outside and in the sunlight. I want to make arrangements for the windshield installation I hope next weekend. I must prep and paint the VIN tag on the dash panel. I will just take this parting shot and leave it here for checking out. Until later. be Safe and Have a Great Week. View attachment 792262
Looking perfect!!!!
 

ScottG2005

Member
111
24
18
Location
Arkansas
I was looking and cleaning some light dirt out of the bottom of the gate. I came across this spring from the driver and lock cylinder. View attachment 792255View attachment 792256View attachment 792257I went back upstairs and dug out my second last GM rear window seal. I have 1 left for my Little Red M1009 project. View attachment 792258This seal fit like a glove after being in storage for 20 years. View attachment 792259The window cranked up tight but smooth. That is to be expected with all new seals and guides. I left the access cover off and everything else is complete on the gate. View attachment 792261By next month I should have this outside and in the sunlight. I want to make arrangements for the windshield installation I hope next weekend. I must prep and paint the VIN tag on the dash panel. I will just take this parting shot and leave it here for checking out. Until later. be Safe and Have a Great Week. View attachment 792262
I have a question. Can you use the tintable bed liner as a paint job on a military truck? I've seen it done on a few civilian vehicles but no military vehicles. I was thinking of getting a old Canadian military chevy and I was wondering if I could paint it with tintable bed liner cause I do want to use the truck off road and not have to worry about the paint
 

cucvrus

Well-known member
11,274
9,601
113
Location
Jonestown Pennsylvania
I have an appointment for March 21, 2020 to get a windshield installed in my M1009 build. I guess I will have to reassemble the doors. Which is still a move in the right direction. I am actually seeing some real progress with this early pre Spring weather. I don't want to rush. The interior will go together quickly. It is all decent and just needs a good scrubbing. The interior floor also needs a good cleaning since it is LineXed completely. More good things to post as they happen. Thank you for all the support from afar. The tires are the big expenditure that remains. I am going to buy 5 new tires for this project to compliment the entire truck. Not sure but leaning towards the Goodyear Duratrak tires. 31 x 10.5 x 15. New tires make the entire truck smell and look new inside and out. I love the smell of a new Chevrolet truck. Stock size tires always worked for me and I never had any problem with anything that way on or severe off road. Excited to get it on the road. But it will still need an alignment and inspection. Inspection is optional but I want another set of unbiased eyes to look over the entire truck with a safety inspection. It is possible I missed something. Possible but not likely. Be Safe.
 

Lostforwords

Member
48
45
18
Location
Ventura, CA
I have an appointment for March 21, 2020 to get a windshield installed in my M1009 build. I guess I will have to reassemble the doors. Which is still a move in the right direction. I am actually seeing some real progress with this early pre Spring weather. I don't want to rush. The interior will go together quickly. It is all decent and just needs a good scrubbing. The interior floor also needs a good cleaning since it is LineXed completely. More good things to post as they happen. Thank you for all the support from afar. The tires are the big expenditure that remains. I am going to buy 5 new tires for this project to compliment the entire truck. Not sure but leaning towards the Goodyear Duratrak tires. 31 x 10.5 x 15. New tires make the entire truck smell and look new inside and out. I love the smell of a new Chevrolet truck. Stock size tires always worked for me and I never had any problem with anything that way on or severe off road. Excited to get it on the road. But it will still need an alignment and inspection. Inspection is optional but I want another set of unbiased eyes to look over the entire truck with a safety inspection. It is possible I missed something. Possible but not likely. Be Safe.

Based on all the photos and meticulous craftsmanship I measure a percent of %000000.1 that something is amiss. Ya done good Lad!
 

cucvrus

Well-known member
11,274
9,601
113
Location
Jonestown Pennsylvania
Today like most Saturdays I get all side tracked and am multi tasking. I had to make a trip to the YOUPULLIT and it turned out to consume all morning and did not find the part I was looking for. I did however find a nice near perfect 6.2 diesel radiator. That was worth the trip. I am going to send it out to the radiator shop on Monday and get it looked over. I need one for an up and coming build. This is a Spectra B850 radiator. DSCF7030.JPGDSCF7031.JPGDSCF7032.JPGI bought enough of them to recognize them anywhere. Old Copper and Brass one but none the less not very old. I also started cleaning the dash for the up and coming windshield install. But the trip to the YOUPULLIT was fruitful so all is well. Be Safe and have a Great Day. Stock up on Toilet Paper.
 

Attachments

Last edited:

cucvrus

Well-known member
11,274
9,601
113
Location
Jonestown Pennsylvania
I have the windshield rubber soaking in HOT soapy Simple Green water for about an hour. I am going out to give it a final scrubbing. I will report back with pictures. it has been a busy weekend and the weather is great. Despite the toilet paper shortage. I never figured that one out yet. I will report back later with pictures and elaboration. Have a Great Day. Be Safe.
 

cucvrus

Well-known member
11,274
9,601
113
Location
Jonestown Pennsylvania
The bucket soaking and scrubbing method worked out pretty good for the windshield rubber. DSCF7033.JPGWhile it was soaking I sat and cooked a few fresh catfish.DSCF7034.JPG I spent the entire day on the patio cleaning and working on CUCV window parts. After the windshield rubber was clean and suited me I left it lay in the sun and dry.DSCF7035.JPG I hung it in the basement so it was warm and pliable for next Saturdays windshield install. Meanwhile I turned my focus on the front vent windows. I had / have 20 sets and now I have become a critic of the vent glass rubbers and window latches. All 20 sets are basically about the same. NOT good enough for me to just clean up and use. So I dove in elbow deep and disassembled 2 sets. I want to tell you that is NOT a simple job. I give it a 7 with 10 being difficult. I will be painting the frames and getting all new parts. I need to rebuild 2 sets at this time. I have a customer that needs a set for his truck. So I dug in. DSCF7036.JPGThe windows look really nice the springs and hardware are clean. The rubber is cracked and does not meet my approval on this build. DSCF7037.JPGDSCF7038.JPGDSCF7039.JPGI called it a day after I had all the vents stripped out and put everything away. It was wonderful weather to spend outside in the sun working at the picnic table. I need to make an LMC order. The pivot rivet looks like the biggest PITA. I think a small screw and lock nut would work better. I shall see. Stay tuned. Be Safe and Thank You for looking and giving support on my build. Have a Great Week.
 
Top
AdBlock Detected

We get it, advertisements are annoying!

Sure, ad-blocking software does a great job at blocking ads, but it also blocks useful features of our website like our supporting vendors. Their ads help keep Steel Soldiers going. Please consider disabling your ad blockers for the site. Thanks!

I've Disabled AdBlock
No Thanks