• Steel Soldiers now has a few new forums, read more about it at: New Munitions Forums!

  • Microsoft MSN, Live, Hotmail, Outlook email users may not be receiving emails. We are working to resolve this issue. Please add support@steelsoldiers.com to your trusted contacts.

303M HydraMatic rebuild

rustystud

Well-known member
9,129
2,634
113
Location
Woodinville, Washington
I finally started rebuilding my 303M transmission. First off I'll show the highlights of my teardown and some tips. Then I'll go into the actual rebuild.

I brought the unit to my crane so I could drain the transmission better. Even after draining it outside the trans will have a lot of fluid trapped in the reduction unit. You can see how I held it up to facilitate the draining.
 

Attachments

marchplumber

Well-known member
Steel Soldiers Supporter
3,691
2,550
113
Location
Peoria, Illinois
I finally started rebuilding my 303M transmission. First off I'll show the highlights of my teardown and some tips. Then I'll go into the actual rebuild.

I brought the unit to my crane so I could drain the transmission better. Even after draining it outside the trans will have a lot of fluid trapped in the reduction unit. You can see how I held it up to facilitate the draining.
NICE shop!! Im subscribed
 

rustystud

Well-known member
9,129
2,634
113
Location
Woodinville, Washington
OK, my post was cut short last night. Got that all settled.
Now I just need to remember how to properly post here again !

The first things I usually take off any transmission is the linkage. They have a tendency of getting smashed !

006.JPG

Once that is done it's time to remove the reduction unit assembly. Since this thing weighs in at 128 Ibs, 012.JPG013.JPG I use my crane to lift it off. Before I remove it though I take off the rear pump filter screen. This poor little filter usually gets torn up from heavy parts hitting it. It takes a 1/2" square socket or your 1/2" impact wrench !
011.JPG

I set this top part aside for later. Now this is the area that you will usually find any damage if your truck was not shifting into and out of low gear.
I have pictures of an earlier 303M I tore down which had a broken return spring. It tore up the reduction piston breaking off a 4" long section of the piston making it a large paper weight .
019.JPG015.JPG

Hopefully the transmission your working on looks better than this one.
Removing the 6 bolts and taking off the "internal gear" and the bronze and steel plates with springs is pretty straight forward.113.JPG116.JPG117.JPG121.JPG122.JPG

Now your down to the clutch drum assembly. There is a snap ring which needs to come off then the rest of the assembly will come right off. I see I forgot to take pictures of this.
Well now your down to the large reduction piston. It can be a little bugger to get out. Using a little shop air will help. I'll take pictures of this tomorrow.
 
Last edited:

rustystud

Well-known member
9,129
2,634
113
Location
Woodinville, Washington
I found the pictures ! They ended up in another file.

So here I'm removing the "output shaft bearing retainer" . It can be a real bear to get off. After removing the 6 bolts I usually smack the bottom with a dead blow hammer then attach the crane and smacking the bottom and the output shaft, start lifting off the assembly.
001.JPG002 (2).JPG004 (2).JPG

The "reverse clutch cone" will just lift out with a little persuasion.
At this point I usually remove the oil pan. The bolts can be a little fun removing. Half of them will take a 1/4" socket to get them off since the space is so tight there. Once the pan is removed I take off the suction pipe and apply servo's. Then the rear main body pump. Once that is removed you can take off the 6 bolts and remove the output shaft .
At this time I will up end the transmission and remove the bellhousing and front pump. Be sure to take out the front pump regulator first. Than it's just remove the valve cover and valvebody and the front and rear clutch drums.
Now the real fun begins. Cleaning everything !
 
Last edited:

rustystud

Well-known member
9,129
2,634
113
Location
Woodinville, Washington
The reason I didn't post any pictures of the rest of the tear down was because I forgot to take pictures !
I was just in auto pilot and continued tearing down the transmission. Later I realized what I did and thought about putting it back together, but it was such a mess by then I just said bag it.

Now the smaller units can be torn down. I did take pictures of the this !
019 (2).JPG Thankfully I own all the HydraMatic repair tools including this holding fixture.
The front and rear drum assemblies can be disassembled now.

020.JPG021.JPG025.JPG026.JPG027.JPG028.JPG029.JPG030.JPG031.JPG The first thing to do is remove 2 small screws that hold-down the ring gear.
Then remove the 6 spring units. They are made up of 2 springs, an inner and outer and a small rod.
005.JPG006.JPG

Then remove the snap ring and pull off the rear drum assembly. Now remove the next snap ring which holds in place the oil delivery sleeve. This next snap ring is down there so use a good snap ring remover.
Then the front drum assembly can be removed.
The next thing to do is apply pressure to the back of the drum assembly. This allows you to remove the large snap ring holding in the clutch plates.

032.JPG033.JPG
After the snap rings are removed from both drums you will need to give them a good "smack" with a deadblow hammer shown here.

034.JPG035.JPG036.JPG037.JPG
The pistons can come out by pulling and twisting them. They can be a little tough if there still sealing good.


I'll show you later how to judge the condition of the plates. First off I need to clean them up.
 

Attachments

Last edited:

rustystud

Well-known member
9,129
2,634
113
Location
Woodinville, Washington
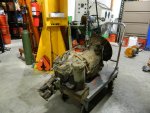
I'm going to show you a few "tricks" I was taught when I was an apprentice working on these transmissions.


136.JPG137.JPG138.JPG
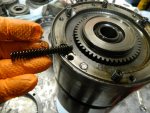
The 2 pistons in the reduction unit move on 4 "rods" which lock them to the housing. When your installing them with new seals it can be really frustrating trying to align them up with these rods. If you put a chamfer on them using a two or three flute reamer it makes it easier to get them started.

Another trick or really, a good general rebuild practice is to remove "all" the sealed off passage plugs.
Especially if your transmission experienced a major failure. Garbage can get trapped in these end-passages and later come out and play nasty with other parts. I remove all plugs and run a tap down each hole. I replaced all the plugs with stainless steel ones on this transmission.

148.JPG149.JPG152.JPG

Now this is not so much a trick as a good general practice on any rebuild of a cast iron housing. Be it an engine or transmission or transfer-case.
Flashing often happens in the casting process. This can often leave sand trapped in porous iron. You can recognize this by the way the casting looks. If not removed, you can potentially have sand come out and ruin things. Especially after cleaning up a cast housing, it can loosen this flashing.
So I use a "die grinder" and carefully remove all the flashing.
163.JPG This was in the oil pan.

Speaking about the oil pan. There are 2 holes which "must" be cleaned out. They are drain holes which allow coolant or oil to escape when the cooler seals leak. Basically, they are an "early warning system" letting you know you have a leak in you oil pan cooler. Also more importantly it will keep small coolant leaks from contaminating the transmission fluid which destroys friction clutch plates. Every oil pan I have taken off has these two holes plugged up. Almost everyone needed "drilling" to remove the crud.
180.JPG181.JPG187.JPG
Also speaking on the oil pans. I strongly urge everyone to sandblast the crap out of the cooler area. This space can be just disgusting with all kinds of debris and rust. This debris can then get in-between the cooler fins. HydraMatics run "Hot" so they need all the cooling they can get.
153.JPG154.JPGAfter cleaning I paint the housing with a good primer, then a good finish coat. Don't want rust reforming any time soon.
Also adding an "inline coolant filter" before the oil pan cooler really makes a huge difference in cooling ability. Let's keep those fins clear !

Just for "grins and giggles" I thought I'd show you a M5 Tank HydraMatic oil pan next to the 303M one.
225.JPG221.JPG230.JPG Instead of the 2 drain holes the M5 pan uses 4 holes. They did not want the transmission fluid contaminated by engine coolant.
222.JPG223.JPG
 
Last edited:

m1010plowboy

Well-known member
Steel Soldiers Supporter
3,830
2,466
83
Location
Edmonton, Canada
Here are a couple of pics of an open seal kit. Not sure it's complete but we'll send you a factory sealed package from 1984 and it'll be like Christmas when you open it. There should be a complete inventory list in the sealed package so you can tell us what we might be missing.

P5262289.JPGP5262292.JPGP5292316.JPGP5292318.JPGP5292320.JPG

The picture taking process is a bit of a pain and the grease all over a phone or camera is not fun while doing anything mechanical. Taking time to take a picture of work means you're not working. The benefit of taking the time to take pics will be appreciated long after we're gone and the trucks are still running. We are grateful to you wiping your hands constantly to take us along for the ride. Thanks Rusty stud.
 

msgjd

Well-known member
Steel Soldiers Supporter
980
3,059
93
Location
upstate ny
Back in the late 70's , I was working at a transmission rebuild shop. Since I was an apprentice I was stuck rebuilding the "old" junk like the Military cast iron HydraMatic, which a lot of loggers used in their trucks and tracked M5 drag line haulers. (Yes they used old tanks with winches mounted on them to haul logs.)
I sure can collaborate your info .. In the early-mid 70's around here right before I enlisted the Jimmies could be seen lined up in droves at DRMO's as Guard units turned in the last of them. Several local highway depts and village depts had been already receiving G749's for several years via the Civil Defense loaner program, some drivers becoming infamous for ripping out reverse.. G749 styling also fit right in with depts that had @1967-74 GMC series-80's and 90's with the big V6 engines... Of course the big V6's ran circles around the G749's on the highway, but the G749's could go places the V6 trucks could not

I didn't see any loggers around here with G749's but they certainly were fit for it... A friend of mine's uncle had a M4 Sherman tank chassis log skidder (no turret) with the rotary engine and his log truck was a 1945 ex-USMC M5H6 International, both bought right after Korea. Trade advertisement newpapers such as "Rock & Dirt" or "The Construction Bargaineer" were loaded with ads from Memphis Equip, SouthEastern, Sam Winer, and many others showcasing M5 tracked tractors, M26 weasels, etc for logging and line work .. And of course all the 6x6 trucks available from WW2 to the mid-70's.. I still have some of these great "old" newspapers in a box somewhere ..

Missed out on an untouched M215 when in my 20's, had an XM211 (briefly, a loaner) in my 40s, and now 20+ years later I have the opportunity to grab two M215's and tons of jimmy parts.. But not at this age when I really need to be in the dispersal phase.. But I cannot forget about those M215's, they look so nifty. :(
 
Last edited:

rustystud

Well-known member
9,129
2,634
113
Location
Woodinville, Washington
I sure can collaborate your info .. In the early-mid 70's around here right before I enlisted the Jimmies could be seen lined up in droves at DRMO's as Guard units turned in the last of them. Several local highway depts and village depts had been already receiving G749's for several years via the Civil Defense loaner program, some drivers becoming infamous for ripping out reverse.. G749 styling also fit right in with depts that had @1967-74 GMC series-80's and 90's with the big V6 engines... Of course the big V6's ran circles around the G749's on the highway, but the G749's could go places the V6 trucks could not

I didn't see any loggers around here with G749's but they certainly were fit for it... A friend of mine's uncle had a M4 Sherman tank chassis log skidder (no turret) with the rotary engine and his log truck was a 1945 ex-USMC M5H6 International, both bought right after Korea. Trade advertisement newpapers such as "Rock & Dirt" or "The Construction Bargaineer" were loaded with ads from Memphis Equip, SouthEastern, Sam Winer, and many others showcasing M5 tracked tractors, M26 weasels, etc for logging and line work .. And of course all the 6x6 trucks available from WW2 to the mid-70's.. I still have some of these great "old" newspapers in a box somewhere ..

Missed out on an untouched M215 when in my 20's, had an XM211 in my 40s, and now 20+ years later I have the opportunity to grab two M215's and tons of jimmy parts.. But not at this age when I really need to be in the dispersal phase :(
You don't know how many times I have mentally kicked myself for not buying (at dirt cheap prices too ) these old trucks and parts. I had so many opportunities too. This one old fart (which I'm now a card carrying member) had two hundred M135's and so many transmissions and engines in cargo containers you couldn't count them all. He was about 68 at the time and was selling off his land so the vehicles had to go. I went with my father to take a look at his stuff. I was driving then so I thought I might buy one of his trucks. They were in good to fair condition but I wanted something sexy to impresss the girls then.
Now I wished I had bought as many trucks as I could and forget the girls !
Then there was the company I was rebuilding transmissions at that had WWII to Korea surplus. The owner was willing to sell me all the old HydraMatic parts he had for almost nothing since I was the only one he knew who could rebuild them at the time. I didn't want to waste my money on all that "junk" back then. I'm talking about 5ft X 5ft wood crates filled with front and rear bands. Still in their triple sealed packages. Thousands of seal rings and rubber piston seals and bushings and thrust washers and on and on ! All still sealed NOS parts ! It drives me crazy sometimes what I could have had. That M5 oil pan I posted came from there. I only got it for a novelty. Also the "bronze" clutch plates.
I better stop, I'm getting seriously depressed right now.
 

rustystud

Well-known member
9,129
2,634
113
Location
Woodinville, Washington
There is one part I don't tear down unless it is broken. That is the reduction units "accumulator assembly" .
It's basically a large shock absorber and you can see if one or both of the springs are broken without tearing it down. Trust me on this, those springs are strong ! and can easily hurt you if they get loose.
009 (3).JPG

I took some pictures of the friction plates to show you how to judge their condition.
001.JPG Starting from the left these are NOS "bronze" frictions, nothing better. The M5 tanks used them. Then you see NOS fiber frictions. Then good used fiber frictions. Next these are OK fiber frictions. I would only use them if I was desperate to complete a job. Then the last fibers are shot. Don't use fibers that look like they came out of a fire, which basically they did due to the heat generated since they were slipping. You can see how fiber material is coming off the plate too. Anytime friction plates are losing material like this their bad. Also any steels that came out of this clutch pack would be thrown out. I see now I forgot to show you the steels. Well that will be for tomorrow then.
Heres some close-up pictures of the friction plates.
002.JPG003.JPG004.JPG
This is some aftermarket fibers made by "ALTO" transmission parts.
014.JPG There good quality though they don't have the "two part" fiber system the military used. If you look closely you will see there is a cork like material then a paper fiber material on each plate. I would have no problem using these ALTO plates though. Very good company, very good quality.
 
Last edited:

rustystud

Well-known member
9,129
2,634
113
Location
Woodinville, Washington
So here's the steel plates.
001.JPG003.JPG004.JPG005.JPG008.JPG
The first one is brand new NOS steels. The second one is slightly used and I buffed them out. The next two are really used but they could be reused if you were desperate. Which in this time means they will get used as parts are almost gone now. The last steel is totally shot. It is blued from the heat and warped.
Never use a steel that has blue in the metal. It is a hot spot that the friction will not be able to grab onto.
Basically it has been "heat treated" and become hard.
 

rustystud

Well-known member
9,129
2,634
113
Location
Woodinville, Washington
I'm gonna show you why you should clean all your parts as best you can.
174.JPG172.JPG173.JPG
This crack was not visible until I sandblasted the housing. You can plainly see it has gone clear through the housing and it's at one of the four ears which holds the bellhousing on.
This housing is "junk" .

Next up is the "output shaft assembly" .
014.JPG028.JPG030.JPG
The planetary gear shown here has the metal gouged out of it. This came out of the same transmission that had the wave spring failure. I didn't see it at first. I was checking each gear for bearing wear when I came upon this one. At first I noticed the gear was "flopping" on the small shaft. Then I saw the tooth damage. Since parts are not available to fix this one gear, the whole shaft assembly is shot.
Here I found a return spring that had been rubbing and would eventually break sending fragments through the transmission.
001.JPG006.JPG
When dealing with any transmission you need to be diligent in checking "all" the parts closely.
That's the difference between a good running transmission which will last for years, or a ticking time bomb waiting to explode in your vehicle.
 
Last edited:

1944mb

Active member
411
101
43
Location
Big Timber, MT
Thanks Rustystud, this has needed to be done for a long time. I am curious, have you noted on a military hydra-matic vs. one built for a civilian vehicle, are there any differences in parts. For example, talking to a tranny guy I know he was saying that the front pump on a hydramatic designed for the deuce was made of brass, and they were a much stouter, robust pump. Do you find that to be accurate? Also he felt most of the hydramatics bad rap in these trucks was that the pump eventually lost line pressure, which allowed the clutch packs to slip-obviously. But that running a truck in high reverse wasn't bad voodoo-that if the clutch packs were slipping is was most likely indicative of a failed or weak front pump. Like your pictures of the steels and clutch packs, gives a good visual of the degree of failure. Now you need a truck to it in! Could that crack be safely welded? Also...., before you send it out, I prefer it painted OD :D:unsure: good work
 
Top
AdBlock Detected

We get it, advertisements are annoying!

Sure, ad-blocking software does a great job at blocking ads, but it also blocks useful features of our website like our supporting vendors. Their ads help keep Steel Soldiers going. Please consider disabling your ad blockers for the site. Thanks!

I've Disabled AdBlock
No Thanks