• Steel Soldiers now has a few new forums, read more about it at: New Munitions Forums!

  • Microsoft MSN, Live, Hotmail, Outlook email users may not be receiving emails. We are working to resolve this issue. Please add support@steelsoldiers.com to your trusted contacts.

404s losing power

79
4
8
Location
Baton Rouge, LA
Timing should be set at idle rpm so there is no advance contribution from the centrifugal spark advance. Then you will see much earlier spark as engine is rev'ed. That's ok. I have seen 30 to 40 deg btdc. You would think the engine would never run with that early timing but it does. It all depends an how slow the fuel mixture burn peaks out.
You wont't be surprised when I tell you that after updating the ignition, plugs and re-installing the Pertronix ignitor correctly that the engine is now 30 degrees BTDC running at idle. Interestingly enough Scott called me today on an unrelated matter and upon asking for guidance, he told me exactly what had to be done. Marking the harmonic balancer at 10-14 (between 1 which is 10 degrees and the next hashmark which is 15), then loosen the M5 screw that holds the distributor cap on (it's hidden behind the distributor, accessible from the driver side of the doghouse opening). Adjust the distributor (by physically moving the distributor cap) so the pointer show the chalk mark at 0 under the standard timing light (or a light with advance set to 0). Then tighten the screw on the distributor. As an additional step I will then apply the logic provided by yourself, Flu and others to fine tune it as needed. He also mentioned not to mess with the little knob on the front with the arrows on it, that's the fine tune adjust and it won't have much or any impact. (hopefully this info will be helpful for others who come across this post).

Ultimately this is the info I was looking for.

The timing depends significantly on the gas you get. Use your common sense if the engine power drops off at higher rpm, then back off on the timing advance. You really can tune by performance but you need a 'test course' over which to make comparisons.I realize this advice is contrary to some other advice given.
My test course is the loop around my neighborhood, however a drive down to the levy to go up and over the levy where I am allowed (old ferry crossing driveway, etc) I can get the pitch on a hill I need as it's mostly flat around here.

I get my gas from a local station that sells Ethanol Free 92, although all the local stations sell Ethanol Free 87 (ncluding Wal-Mart!) which as I understand it the 404 will not like as it's higher compression engine. So I have a few bottles of the Star-Tron Enzyme Fuel treatment, which I think I read about somewhere in the threads of this forum actually in case I can't find any Ethanol Free on any journey. I've read all the threads on different kinds of gas (topping of with diesel to prevent vapor lock, fuel pumping from bottom of tank, etc) Still curious though of E-Free 87 will run on a 404, would make my life a lot easier.

This is simply what has been learned from tweeking 404s for a few years.
You and a few other guys should setup patreon or gofundme accounts so we can send you some contributions for the time and money you're saving us newbies.
 
Last edited:

The FLU farm

Well-known member
Steel Soldiers Supporter
3,342
1,329
113
Location
The actual midwest, NM.
Not knowing the 404, can you reach the distributor while driving? I've found cab over vehicles handy in that respect, as you can top off fluids and make adjustments while driving. If being able to grab the distributor from the driver's seat is sketchy, maybe you can enlist a helper?

Either way, it would save a ton of time to do the fine tuning while on the move. Once you've arrived at the preferred setting, mark it so that you can easily put the timing back to that point after having to change it to compensate for fuel or other things.
 
79
4
8
Location
Baton Rouge, LA
Finally found some free time to have soldier B come over and help me. We did everything by the book and what was recommended here and by Scott at EI. Had to borrow some chalk from the neighbor (who has chalk these days, meesh). Timed it and my friend had smaller arms and hands to get in behind the distributor to adjust the set screw. Took it for a drive and it seemed happier and more responsive.

Then the blasted throttle control / fuel pedal stuck again, made driving in 3rd and 4th gear easy! After our run around the block and parked, opening the passenger side of the dog-house, we noticed when pulling back and pushing back up on the Throttle lever, that the control rod socket end is not returning all the way back to original idle position when it's on the "Throttle Shaft Lever" (little circle thing with holes on it on the passenger side of the carb). I took the control rod off the carb this morning and adjusted engine speed by hand to confirm it's not the Throttle Shaft that's creating the resistance, turns out the rod is pretty loose (you guys had suggested lubricating it which I did last evening).

I have a replacement return spring and some of the parts to redo the throttle linkage, I'm going to order some more parts from Unipaser (fortunately they're not expensive) and I'm going to rip out the entire throttle linkage and clean / replace every part.

Frustrated with all that and the resolve to replace parts, satisfied that the engine is timed correctly, I switched my efforts over to checking power on the engine, I pulled each of the Beru wires one at a time while the engine was idling, I noticed cylinder #4 did not have an apparent drop in power (at least audibly like the other cylinders did when I pulled their cables).

Using a Lisle spark gap checker with the gap dialed in to 0.50mm (using my feeler gauge) that distributor #4 output is a bit weak on the spark. However when I re-attach the Beru wire to the spark plug in the cylinder, the engine picks up.

So I put the effort in and did a compression test today and amazingly no loss of power in cylinder #4, everything looks good.

Cyl 1Cyl 2Cyl 3Cyl 4Cyl 5Cyl 6
Dry125120120120110115
Wet135135130130115120
Avg130127.5125125112.5117.5
KP/CM[SUP]2[/SUP]9.138.968.788.787.98.26
GAP (mm)0.5-0.60.5-0.60.5-0.60.5-0.60.6-0.650.5-0.6
GAP (actual)0.55mm0.55mm0.55mm0.55mm0.63mm0.55mm


I set the spark gap for each plug that matches the compression of the chamber per the rating in workshop manual (section 7.5, page 2.1/2) and is in range of a normally operating plug from 1.2 to 0.4.
I ended up replacing spark plug #5 with a new one and moving the previous #5 to #4 (just in case it was the plug)

Fired up the engine and after warming back up, to my frustration, Cylinder #4 still seems to have no noticeable drop in engine speed when I pull the Beru wire, #3 which had the spark plug from #4 before, was working properly).

To make it even more interesting, I noticed that I lose air pressure in my dash gauge when I pull #4 wire, when I reinsert it, pressure begins to rebuild.

Tomorrow I'll go back and go over my wiring for #4 (maybe it's the cable, will try swapping beru wires to see if problem follows).

I'm partially stumped.

On a side note for Flu Farm - for your last post, Will invest in a longer hex drive to keep with me in case I have to buy lower grade Ethanol free 87 gas. (thanks for the suggestion).
 
Last edited:
79
4
8
Location
Baton Rouge, LA
That sounds like the result of an air leak, which the compressor barley keeps up with at normal idle.
We noticed there was an air leak and upon further inspection found that the glad hands on the back of the truck had holes in the Dummy Shut-Offs. I replaced them with new ones from FleetPride. I need to check the one on the front of the truck and check all the lines from the air compressor back to the tank and everything in between. I'd get rid of the air system, but I've been asked to tow a trailer in a few parades here in town so I think I will keep it enabled and make sure it works.
 

The FLU farm

Well-known member
Steel Soldiers Supporter
3,342
1,329
113
Location
The actual midwest, NM.
Those glad hand covers are there to keep crap, mud dobbers, etc. out of the system, not to create a seal. I often use those little conical plastic covers that come on fittings and hoses to plug the hole if I don't have the real thing handy. While the plugs don't help protect the rubber seal from UV, at least the opening is covered.

If you have air going to the glad hands at all times, something's wrong. Or, your trailer brake controller is partially on, or the trailer air supply knob is pulled.
 
79
4
8
Location
Baton Rouge, LA
If you have air going to the glad hands at all times, something's wrong. Or, your trailer brake controller is partially on, or the trailer air supply knob is pulled.
I was using the force today, just reading this now, today I made sure the levers were turned off, nonetheless mud dobbers are a reality here so replacing the glad hand covers is necessary. I got those rubber gaskets with the pizza cut flaps in the center, haven't figured out how to put those in, but did put the glad hand replacement covers on. Glad Hands appears to be one of the few parts that are standard and can be gotten at any truck supply. $6 at FleetPride if anyone is interested.

Today, I ripped out the throttle control from the throttle all the way around to the carb. The only parts that can be salvaged really are the bolts and the cross-over bracket (darn thing is $80 as a replacement part). I will use a rifle cleaning brush to clean out the shafts. The control rods were rusted and bent out of shape, the linkage was gummed up and the throttle rod was bent out of shape.

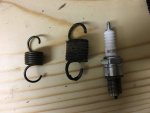
One thing I noticed is that the replacement return spring (#40439930710) is noticeably smaller than the original.

APlajBw.jpg
The spark plug is there for size reference.

The next challenge in replacing the throttle linkage to the carb is taking the fuel pedal out. The spring is gummed up and it needs to be replaced. ($93 for the replacement, ouch) With my sons help I took the two bolts out holding it in, yet it's stuck in limbo as the shaft into the engine compartment through the chassis takes a right angle turn.

It appears the only way to remove the pedal is to remove the driver side lower panel that the dog house sits on. I referenced this in an earlier thread that those screws may not come out. I've dumped special wd-40, rust penetrant and the acetone - atf mix with no results. Short of drilling it out I may just make the opening for the fuel pedal shaft into the engine compartment a bit larger so I can maneuver the angled pedal shaft out and put a new one in.

Placing parts order tonight.

Going back to a previous post in the same thread from yesterday, with the engine off, I was able to swap the spark plug wires (swapped 3 and 4). adjusting the throttle plate lever by hand with the doghouse off I started the truck and still have a low to no spark condition on #4. Thinking about it a bit further, I think I will need to re-open the distributor cap and adjust the gap between the ignitor and the magnetic ring, for some reason it's working fine for 1, 2, 3, 5, and 6, but not #4.

Oh let me count the ways.

I checked the voltage at the coil according to how EI did it in their video: https://www.youtube.com/watch?v=yDLSsHl9baY and I'm getting all the same readings he's getting with 24vdc at the 3 points however I'm only getting 2v DC between 1 and 3 terminals and not the near 5V that Scott is getting. I'm going to ask him about this and dig in the workshop manual to see if I can find a reference. Anyone have any ideas?

I'm sure you guys are tired of this thread by now. Believe me I'm just as tired too, just bear with me.
 
Last edited:

The FLU farm

Well-known member
Steel Soldiers Supporter
3,342
1,329
113
Location
The actual midwest, NM.
I was using the force today, just reading this now, today I made sure the levers were turned off, nonetheless mud dobbers are a reality here so replacing the glad hand covers is necessary. I got those rubber gaskets with the pizza cut flaps in the center, haven't figured out how to put those in, but did put the glad hand replacement covers on. Glad Hands appears to be one of the few parts that are standard and can be gotten at any truck supply. $6 at FleetPride if anyone is interested.
Not sure what you mean by "with pizza cut flaps in the center", but glad hand seals come in basic rubber and in poly versions. Either kind is installed by pushing it into place.
Like with all rubber, wetting it downs helps reduce friction so spitting on them helps.

As far as the glad hand covers go, the trucking industry has been getting by with the basic metal ones (with a small hole in the center) since the invention of air brakes, so I don't think you need to worry about using the old ones.
I suspect that the holes are there to prevent someone from getting smacked when removing a cover if the circuit was accidentally pressurized. Or in your case, pressurized because something's wrong. In other words, your application (as is) really does need the holes in the covers. Or non sealing seals - just cut a section out to create an air passage, or leave the seal off altogether.
 

tennmogger

Well-known member
Steel Soldiers Supporter
1,579
543
113
Location
Greenback, TN
...chop...
I checked the voltage at the coil according to how EI did it in their video: https://www.youtube.com/watch?v=yDLSsHl9baY and I'm getting all the same readings he's getting with 24vdc at the 3 points however I'm only getting 2v DC between 1 and 3 terminals and not the near 5V that Scott is getting. I'm going to ask him about this and dig in the workshop manual to see if I can find a reference. Anyone have any ideas?

.
Voltage measurements on the number 3 terminal are misleading and meaningless, except to know 'something' is there. That voltage is pulsed at a rate depending on engine rpm. Response to pulsed voltages changes meter to meter. Remember that terminal 3 goes to the "points", in this case the Pertronix, and is alternately shorted to ground and allowed to 'pull up' to system voltage in between sparks. You will never get a meaningful voltage reading here.

Even if the engine is off, the voltage could be "high", or "low" depending on the position of the points/Pertronix, that is whether conducting or not.

The other variables other than rate of pulsing are the resistance of the coil primary and the resistance value of your particular ignition resistor, both of which form voltage dividers.

Summary, don't worry too much about Terminal 3 :)
 
79
4
8
Location
Baton Rouge, LA
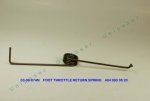
I got my parts order in from Unipaser, he didn't have the cross-over shaft but sent me a Foot Throttle Return spring instead, mentioned that it is often missing on the 404.

I wonder if this has been part of my issue all along, nonetheless, I'm having trouble figuring out where it goes.

Looking at the Throttle parts diagram, page 59 of the Chassis guide (green book) I don't see it listed, looking on the Unipaser site there is a number for it under the fuel pedal (look for 74), part number is 03-06-74N but no picture of where it goes.

03-06-074N.jpg

I do not believe this is not the same as the return spring that attaches to the shaft to the cross-over bracket by the engine.
 
Top
AdBlock Detected

We get it, advertisements are annoying!

Sure, ad-blocking software does a great job at blocking ads, but it also blocks useful features of our website like our supporting vendors. Their ads help keep Steel Soldiers going. Please consider disabling your ad blockers for the site. Thanks!

I've Disabled AdBlock
No Thanks