• Steel Soldiers now has a few new forums, read more about it at: New Munitions Forums!

  • Microsoft MSN, Live, Hotmail, Outlook email users may not be receiving emails. We are working to resolve this issue. Please add support@steelsoldiers.com to your trusted contacts.


5 Ton combat wheel bolt up beadlock install

kfrosty

New member
267
5
0
Location
Belmont, NC
I piggy backed another thread about beadlocks. I'm bobbing a truck and going with a locker in the rear. I run relatively low air pressures so I'm going to try beadlocks in the rear.

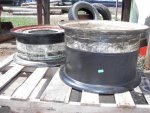
I purchased some Hutchinson beadlocks that have 4 bolts. Has anybody installed these? I'm looking for any tips or tricks to.

I thought these were going to be easier as I thought the ends would fold over each other but that doesn't appear to be the case.

Here is a picture of one.

Beadlock.jpg
 

kfrosty

New member
267
5
0
Location
Belmont, NC
I have them and the 4 bolts.. Just curious as to how others go about getting these in the tire

Sent from my SM-N920V using Tapatalk
 

tobyS

Well-known member
4,820
815
113
Location
IN
Are you assembling them inside the tire, prior to setting the tire on the rim?
 

simp5782

Feo, Fuerte y Formal
Supporting Vendor
12,095
9,261
113
Location
Mason, TN
Cut some time 2x4s so they have little notches on each side. You need 2 of them and 2 ratchets straps. Hook straps to an anchor point and then around he boards so it will spread the tire apart. Already have it bolted together. And slide it in and release the pressure

Sent from my SM-G860P using Tapatalk
 
  • Like
Reactions: HDN

Csm Davis

Well-known member
4,152
376
83
Location
Hattiesburg, Mississippi
Just slide it in the tire so the upper half is in the middle of the area for the wheel bolt it together then slide it until the two aline and slide the big part of the rim in the tire and beadlock combo and then the o-ring and then bolt on the other half. I know this sounds over simplistic but it is just that easy.

sent from my decrepit fingers
 

gringeltaube

Staff Member
Super Moderator
Moderator
Steel Soldiers Supporter
6,886
2,269
113
Location
Montevideo/Uruguay
Cut some time 2x4s so they have little notches on each side. You need 2 of them and 2 ratchets straps. Hook straps to an anchor point and then around he boards so it will spread the tire apart. Already have it bolted together. And slide it in and release the pressure
Not! This kind of beadlock installs disassembled (like pictured), ends twisted apart, one end first, then you keep turning it around inside the tire until the other end just drops in place. Use some tire soap, it helps. Then the two straps are bolted in place.


G.
 

tobyS

Well-known member
4,820
815
113
Location
IN
Do like G and Gen Davis said...put one end in and rotate around, letting it fall to the bottom of the tire as you roll the tire and the lock ring along. Once in, with the bottom sitting against the tire outside, roll the tire until the joint is right in front of you, in the middle of the opening. Then it's easy, right where you get at both sides of the joint to put the plate on and bolt it. By the time you read these, you will probably have figured it out.
 
  • Like
Reactions: HDN

kfrosty

New member
267
5
0
Location
Belmont, NC
Thanks everyone. I guess I did a hybrid. I laid the tire on it's side, got one edge of the bead lock in using a flat pry bar and tire soap. Then I stood it up and used my excavator bucket to compress the tire so I could get the other side in. I then rolled it around with less pressure to try and center up the bead lock so could get both halves of the wheel inside. (My second one it's been a challenge trying to get the 2nd half of the wheel inside of the bead lock.

I don't have anymore to do but next time, I'll try compressing the tire and twisting the beadlock and running it into the bottom of the tire as tobys & gringe suggest. I think that would definitely save some time.

Also, I aired the tire up to 45. I never hear a pop like you do with some tires when the bead sets. But the tire looks like the bead is properly seated. I'm now aware of the danger with these wheels. Anything other than an eye test to make sure they are 100% seated properly?

Finally, I used the bucket and blade as my "tire cage". My hats off to anybody doing this by themselves without equipment.

Here are some pictures.


20160730_145754.jpg

Prybar getting one side in.

20160730_145854.jpg

Compressing tire to make it wide at the bottom to start getting second side of beadlock in with prybar.
20160730_152002.jpg

Moving it around to get the second have on
20160730_155416.jpg

Little help with forks moving the second half around on the first tire to get it inside the beadlock to bolt together. I didn't use the forks on the second on.
20160730_155850.jpg

"Tire Cage" for airing up
20160730_161738.jpg
 
Last edited:

kfrosty

New member
267
5
0
Location
Belmont, NC
Another question for this thread. In installing the 2nd half of the wheel, I had to use a pry bar to try and move the bead lock around to try. I notice the bolt heads of the beadlock hit the lip of the wheel where the oring goes. The other side I had to pry and tap the rubber of the bead lock in past the edge of the tire. But it still stuck out. Installing the 2nd half, my Milwaukee 1/2" cordless impact hammered all the way on every bolt. I used an alternating pattern to try and keep 2nd half flat going down.

I was going to try and torque to spec but it took all the gun had to get the wheel down and full seated all away around? Is that typical with these bolt together beadlocks? I'm curious as to what all is going to be involved when it comes time to change the tires again removing this as tight as it seemed to go in. It was the same with both tires and I do have tire soap used for changing tires.

Also, airing up, I've ready it's "safer" to stand the tires up, but it seems with an excavator it's safer and potential for less damage to it to lay the bolt side of the wheel towards the ground, put the bucket on top of the wheel on the other side. If the bolt side failed it goes into the ground, the bucket against the top of the wheel isn't going to allow any momentum like a tire cage and the tire isn't going to go anywhere unless it ripped into but if that happened, then same problem if it were upright in a cage potentially.

Thanks everyone. It would be nice for anybody doing this with chains and 2x4's to post some pix and also how you center the beadlock after you have it inside and bolted back together.

Thanks again everyone. I got mine together and everything looks to be good. The tire I got finished yesterday held air over night. Airing up the other right now.
 

tobyS

Well-known member
4,820
815
113
Location
IN
I'll admit I have not done the steel bead-lock and don't really want to try. I don't want that much outward pressure. The rubber ones on the 450 tires I'm working on measure, with the tire beads, the exact size of the rim width. You didn't possible take a measure prior to assembling them did you?

Yea, watch ripping your o-ring with the bolt head.

I'm using the 450 Sand Trail tires and half of a pilot centered, 11.25 BC MRAP wheel and the outer part of the wheel that came with the tires, which is 13.19 BC to make a wheel that is 12" wide and has the 11.25 BC. I have some rubber M35A3 bead-locks coming that are 10" wide to go on them with the wider wheel. Here is the tire and the wheel, I still have to PU the rubber lock.
 

Attachments

kfrosty

New member
267
5
0
Location
Belmont, NC
Yea, watch ripping your o-ring with the bolt head.
The bolt head is against the edge, it doesn't look like it would affect the oring.

By a screw up I got to figure out how to get the wheel back apart. I took the oring out last night trying to center up the beadlock and forgot to put it back in. I had to put the excavator bucket on the tire and use a pry bar on the inside of the wheel to pry it up. Wasn't too bad.

No I didn't measure, but they are on ebay. The listing states they are 7.5" wide.

He sold both and I called and he said he was selling more of these now than the rubber ones. I just forgot to ask for a tip on how they installed them.

Having a machine to move the tire around it wasn't too bad.

I like the width of your tires. But I need something for the mud I wanted the height of the XZL 16's.
 

Ford Mechanic

Active member
1,805
6
38
Location
Edenton, NC
It's normal for a 1/2 in gun to struggle getting the nuts down, they're captive lock nuts. And strong ones at that.

Those rims are safe for inflating too. It's the snap ring ones you have worry so much about.

Sent from my SM-G900V using Tapatalk
 
Top
AdBlock Detected

We get it, advertisements are annoying!

Sure, ad-blocking software does a great job at blocking ads, but it also blocks useful features of our website like our supporting vendors. Their ads help keep Steel Soldiers going. Please consider disabling your ad blockers for the site. Thanks!

I've Disabled AdBlock
No Thanks