• Steel Soldiers now has a few new forums, read more about it at: New Munitions Forums!

  • Microsoft MSN, Live, Hotmail, Outlook email users may not be receiving emails. We are working to resolve this issue. Please add support@steelsoldiers.com to your trusted contacts.

802a no power at lugs

mgoben64

Member
19
30
13
Location
Michigan USA
If you haven't done so already you need to test the circuit to see where it's broken.
Start it up and first verify you have 24V on the X terminal of K1
If so, follow the instructions in the TM, it will tell you to manually connect the Y terminal to ground with a jumper. If K1 is good it should close when you ground the Y terminal. If not, the K1 contactor is either bad or stuck.

If it does close, that indicates a failure somewhere in the ground path between K1-Y terminal and the S5 switch.
You can then work backwards from K1-Y to S5 and figure out where the ground gets lost.

If you do not have 24V on K1-X, run a jumper to any +24 source, such as the battery etc.
Retest the contactor using the switch as normal. If it works now, you need to back track through the oil pressure switch to see where your +24V signal got lost.

If you have power and ground at X and Y , don't take the mallet suggestion as a joke. I'm dead serious, it works quite often.
Hold S5 up and whack the top of K1 If it works, then you just need to determine why the contactor is sticking.

Also, Have you checked S5 yet, to make sure it's wired correctly and it's working?
Did you put the markings on the connectors of K1 or has someone else been in there messing around before you ?

Greetings! Sorry for the delay but life got in the way. Was able to do all of the diagnosis and if I put 24V to X on K1, works perfectly! 120V at lug 1 & lug 3. Sweet! So when you refer to the oil pressure switch, what exactly am I chasing? Also, why not just bypass X with a separate 24V (like direct to battery)?

Thanks a ton!
 
Last edited:

mgoben64

Member
19
30
13
Location
Michigan USA
Update for posterity...

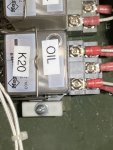
Put 24V + direct from battery to X on K1. Relay closed and green light lit, tested both 120V legs at output. Traced back to K20 per the schematic that kloppk shared. Pulled K20 relay and blew out the area with compressed air. Noticed that underneath the top most K20 screw in this picture one under it was loose. Removed the ones on top, tightened the ones below, reattached the top ones and voila! Works like a charm.

Got lucky. Now to make sure I get enough spares of the must haves on hand. Going to order up a few of those relays just in case.

Thanks to everyone for your help. Much appreciated!

IMG_8938.jpeg
 

mgoben64

Member
19
30
13
Location
Michigan USA
That terminal is one of the relay coil wires. If bad connection the relay won't close causing the problem you had
Good job and thx for the update!
Next project is a faulty coolant temp gauge and more importantly is settling down the engine vibration. Welcome any tips on either.

Thanks!
 

loosegravel

Just a retired mechanic who's having fun!
504
892
93
Location
Enumclaw, Washington
Next project is a faulty coolant temp gauge and more importantly is settling down the engine vibration. Welcome any tips on either.

Thanks!
The coolant temp gauges are very prone to failure on these. One of the members here sells them, I forgot who! Check out “Gijoeczar.” I think he’s got them. The 802A’s are inherently bad for vibration too. Probably why the gauges regularly fail!
 

loosegravel

Just a retired mechanic who's having fun!
504
892
93
Location
Enumclaw, Washington
The coolant temp gauges are very prone to failure on these. One of the members here sells them, I forgot who! Check out “Gijoeczar.” I think he’s got them. The 802A’s are inherently bad for vibration too. Probably why the gauges regularly fail!
I should have added…we should go through the process of checking the wiring and the integrity of the gauge before condemning the gauge. They work on resistance. With the S1 in the run position and the wire disconnected from the sending unit on the engine, the gauge should read pegged on high. With the wire at the sending unit grounded, the gauge should read pegged on low. If those tests show something wrong, then we need to ohm check the wire from the gauge to the sending unit. If that wire ohm checks good, then we can safely say the gauge is faulty, if the wires are hooked up correctly on the back of the gauge.
 

mgoben64

Member
19
30
13
Location
Michigan USA
ALWAYS, check that the wires are hooked up right first. Then do the trouble shooting. Is the gen set on the floor? Concrete floor? Pallet?
Concrete floor. As luck would have it, we lost power at the farm yesterday for the better part of a day and I pressed the 802a into service. Did fantastic charging up the solar batteries via the 240v quick connect I did. The courtesy 120 outlets kept the freezers going plus my pellet grill with a chuck roast on it lol. Ran for 7 hours straight at 75% and didn't skip a beat, except settled the concrete approach to the garage thru the constant vibration.

Peeking inside, pretty clear that at least 1 of the motor mounts isn't even there and I'm sure the rest are probably worn. Trying to find a part number for mounts but no success yet. On GMG site now trying to find the part.

On the temp gauge, still pegged at hot but the machine ran perfectly all day. So will have to chase that next weekend. Was too sloppy outside to deal with it yesterday.

Any links to the motor mount service procedure greatly appreciated! UPDATE: Think I found it: https://dpequip.net/shop/generator-...t-dod-88-21070-3-mep-802a-88-21070-1-5kw-tqg/


Thanks a ton!
 
Last edited:

Ray70

Well-known member
Steel Soldiers Supporter
2,632
6,053
113
Location
West greenwich/RI
Which motor mount is missing? One of the forward mounts towards the radiator fan?
Just an FYI incase you aren't familiar, these machines only use the 2 forward mounts and the mounts on the generator head, they don't use any mounts at the 2 rearward tabs on the side of the block near the bellhousing.
 

mgoben64

Member
19
30
13
Location
Michigan USA
Thanks Ray, I'll have to confirm front/back orientation as it was really crappy out and I just looked inside the hatch when it was running and saw it bouncing off the mount with no apparent attachment. But I'm pretty sure it was one of the ones closest to the radiator.
 
Top
AdBlock Detected

We get it, advertisements are annoying!

Sure, ad-blocking software does a great job at blocking ads, but it also blocks useful features of our website like our supporting vendors. Their ads help keep Steel Soldiers going. Please consider disabling your ad blockers for the site. Thanks!

I've Disabled AdBlock
No Thanks