-
Steel Soldiers now has a few new forums, read more about it at: New Munitions Forums!
803 Pre-heat run-away
- Thread starter pclausen
- Start date

More options
Who Replied?Finally had a chance to pop the roof and have a closer look at the intake manifold. After removing the muffler, this is what I was greeted with:
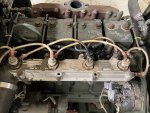
#1 and #2 took the brunt of it. Closeup of #2:
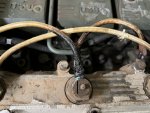
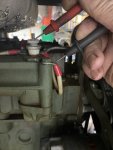
I was able to unscrew #1 and #4 nuts pretty easily, but #2 and #3 required that I hold the threaded shaft with vise grips while undoing the nuts to prevent the heating coil from unwinding itself. I eventually was able to remove all the wires:
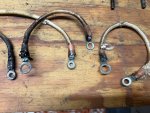
I believe I have those 2 short sections for my spare 802, so I'll swap those in.
I then removed the manifold and was bracing for the worst, but was pleasantly surprised to see that all 4 coils were completely undamaged:
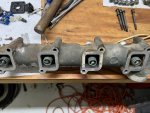
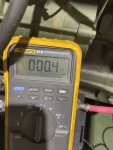
All 4 measured 0.0 Ohm, which I think is what I should get since my multimeter doesn't measure anything less than 0.1 Ohm.
All in all, I think I got pretty lucky. Next up will be to replace S1 with the Mark 3 from my spare 802.

#1 and #2 took the brunt of it. Closeup of #2:

I was able to unscrew #1 and #4 nuts pretty easily, but #2 and #3 required that I hold the threaded shaft with vise grips while undoing the nuts to prevent the heating coil from unwinding itself. I eventually was able to remove all the wires:

I believe I have those 2 short sections for my spare 802, so I'll swap those in.
I then removed the manifold and was bracing for the worst, but was pleasantly surprised to see that all 4 coils were completely undamaged:

All 4 measured 0.0 Ohm, which I think is what I should get since my multimeter doesn't measure anything less than 0.1 Ohm.
All in all, I think I got pretty lucky. Next up will be to replace S1 with the Mark 3 from my spare 802.
loosegravel
Just a retired mechanic who's having fun!
- 504
- 893
- 93
- Location
- Enumclaw, Washington
Based on your thread here I checked the two 10kw units that I have here now. Thanks for sharing your experience! So was it S1 that stuck or K18? I see that I’m lucky to have the ceramic S1 on both of these units.Finally had a chance to pop the roof and have a closer look at the intake manifold. After removing the muffler, this is what I was greeted with:
View attachment 863433
#1 and #2 took the brunt of it. Closeup of #2:
View attachment 863434
I was able to unscrew #1 and #4 nuts pretty easily, but #2 and #3 required that I hold the threaded shaft with vise grips while undoing the nuts to prevent the heating coil from unwinding itself. I eventually was able to remove all the wires:
View attachment 863435
I believe I have those 2 short sections for my spare 802, so I'll swap those in.
I then removed the manifold and was bracing for the worst, but was pleasantly surprised to see that all 4 coils were completely undamaged:
View attachment 863436
All 4 measured 0.0 Ohm, which I think is what I should get since my multimeter doesn't measure anything less than 0.1 Ohm.
All in all, I think I got pretty lucky. Next up will be to replace S1 with the Mark 3 from my spare 802.
I’m 99% sure it was S1 since it won’t spring back to OFF after using pre-heat. So when shutting down the unit, one can easily turn it past OFF and it will be stuck in pre-heat.
That said, I’ll be sure to check K18 before putting it all back together again.
That said, I’ll be sure to check K18 before putting it all back together again.
loosegravel
Just a retired mechanic who's having fun!
- 504
- 893
- 93
- Location
- Enumclaw, Washington
loosegravel
Just a retired mechanic who's having fun!
- 504
- 893
- 93
- Location
- Enumclaw, Washington
3-6.2. Inspect and Measure. a. Inspect manifold for cracks, corrosion, or other damage. Replace if damaged. b. Inspect attaching hardware for damage. Replace if damaged. c. Inspect heater plugs for damage. d. Set multimeter for ohms and test heater plugs. Normal reading is 4 to 5 ohms. Zero resistance indicates a shorted heater and a high reading indicates an open heater. Copied and pasted right out of the TM. Notice there's no decimal point in front of their figure? I'm wondering if they have to be isolated, even though the TM doesn't say so?
- 18,145
- 27,263
- 113
- Location
- Burgkunstadt, Germany
This is a very common problem. Often its because the connections were loose. Or K18 or S1 were the problem.
- 4,044
- 6,780
- 113
- Location
- MA
I have some manifold preheaters on the shelf if you don't want to steal from your other machines. Can get a count later this morning.
I rechecked the resistance and I guess I just wasn't patient enough last night. After waiting 5 seconds or so, the readings on all 4 preheaters settled to 0.5 Ohms, so the same you are seeing @loosegravel
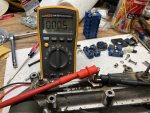
I need to chase the shaft on one of the preheaters:
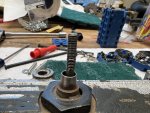
The other 3 are fine. @Light in the Dark I'll let you know how that turns out.
I was able to steal some of the wiring from my spare:
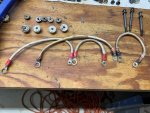
So at least the worst of the charred wiring has been replaced. Some red heat shrink would pretty up the remaining 4 terminators I suppose.
Since I had the manifold off anyway, I went ahead and scraped off all the loose paint and shot it with some paint:
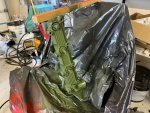
I guess its time to swap out S1 next.

I need to chase the shaft on one of the preheaters:

The other 3 are fine. @Light in the Dark I'll let you know how that turns out.
I was able to steal some of the wiring from my spare:

So at least the worst of the charred wiring has been replaced. Some red heat shrink would pretty up the remaining 4 terminators I suppose.
Since I had the manifold off anyway, I went ahead and scraped off all the loose paint and shot it with some paint:

I guess its time to swap out S1 next.
loosegravel
Just a retired mechanic who's having fun!
- 504
- 893
- 93
- Location
- Enumclaw, Washington
Rich, I’m wondering if that’s a typo in the TM? Their figure for a good heater is 4 to 5 ohms. We’re both seeing .4 to .5 ohms.I have some manifold preheaters on the shelf if you don't want to steal from your other machines. Can get a count later this morning.
loosegravel
Just a retired mechanic who's having fun!
- 504
- 893
- 93
- Location
- Enumclaw, Washington
Guy, what are your thoughts on the glow plug resistance values? We're both seeing .4 to .5 ohms. The TM says they should be 4 to 5 ohms. There's a big difference between 1/2 of an ohm and 5 ohms. Thanks.This is a very common problem. Often its because the connections were loose. Or K18 or S1 were the problem.
- 18,145
- 27,263
- 113
- Location
- Burgkunstadt, Germany
This is what I copied from the 5 KW book, and its what is in the 10 KW book. Having said that, let me ask a higher power.
d. Set multimeter for ohms and test heater plugs. Normal reading is 4 to 5 ohms. Zero resistance indicates a
shorted heater and a high reading indicates an open heater
d. Set multimeter for ohms and test heater plugs. Normal reading is 4 to 5 ohms. Zero resistance indicates a
shorted heater and a high reading indicates an open heater
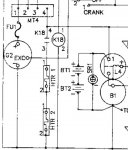
The preheaters are 12V each and wired in series. 12V across 0.5 Ohm is 24A and 288 watts. That sounds reasonable. If they are supposed to be 5 Ohms, that would only produce about 29 watts per preheater @ 2.4A, which seems on the low side. The gauge of the preheater wires coming from K18 appear to be #10 or so, which would be WAY overkill for 2.4A. My money is on a typo in the TM...
Got the S1 switch from my spare 802 installed:
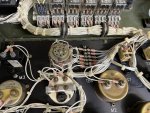
Feels so much better than the Mark 1. K18 kicks on and off like it should when moving S1 to pre-heat position and I verified I get 24V from each of the feeders to the preheater banks while holding S1 in the pre-heat position.
Got the S1 switch from my spare 802 installed:

Feels so much better than the Mark 1. K18 kicks on and off like it should when moving S1 to pre-heat position and I verified I get 24V from each of the feeders to the preheater banks while holding S1 in the pre-heat position.
Last edited:
- 18,145
- 27,263
- 113
- Location
- Burgkunstadt, Germany
I just sent a mail to a higher power. See if his old butt is up.
- 349
- 508
- 93
- Location
- St. Joseph Missouri
I went out to my 803a and got some measurements to add to the pile.
My batteries were a smidge low due to the NOCO kicking one out on "bad battery" (Long story) so the voltage and amperage might be a tad off, but they should be within margin of error.
If my math is correct then each pair of heaters is ~750W.
That would mean an 803a is pumping out 1500W of heat during preheat/starting.
- Both heaters in series 0.4-0.5ohm
- Single Heater 0.2-0.3ohm
- Voltage at first heater in series 24V
- Voltage at second heater in series 12V
- Amperage 62A per pair of heaters
My batteries were a smidge low due to the NOCO kicking one out on "bad battery" (Long story) so the voltage and amperage might be a tad off, but they should be within margin of error.
If my math is correct then each pair of heaters is ~750W.
That would mean an 803a is pumping out 1500W of heat during preheat/starting.
- 18,145
- 27,263
- 113
- Location
- Burgkunstadt, Germany
I believe the heaters are 12 volt heaters.
- 4,044
- 6,780
- 113
- Location
- MA
They are 12V as others have stated... and I was not able to get out and test for the thread. Maybe tomorrow, sorry chaps.
Chased that one thread that needed it and re-installed the intake and the wiring:
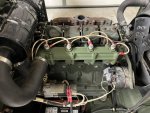
After completing the wiring, I flipped S1 to pre-heat while having a voltmeter on the tip of #4 pre-heater. It started out at ~25.5V and over the following 10 seconds, slowly dropped to about 23.5V. I then stopped and felt the top of the manifold. It was lukewarm at the base of the pre-heaters. So I think everything is working like it should.
I'll have to swap that alternator with one from one of my 802s. It looks out of place now that I painted the intake.
Last edited:
NATCAD
Active member
- 241
- 50
- 28
- Location
- Port Huron Michigan
pc that paint adds at least a horsepower! nice work on running down the problem and having the spares on hand...!
Regarding the pre-heat. I have an 803a that has given me quite a few problems on coming up to 180F and holding temp, but I have never had problems starting it. I haven't been in the habit of pre-heating it, it will catch and diesel in my experience without the pre-heat down to 0F.
If the set doesn't require pre heat to start, is there any harm in not using it? If this problem could happen with an experienced operator around, I question having competent, but otherwise unfamiliar people operating the set. I wonder about putting the pre heat on a separate momentary toggle switch. Is this a problem guy fang that you saw frequently?
- 114,300members
- 167,186threads
- 2,353,745posts
- 3,655online users


