• Steel Soldiers now has a few new forums, read more about it at: New Munitions Forums!

  • Microsoft MSN, Live, Hotmail, Outlook email users may not be receiving emails. We are working to resolve this issue. Please add support@steelsoldiers.com to your trusted contacts.

Advice Please: Planning 4L80 Conversion

FlameRed

Well-known member
Steel Soldiers Supporter
348
538
93
Location
Florida
Thanks for all the help. I think I now have most of the parts needed to properly do the 4L80 conversion. I got a nice rebuild stock torque converter instead of using that rusty one. Got a new pan with drain, gasket and new filter. Got the TPS that goes along with the new harness and tranny controller. New shifter is ready to go. Just need to figure out what I need to connect to the existing cooler lines, vent lines, etc.

I was directed to a good deal on the proper NOS fuel tank with hardware. And a fan switch relocation bracket that is being fabed up for me - thank you @springer1981 for both!

The exhaust system I have on it is really, really rusty, but has no leaks that I can see. However, I am sure I will need to use a sawsall to get it out so I can R&R the tranny. I will attempt to get the exhaust apart but I doubt it will come apart willingly! That ride over to the exhaust shop is going to be noisy!

I guess I will take it to a local exhaust shop to replace the whole exhaust as the individual exhaust parts have the usual HMMWV "tax" and added high shipping "tax" bonus. I have the tail pipe going out in front of the driver back wheel. No fording.

Any suggestions for either a "reasonably priced" M998 stock complete replacement I might not be finding?

If I go for a local shop - any advice on what exhaust configuration they should install for me?
 
Last edited:
  • Like
Reactions: OBX

Mogman

Moderator
Staff member
Moderator
Steel Soldiers Supporter
7,017
9,690
113
Location
Papalote, TX
The bolts from the pipes to the manifolds and all the flanges on the exhaust system are simple nuts and bolts so if you get in a bind they can be cut with a saws-all (if you can get to the ones you need to cut) or a torch, there are no "slip fit" pipes so that will not be an issue, should be no big deal to get them apart.
The ones on the pass. side manifold are a PITA.
Buy all new donuts, there are a couple different sizes so check the TM for the part numbers.
Start soaking all of them now with blaster, a few heat cycles and blaster will really help!
 

FlameRed

Well-known member
Steel Soldiers Supporter
348
538
93
Location
Florida
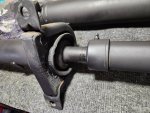
Another dumb question. I need to replace the front drive shaft carrier bearing. I got a replacement ordered. The TSM says the staft just pulls apart? It lenghens and shortens but won't pull apart for me. Does the dust cap unscrew to get it apart?


20221016_154759.jpg
 

Maxjeep1

Well-known member
Steel Soldiers Supporter
1,338
1,918
113
Location
Las Vegas Nevada
I thought the caps unscrewed? I had one that did but it was on a Chevy truck. What if you removed the zerk fitting? Could the negative pressure and grease be making it harder to pull apart? Probably dumb idea..
 

Mogman

Moderator
Staff member
Moderator
Steel Soldiers Supporter
7,017
9,690
113
Location
Papalote, TX
I thought the caps unscrewed? I had one that did but it was on a Chevy truck. What if you removed the zerk fitting? Could the negative pressure and grease be making it harder to pull apart? Probably dumb idea..
Mine did not, I have seen others that did unscrew but not on the HMMWV at least not the three speed shaft, taking the zerk fitting may in fact help, if I put grease in the fitting it tries to collapse the shaft, watch out for squirting grease!
The cap may in fact need to be correctly aligned with the splines
 

springer1981

Well-known member
844
1,150
93
Location
Maine
No the cap does not unscrew, it is held on by a lip and it is very difficult to remove and even more difficult to get the new one on. I rebuilt my front driveshaft during my conversion and replaced my cap because it was damaged.

The slip yoke where the two driveshaft halves pull apart is hydro-locked with grease. You either must pull very hard until it lets go (one person pulling on each end until you are both lying on the floor with half a driveshaft LOL) or a trick that works sometimes is using compressed air and directly on the splines to get air on the inside of the slip yoke causing it to come apart much easier. I've had mixed results with the air method.
 

Maxjeep1

Well-known member
Steel Soldiers Supporter
1,338
1,918
113
Location
Las Vegas Nevada
No the cap does not unscrew, it is held on by a lip and it is very difficult to remove and even more difficult to get the new one on. I rebuilt my front driveshaft during my conversion and replaced my cap because it was damaged.

The slip yoke where the two driveshaft halves pull apart is hydro-locked with grease. You either must pull very hard until it lets go (one person pulling on each end until you are both lying on the floor with half a driveshaft LOL) or a trick that works sometimes is using compressed air and directly on the splines to get air on the inside of the slip yoke causing it to come apart much easier. I've had mixed results with the air method.
So removing the zerk fitting would let air come in as you are pulling it apart? Maybe blow air in it after zerk is out?
 

Mogman

Moderator
Staff member
Moderator
Steel Soldiers Supporter
7,017
9,690
113
Location
Papalote, TX
So removing the zerk fitting would let air come in as you are pulling it apart? Maybe blow air in it after zerk is out?
Blowing air in the zerk fitting will collapse the shaft not expand it, it will come apart
 

springer1981

Well-known member
844
1,150
93
Location
Maine
So removing the zerk fitting would let air come in as you are pulling it apart? Maybe blow air in it after zerk is out?
I've never tried it that way. I'd pull it until you see the splines then put the air nozzle right into the where the splines and shaft meet. At the zerk fitting you would likely just blow past the seal. I've done this with other stubborn yokes over the years and it's probably been 50/50 success. I've never done it with a HMMWV driveshaft but I would try it since you have nothing to lose.
 

Mogman

Moderator
Staff member
Moderator
Steel Soldiers Supporter
7,017
9,690
113
Location
Papalote, TX
There may or not be a hole in the center where the U joint is, if the joint is out maybe put air there carefully.
 

Maxjeep1

Well-known member
Steel Soldiers Supporter
1,338
1,918
113
Location
Las Vegas Nevada
Another dumb question. I need to replace the front drive shaft carrier bearing. I got a replacement ordered. The TSM says the staft just pulls apart? It lenghens and shortens but won't pull apart for me. Does the dust cap unscrew to get it apart?


View attachment 882221
I would mark the shaft before you pull it apart. I’m sure it was balanced and if you get it together wrong or out of phase it could vibrate. Maybe Humvee is different
 

FlameRed

Well-known member
Steel Soldiers Supporter
348
538
93
Location
Florida
The slip yoke where the two driveshaft halves pull apart is hydro-locked with grease. You either must pull very hard until it lets go (one person pulling on each end until you are both lying on the floor with half a driveshaft LOL) or a trick that works sometimes is using compressed air and directly on the splines to get air on the inside of the slip yoke causing it to come apart much easier. I've had mixed results with the air method.
So I just have to pull the two half shafts apart. Yeah, I'm a weakling. Maybe a tug of war using the driveshafts using the local high school football team!

Why do I have a feeling that if I do manage to get it apart it is not going to go back together very easily!

Thanks for the advice!
 

FlameRed

Well-known member
Steel Soldiers Supporter
348
538
93
Location
Florida
So I just have to pull the two half shafts apart. Yeah, I'm a weakling. Maybe a tug of war using the driveshafts using the local high school football team!

Why do I have a feeling that if I do manage to get it apart it is not going to go back together very easily!

Thanks for the advice!
Well this is turning into quite the adventure. I managed to find a US made carrier bearing rebuilt kit so I managed to avoid all the Chinese crap.

The two of us tried pulling the half shafts apart but we are total weaklings and while we could get it to the point to see the splines, but it would not budge any further.

So I took a strap and tied one end to one haft shaft, and parked my SUV on the other end of the strap. I then wrapped the end of HMMWV winch to the other half shaft. The winch had not trouble pulling them apart! VICTORY!

I just hope when it is time to get the half shafts back together, I can! I guess if I completely clean out all all the grease inside and outside, maybe it will go back together easily. I hope! Then I can put the grease back through the zerk.

I found this nice reference on how to replace the carrier bearing: https://flashoffroad.com/Maintenance/DriveShaft/front/frontdriveShaft.htm

Of course I did not have the proper tool to remove the carrier bearing. But after struggling with my ancient 8" 3 jaw puller, I was able to remove the carrier bearing from the shaft. The only problem is that I need to find a 1 1/4" steel or iron pipe so I can seat the new carrier bearing. Off to Ace or Lowes to see what they might have that will work.
 

FlameRed

Well-known member
Steel Soldiers Supporter
348
538
93
Location
Florida
I can really use some help with the installation of the front drive sfat carrier bearing please. The rebuild kit I got looks a bit different over the one that was on the front shaft. I tried looking at the TM's but cannot see what I need - an exploded diagram on the right way to install the carrier bearing.

I hope someone might be able to prevent me from making an expensive mistake.

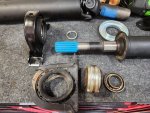
In the picture below, on top of the drive shaft is the new kit I received. The numbers are in white.
Below the drive shaft are the old the parts I pulled off, numbered in yellow.

First question - did I order the wrong carrier bearing?

If I got the right carrier bearing, here are my questions.

  • The new parts I labeled #1, #2 and #4 and placed them in them above the drive shaft.
  • The original parts I labeled #1 #2 #3 #4 and placed them below the drive shaft.
  • I left old part #1 on the drive shaft.
  • Should I pull old part #1 off the drive shaft. and replace it with new part #1? The new part has a bigger outer diameter than the old and would cover more of the carrier bearing. I am not sure if the inner diameter of the hole matches unit I pull the old part off.
  • They supplied a ring new part #2 - does that go on the right or left side of the carrier bearing?
  • Or should I just use the new carrier bearing, #4, with the old parts #1 #2 as they originally came off and I think that would be how it originally was just with that new bearing assembly.
20221023_142647.jpg

Does anyone have any insights on if the new parts are correct, and if so, the order they should be assembled?

Thank you in advance!
 
Top
AdBlock Detected

We get it, advertisements are annoying!

Sure, ad-blocking software does a great job at blocking ads, but it also blocks useful features of our website like our supporting vendors. Their ads help keep Steel Soldiers going. Please consider disabling your ad blockers for the site. Thanks!

I've Disabled AdBlock
No Thanks