• Steel Soldiers now has a few new forums, read more about it at: New Munitions Forums!

  • Microsoft MSN, Live, Hotmail, Outlook email users may not be receiving emails. We are working to resolve this issue. Please add support@steelsoldiers.com to your trusted contacts.

Air Brake Info and Troubleshooting

Oxyacetylene

Active member
Steel Soldiers Supporter
518
179
43
Location
Stoneville, NC
I wanted to share some of the information I have learned about the LMTV / FMTV air brake system. I encourage you to also share the tips/tricks/etc you have found. Please do not post troubleshooting questions in this thread, let's keep this one for sharing solutions. If you are actively troubleshooting yours, start a new thread and once we figure out the problem, we can post the relevant info here. Also a big thanks to those that have posted troubleshooting tips in other threads, it was very helpful.

Most of the air brake components are Haldex including brake chambers, valves, etc. One exception is the load sensing proportioning valve which was made by Grau. While everything has a military part number, some of those are direct civilian numbers, and some are not. Some parts can still be matched up to their civilian equivalent. Napa can order probably any Haldex parts that you have a number for. I have ordered two-way check valves and a valve rebuild kit for the tractor protection valve.

I'll start off with the two-way check valves that are used on the truck. There are at least 4 of them used on the truck. Three of them are mounted behind the driver's side step area on the backside. One of them is located at the rear close to all the other valves mounted up on the crossmember. These are Haldex KN25060. The rebuild kit is Haldex RN11V. I had a problem where air would dump from the front emergency gladhand when the parking brakes were released. There was a two way check valve with a bad diaphragm. Of the three valves behind the driver's step, it was the topmost one, the one with a sensor also plumbed into it. The diaphragm in these valves will go bad, so I would suggest going ahead and ordering a couple rebuild kits to have on-hand.
 

Oxyacetylene

Active member
Steel Soldiers Supporter
518
179
43
Location
Stoneville, NC
The brakes on these trucks are wedge brakes. One of the guys at the local Truck Pro commented that wedge brakes are obsolete now with other self-adjusting brake systems. He asked if the truck was really old and was surprised when I told him mine was a 93 model. If you are completely new to air brake systems like I was, I suggest you do some reading about how the brake chambers work, it will help quite a bit when you start troubleshooting them.

Here is a link to a Haldex catalog that lists wedge brake chambers:http://www.haldex.com/Documents/hbsna/Actuator-Spring_Brake/L00092W Actuators Catalog 2-2012.pdf

The rear chambers are a trade size 9/12, which means the inside (service) diaphragm is a trade size 9, and the outside (parking) diaphragm is a trade size 12. On these the parking brake portion is removable, although I would probably not recommend it. Due to safety concerns, the parking brake section on most new style chambers is crimped closed so you can't open it. There is info online about the dangers of the parking brake springs if you are curious. The service brake side of the chambers can be accessed, just remember to cage the brakes before you open it.

On my truck, I had and air leak in the rear when applying the service brakes (brake pedal). I was able to trace the air to the vent line that runs up to the frame rail and vents there. This pointed to a leak in the service brake diaphragm which was allowing air into the vent line. You can pick up a size 9 seal for under $10. The only caveat is that with the factory seal, the plunger piece is glued to the seal. Aftermarket seals are not made this way. So, for the cost I decided to just attach the plunger piece back to the new seal. I removed the old seal, peeled it off the plunger, scraped the plunger, wire brushed it, cleaned with alcohol, and applied contact cement. So far so good on the repair. I think there is probably a better adhesive option, but not that I could get locally to fix mine in a hurry.

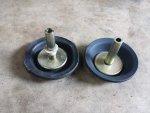
In this pic, you can see one of the factory seals on the left with the plunger attached. The plastic bushing shown has been removed from the one on the right while I was repairing it. On the right is the aftermarket seal with the plunger piece glued back to it. The factory seal was shaped so that the center was raised, the aftermarket one is not, but works just fine as far as I can tell.
2015-04-09 16.22.31.jpg
 
Last edited:

Oxyacetylene

Active member
Steel Soldiers Supporter
518
179
43
Location
Stoneville, NC
Now for the tractor protection valve. My truck developed another leak at the rear of the truck that I was able to trace to the tractor protection valve. On the top of the valve there is a bleeder, and when applying the service brakes (pedal) it would dump air out of there. The harder I pushed the pedal, the worse it was. The tractor protection valve incorporates two double check valves into the top section of the valve. One of those double check valves (diaphragm type) is what keeps air from dumping out of this bleeder. If your truck develops this same problem, and you don't want to check/rebuild the whole valve, you could easily replace the seal in this top portion with the valve on the truck and without taking any lines loose. There are just 4 torx screws holding the top plate on, as you will see in the pics. You could take that cap loose, and just replace the diaphragm and also the o-ring if needed.

I am not positive which part number the whole valve is, but it might be a KN34100. The repair kit which services several valves in this series is a RN31BC. A remanufactured valve will have an X at the end of the part number, such as KN34100X. Again, I haven't verified the valve as a complete unit, but I know the rebuild kit works.

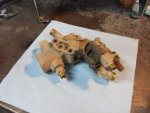
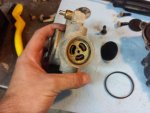
Here is the valve removed from the truck. Notice how the side cap is held on with 4 screws? The top cap is the same way. These are the two chambers that comprise the two integrated two-way check valves.
2015-05-28 19.34.03.jpg

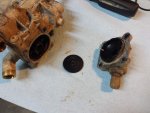
Here is the top cap removed, and the diaphragm out
2015-05-28 19.41.24.jpg

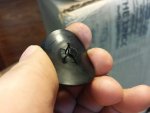
Here is the faulty diaphragm
2015-05-28 19.42.38.jpg

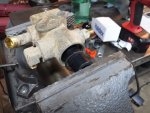
Take off the whole top portion of the valve, paying attention to the orientation of the weird looking seal with a cone on one side. Drill out the rivet holding the flimsy dust boot on the bottom of the valve. You will then see the spring retaining washer, held in with a circle clip
2015-05-28 19.52.11.jpg

To remove this retaining washer I used a socket and tightened it in the vise just enough to take the pressure off the circle clip
2015-05-28 20.12.47.jpg

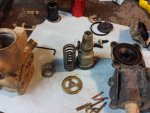
Once the spring is out, you can push out the plunger assembly, going top down. Here is the plunger assembly and spring
2015-05-28 20.04.25.jpg

Replace the seals and button everything up! After I put the spring retaining washer and circle clip back in, I used a screwdriver to move the spring inside to center it up. Might not be important but figured it wouldn't hurt.
 
Last edited:

Oxyacetylene

Active member
Steel Soldiers Supporter
518
179
43
Location
Stoneville, NC
I had a couple leaky air tank drain valves. I replaced those with Tectran 110, stock number 90076. They look almost identical and seal very well.
 
Last edited:

Oxyacetylene

Active member
Steel Soldiers Supporter
518
179
43
Location
Stoneville, NC
The park brake dash valve is a Haldex KN20035. The trailer dash valve is a Haldex KN20025. On these first generation trucks those two valves are separate. On newer trucks they are integrated into a single valve assembly which is also serviceable. Maybe one day I will swap out the two individual valves for this single valve setup, I like the idea of being able to service it.
 

Suprman

Well-known member
Supporting Vendor
6,861
696
113
Location
Stratford/Connecticut
The front gladhands are for towing only not supply like on the M939 trucks. If you look on the cover it has a vent on each same as axle vents. If the vents are clogged or if some bug nests in there and it cant breathe, this can cause the brakes to not release. Behind the front grill is a small valve this also can go bad and not allow the brakes to release.
 

tennmogger

Well-known member
Steel Soldiers Supporter
1,579
543
113
Location
Greenback, TN
Copied from another thread to consolidate information:

Haven't found info on a rebuild kit for Wabco 461-315-161-0 treadle valve yet. Several local auto parts places and a big truck repair place don't find reference to any kit. The big-trucks guy speculated the treadle valve is critical enough that a new, certified valve might be all that is available.

Anyway, I took apart the treadle valve again, cleaned again, and got it working fine. The guts look like new, o-rings pliable, and face seals just fine. I had just found a tiny pile of sand in there and one chunk caught in a face seal. That's what dumped my air.

Here are some notes if you suspect trouble with the treadle valve. First, the vent for it is in the center of the front of the truck, in front of the radiator, and you can touch it with your fingers if you take off the grill and reach upward. It vents downward. But, reaching it won't help a bit! (Overdrive may post his photo here, if not see post 59, http://www.steelsoldiers.com/showthread.php?154348-LMTV-air-brake-problems/page6 )

Physically tracing the source of the hose to that 'leak' is impossible....can't get to it, it's back behind the heater. Just know that that vent comes from the treadle valve. The hose to the vent comes off the treadle valve on it's rear, the side nearest the driver, and nearest to the steering column. The thin-walled vent hose is a press fit, and can be removed by hand. Pull the hose off and now the vent is right there under the steering column where you can hear it. If you heard air escaping up front, you will heard it there at the treadle valve.

This is where the swoosh of air comes from when the brakes are dumped.

A leak through the treadle manifests as air coming out that vent. As air flows there then air will be flowing through the brake controller on the dash. It can sound like the (yellow knobbed) control is leaking, it vents there too).

The leak can be on either of the two circuits of the treadle valve, front or rear, and it can make a huge difference on repair effort as to which is leaking. My initial leak was on the rearward section and that is the tough one to work on, but it can be done without removal.

Testing which section is leaking: First, a numbering convention is needed. There are four tubes coming out the left side of the treadle valve. As you look at them from standing beside the drivers floorboard, I called them 1, 2, 3, 4, just as read from top left to lower right.

1 and 2 are input hoses and have truck air on them. If you remove the lower two, 3 and 4, those go to the brakes and have zero pressure if not actuated. If pressure is coming out of either of those hoses (hose side) it's feedback from the brake system, and something leaking elsewhere, not the treadle.

If there's air coming out of the ports 3 or 4 then the treadle valve is leaking. My initial failure was air leaking out of port 3 (caused by the gravel in the face seal). My second failure was leakage coming out of port 4, the other face valve leaking.

If your leak is out number 4 then removal of just the most accessible half of the treadle valve is required. Disconnect the pressure sensor, take out 4 bolts holding the two halves of the treadle valve together, and work it loose. Note o-ring seal.

Take apart this half of the assembly with retainer clip pliers, being ready for strong spring pressure(!!!). Disassemble, clean out junk, lube, and reassemble.

It's a good idea to remove both hoses 1 and 2, build truck air, and let those hoses blow all the crud out of the lines before reattaching everything.

That how I got my brakes going.
 

tennmogger

Well-known member
Steel Soldiers Supporter
1,579
543
113
Location
Greenback, TN
Found the source of a couple more air leaks that I'll describe here. Look at TM 9-2320-365-34-1, Figure FO-2 pneumatic system schematic. Air was leaking from the front emergency gladhand. The nearest component in line behind the gladhand is a one-way valve. To get to it, must remove front guard below the bumper. That valve had some dirt in it. It is a Velvac 320014. I bought some spares. However it is easily cleanable by using a pair of large wrenches to unscrew the two halves apart. If the valve disc is not damaged and the spring is still good, there's no reason not to reuse those parts after cleaning. No rubber diaphragms to worry about.

The leak was still there, leading to another component on the other leg of the "Y" behind the E gladhand, a two-way check valve located inside the fender on the drivers side. If you jack up the cab and sit on the left front tire you can lean forward and reach this component (and some more valves described later). This valve has the low pressure switch attached to it. Of the three air valve thingies on that fender, this is the upper one. Look for the pressure switch as a dead give-away. I put a new valve in. This valve is encumbered with four air lines, and a 'T' so mark them well. One trick on this valve is to remove all the lines, take out the retaining bolt, then unscrew the pressure switch by holding the switch steady and unscrewing the whole valve. This way you do not have to remove the abundant RTV found (on mine anyway) on the electrical connections. Reinstall by screwing the valve back onto the switch first, etc.

Note that in spite of the rule to never plug a gladhand, the front emergency gladhand apparently can be. I had done that as a get-me-home measure and drove it that way for an unrevealed long time. Looking at the schematic, the front gladhand is isolated from outward flowing air by two devices, the one-way valve I cleaned out, and the two-way valve I replaced. BOTH those components were leaking air out my front E gladhand. If both are working properly and with no air being forced inward, they behave exactly as a plug on the E gladhand.

The second air leak was coming from the quick release valve for both front brakes. It is located behind the same front shield under the bumper, but on the drivers side. A tiny amount of air was coming out of the vent all the time. I could not hear it but my daughter could. If possible, get a younger, non-deaf person to help with troubleshooting. The area involved with the vent on the bottom side of the QRV makes it impossible to detect that leak with soapy water.

With that QRV off, I could blow air through any port and it would come out the vent. Bad rubber diaphragm. This QRV (quick release valve) on my truck was a Midland N50009. This is the same as a Haldex KN32005, can be picked up at NAPA ($15), and that's what I put in. On my truck this was a plastic valve and not serviceable. Finditparts has the Haldex KN32005 for $7.58, plus shipping. I find that a remarkable price!!!! and bought some spares.

My air system was then staying pressurized for 5 or 6 hours and I was almost happy. But, leave it overnight and that obnoxious warning buzzer would still come on the next day. So I asked my daughter to listen again, and she found a small leak from one of the input air lines to the treadle valve up under the dash. I could not see any bubbles, but she heard it. A few turns on the ferrule nut and that leak was gone. My LMTV air system will now stay steady for over 48 hours at least!

Bob
 
Last edited:

Rene M

New member
201
2
0
Location
Houston, Texas
Now for the tractor protection valve. My truck developed another leak at the rear of the truck that I was able to trace to the tractor protection valve. On the top of the valve there is a bleeder, and when applying the service brakes (pedal) it would dump air out of there. The harder I pushed the pedal, the worse it was. The tractor protection valve incorporates two double check valves into the top section of the valve. One of those double check valves (diaphragm type) is what keeps air from dumping out of this bleeder. If your truck develops this same problem, and you don't want to check/rebuild the whole valve, you could easily replace the seal in this top portion with the valve on the truck and without taking any lines loose. There are just 4 torx screws holding the top plate on, as you will see in the pics. You could take that cap loose, and just replace the diaphragm and also the o-ring if needed.

I am not positive which part number the whole valve is, but it might be a KN34100. The repair kit which services several valves in this series is a RN31BC. A remanufactured valve will have an X at the end of the part number, such as KN34100X. Again, I haven't verified the valve as a complete unit, but I know the rebuild kit works.

Here is the valve removed from the truck. Notice how the side cap is held on with 4 screws? The top cap is the same way. These are the two chambers that comprise the two integrated two-way check valves.
View attachment 562127

Here is the top cap removed, and the diaphragm out
View attachment 562128

Here is the faulty diaphragm
View attachment 562129

Take off the whole top portion of the valve, paying attention to the orientation of the weird looking seal with a cone on one side. Drill out the rivet holding the flimsy dust boot on the bottom of the valve. You will then see the spring retaining washer, held in with a circle clip
View attachment 562130

To remove this retaining washer I used a socket and tightened it in the vise just enough to take the pressure off the circle clip
View attachment 562131

Once the spring is out, you can push out the plunger assembly, going top down. Here is the plunger assembly and spring
View attachment 562135

Replace the seals and button everything up! After I put the spring retaining washer and circle clip back in, I used a screwdriver to move the spring inside to center it up. Might not be important but figured it wouldn't hurt.


Strange as that is a valve found almost always on a trailer or a tractor with a hand brake?
 

Rene M

New member
201
2
0
Location
Houston, Texas
Your buddy at Truck pro is wrong. The reason wedge brakes were used is at that time they were the only air brakes that WERE self adjusting. Auto slack adjusters are just now " last 5 years" actually reliable.


The brakes on these trucks are wedge brakes. One of the guys at the local Truck Pro commented that wedge brakes are obsolete now with other self-adjusting brake systems. He asked if the truck was really old and was surprised when I told him mine was a 93 model. If you are completely new toair brake systems like I was, I suggest you do some reading about how the brake chambers work, it will help quite a bit when you start troubleshooting them.
 

Rene M

New member
201
2
0
Location
Houston, Texas
New Tractor protection valve replacement is a Midland KN34110 part number.


Copied from another thread to consolidate information:

Haven't found info on a rebuild kit for Wabco 461-315-161-0 treadle valve yet. Several local auto parts places and a big truck repair place don't find reference to any kit. The big-trucks guy speculated the treadle valve is critical enough that a new, certified valve might be all that is available.

Anyway, I took apart the treadle valve again, cleaned again, and got it working fine. The guts look like new, o-rings pliable, and face seals just fine. I had just found a tiny pile of sand in there and one chunk caught in a face seal. That's what dumped my air.

Here are some notes if you suspect trouble with the treadle valve. First, the vent for it is in the center of the front of the truck, in front of the radiator, and you can touch it with your fingers if you take off the grill and reach upward. It vents downward. But, reaching it won't help a bit! (Overdrive may post his photo here, if not see post 59, http://www.steelsoldiers.com/showthread.php?154348-LMTV-air-brake-problems/page6 )

Physically tracing the source of the hose to that 'leak' is impossible....can't get to it, it's back behind the heater. Just know that that vent comes from the treadle valve. The hose to the vent comes off the treadle valve on it's rear, the side nearest the driver, and nearest to the steering column. The thin-walled vent hose is a press fit, and can be removed by hand. Pull the hose off and now the vent is right there under the steering column where you can hear it. If you heard air escaping up front, you will heard it there at the treadle valve.

This is where the swoosh of air comes from when the brakes are dumped.

A leak through the treadle manifests as air coming out that vent. As air flows there then air will be flowing through the brake controller on the dash. It can sound like the (yellow knobbed) control is leaking, it vents there too).

The leak can be on either of the two circuits of the treadle valve, front or rear, and it can make a huge difference on repair effort as to which is leaking. My initial leak was on the rearward section and that is the tough one to work on, but it can be done without removal.

Testing which section is leaking: First, a numbering convention is needed. There are four tubes coming out the left side of the treadle valve. As you look at them from standing beside the drivers floorboard, I called them 1, 2, 3, 4, just as read from top left to lower right.

1 and 2 are input hoses and have truck air on them. If you remove the lower two, 3 and 4, those go to the brakes and have zero pressure if not actuated. If pressure is coming out of either of those hoses (hose side) it's feedback from the brake system, and something leaking elsewhere, not the treadle.

If there's air coming out of the ports 3 or 4 then the treadle valve is leaking. My initial failure was air leaking out of port 3 (caused by the gravel in the face seal). My second failure was leakage coming out of port 4, the other face valve leaking.

If your leak is out number 4 then removal of just the most accessible half of the treadle valve is required. Disconnect the pressure sensor, take out 4 bolts holding the two halves of the treadle valve together, and work it loose. Note o-ring seal.

Take apart this half of the assembly with retainer clip pliers, being ready for strong spring pressure(!!!). Disassemble, clean out junk, lube, and reassemble.

It's a good idea to remove both hoses 1 and 2, build truck air, and let those hoses blow all the crud out of the lines before reattaching everything.

That how I got my brakes going.
 

Oxyacetylene

Active member
Steel Soldiers Supporter
518
179
43
Location
Stoneville, NC
My truck finally developed another air brake leak. This time when applying the service brakes (pedal) air was exhausting from the front Service gladhand. The harder I pressed the pedal, the more air escaped. As you can imagine the truck would quickly lose air pressure. The problem was once again one of those two way check valves mounted behind the driver's step. This time it was the bottom one of the three, which is the one I had not replaced. As posted above, the check valve is a Haldex KN25060 and the rebuild kit is RN11V. The rebuild kits cost at least $15 each plus shipping, and you can buy a whole new valve at Napa for about $30 plus tax. Napa couldn't give me an estimate on how long it would take to order the rebuild kit from Haldex and they generally stock the whole valve. Once you factor in shipping and availability of the rebuild kit, you might as well just get a whole new valve...or at least that's what I did again. Since the valves contain a rubber diaphragm, buying an old stock valve might result in a shorter service life of the valve if the rubber has started to deteriorate. Maybe it doesn't make a difference. With that being said, I just picked up one on eBay that is NOS to keep as a spare.

Here's a few pictures of the CARC/dirt covered old valve, and the inside. You can see the crack in the diaphragm. The diaphragm in these valves is not the same size as what is used in the tractor protection valve, in case you were wondering and thinking you could buy cheaper diaphragms for that valve by buying the RN11V rebuild kit.
2017-06-12 20.06.46.jpg2017-06-12 20.07.12.jpg2017-06-12 20.09.26.jpg

This last picture is all three valves mounted behind the driver's step. Note that in the picture they appear to be in a horizontal row, but that is because the cab is tilted all the way forward. The one replaced this time was the bottom/left valve.
2017-06-12 20.03.01.jpg
 

Reworked LMTV

Expedition Campers Limited, LLC
Supporting Vendor
1,507
1,175
113
Location
TN
Now for the tractor protection valve. My truck developed another leak at the rear of the truck that I was able to trace to the tractor protection valve. On the top of the valve there is a bleeder, and when applying the service brakes (pedal) it would dump air out of there. The harder I pushed the pedal, the worse it was. The tractor protection valve incorporates two double check valves into the top section of the valve. One of those double check valves (diaphragm type) is what keeps air from dumping out of this bleeder. If your truck develops this same problem, and you don't want to check/rebuild the whole valve, you could easily replace the seal in this top portion with the valve on the truck and without taking any lines loose. There are just 4 torx screws holding the top plate on, as you will see in the pics. You could take that cap loose, and just replace the diaphragm and also the o-ring if needed.

I am not positive which part number the whole valve is, but it might be a KN34100. The repair kit which services several valves in this series is a RN31BC. A remanufactured valve will have an X at the end of the part number, such as KN34100X. Again, I haven't verified the valve as a complete unit, but I know the rebuild kit works.

Here is the valve removed from the truck. Notice how the side cap is held on with 4 screws? The top cap is the same way. These are the two chambers that comprise the two integrated two-way check valves.
View attachment 562127

Here is the top cap removed, and the diaphragm out
View attachment 562128

Here is the faulty diaphragm
View attachment 562129

Take off the whole top portion of the valve, paying attention to the orientation of the weird looking seal with a cone on one side. Drill out the rivet holding the flimsy dust boot on the bottom of the valve. You will then see the spring retaining washer, held in with a circle clip
View attachment 562130

To remove this retaining washer I used a socket and tightened it in the vise just enough to take the pressure off the circle clip
View attachment 562131

Once the spring is out, you can push out the plunger assembly, going top down. Here is the plunger assembly and spring
View attachment 562135

Replace the seals and button everything up! After I put the spring retaining washer and circle clip back in, I used a screwdriver to move the spring inside to center it up. Might not be important but figured it wouldn't hurt.
I found some sort of lubrication in my tractor valve, did you? Did you use any lubrication? Me thinks someone went under truck and injected something in the exhaust port to free it.
 

TNriverjet

Active member
Steel Soldiers Supporter
1,172
24
38
Location
Clifton, TN
A failing compressor can allow excessive oil into air lines and contaminate the system. I'm not sure if this will purge through the air dryer or just clog up the system.

There is an alcohol based liquid put in the system in colder climates to keep ice from forming, but it has no lube in it.

Which air dryer do you have? I'm getting ready to install the newer Haldex Pure EST unit in place of the original finned canister unit.
 

Reworked LMTV

Expedition Campers Limited, LLC
Supporting Vendor
1,507
1,175
113
Location
TN
Now for the tractor protection valve. My truck developed another leak at the rear of the truck that I was able to trace to the tractor protection valve. On the top of the valve there is a bleeder, and when applying the service brakes (pedal) it would dump air out of there. The harder I pushed the pedal, the worse it was. The tractor protection valve incorporates two double check valves into the top section of the valve. One of those double check valves (diaphragm type) is what keeps air from dumping out of this bleeder. If your truck develops this same problem, and you don't want to check/rebuild the whole valve, you could easily replace the seal in this top portion with the valve on the truck and without taking any lines loose. There are just 4 torx screws holding the top plate on, as you will see in the pics. You could take that cap loose, and just replace the diaphragm and also the o-ring if needed.

I am not positive which part number the whole valve is, but it might be a KN34100. The repair kit which services several valves in this series is a RN31BC. A remanufactured valve will have an X at the end of the part number, such as KN34100X. Again, I haven't verified the valve as a complete unit, but I know the rebuild kit works.

Here is the valve removed from the truck. Notice how the side cap is held on with 4 screws? The top cap is the same way. These are the two chambers that comprise the two integrated two-way check valves.
View attachment 562127

Here is the top cap removed, and the diaphragm out
View attachment 562128

Here is the faulty diaphragm
View attachment 562129

Take off the whole top portion of the valve, paying attention to the orientation of the weird looking seal with a cone on one side. Drill out the rivet holding the flimsy dust boot on the bottom of the valve. You will then see the spring retaining washer, held in with a circle clip
View attachment 562130

To remove this retaining washer I used a socket and tightened it in the vise just enough to take the pressure off the circle clip
View attachment 562131

Once the spring is out, you can push out the plunger assembly, going top down. Here is the plunger assembly and spring
View attachment 562135

Replace the seals and button everything up! After I put the spring retaining washer and circle clip back in, I used a screwdriver to move the spring inside to center it up. Might not be important but figured it wouldn't hurt.
In regard to picture 2015-05-28 20.04.25.jpg Attachment 562135, Does the pointed portion of the rubber valve goes towards the metal portion of the valve (with the sunburst cut) or toward the black plastic cap portion ?
 

Reworked LMTV

Expedition Campers Limited, LLC
Supporting Vendor
1,507
1,175
113
Location
TN
A failing compressor can allow excessive oil into air lines and contaminate the system. I'm not sure if this will purge through the air dryer or just clog up the system.

There is an alcohol based liquid put in the system in colder climates to keep ice from forming, but it has no lube in it.

Which air dryer do you have? I'm getting ready to install the newer Haldex Pure EST unit in place of the original finned canister unit.
It actually looked like O ring lube and possibly something red? I believe that these got lubed by techs when they stuck. Just a hunch. I have figured out why the valves with vents go bad. The thin plastic flapper valve distorts with time and heat and stays open and allows dirt to enter the system. My Haldex drier is the brand new updated version.
 
Last edited:

Smokinyoda

Member
657
8
18
Location
Franklin, NC
I just had to replace a leaking spring brake diaphragm on a 96 1078 and ordered a size 12 per your post. Imagine my surprise when I went to pick it up and it was to small. Not sure why but my truck takes a trade size 16 for spring brake diaphragm. Just wanted to put that out there in case someone else has issues with 12 not fitting.

The brakes on these trucks are wedge brakes. One of the guys at the local Truck Pro commented that wedge brakes are obsolete now with other self-adjusting brake systems. He asked if the truck was really old and was surprised when I told him mine was a 93 model. If you are completely new to air brake systems like I was, I suggest you do some reading about how the brake chambers work, it will help quite a bit when you start troubleshooting them.

Here is a link to a Haldex catalog that lists wedge brake chambers:http://www.haldex.com/Documents/hbsna/Actuator-Spring_Brake/L00092W Actuators Catalog 2-2012.pdf

The rear chambers are a trade size 9/12, which means the inside (service) diaphragm is a trade size 9, and the outside (parking) diaphragm is a trade size 12. On these the parking brake portion is removable, although I would probably not recommend it. Due to safety concerns, the parking brake section on most new style chambers is crimped closed so you can't open it. There is info online about the dangers of the parking brake springs if you are curious. The service brake side of the chambers can be accessed, just remember to cage the brakes before you open it.

On my truck, I had and air leak in the rear when applying the service brakes (brake pedal). I was able to trace the air to the vent line that runs up to the frame rail and vents there. This pointed to a leak in the service brake diaphragm which was allowing air into the vent line. You can pick up a size 9 seal for under $10. The only caveat is that with the factory seal, the plunger piece is glued to the seal. Aftermarket seals are not made this way. So, for the cost I decided to just attach the plunger piece back to the new seal. I removed the old seal, peeled it off the plunger, scraped the plunger, wire brushed it, cleaned with alcohol, and applied contact cement. So far so good on the repair. I think there is probably a better adhesive option, but not that I could get locally to fix mine in a hurry.

In this pic, you can see one of the factory seals on the left with the plunger attached. The plastic bushing shown has been removed from the one on the right while I was repairing it. On the right is the aftermarket seal with the plunger piece glued back to it. The factory seal was shaped so that the center was raised, the aftermarket one is not, but works just fine as far as I can tell.
View attachment 562126
 
Top
AdBlock Detected

We get it, advertisements are annoying!

Sure, ad-blocking software does a great job at blocking ads, but it also blocks useful features of our website like our supporting vendors. Their ads help keep Steel Soldiers going. Please consider disabling your ad blockers for the site. Thanks!

I've Disabled AdBlock
No Thanks