• Steel Soldiers now has a few new forums, read more about it at: New Munitions Forums!

  • Microsoft MSN, Live, Hotmail, Outlook email users may not be receiving emails. We are working to resolve this issue. Please add support@steelsoldiers.com to your trusted contacts.

Air Dryer for an M35A2

gimpyrobb

dumpsterlandingfromorbit!
27,786
755
113
Location
Cincy Ohio
I thought the heater was to dry out the descant, and the control port (via the governor) controlled when the air dryer ran.
No, it keeps the water from freezing in the winter. Can't blow the water out if its frozeded.

When the governor sends out the signal to "turn off air" thats when the air drier expels the collected water.
 

rustystud

Well-known member
9,280
2,987
113
Location
Woodinville, Washington
No, it keeps the water from freezing in the winter. Can't blow the water out if its frozeded.

When the governor sends out the signal to "turn off air" thats when the air drier expels the collected water.
Exactly, and if you keep the heater unit on all the time you will burn it out very soon. The stupid things costs almost $50.00 so you don't want to have to replace that thing every year.
 

rustystud

Well-known member
9,280
2,987
113
Location
Woodinville, Washington
Just thinking about it, so I looked in the service manual and it should have a built-in thermostat. Just hook it to a circuit that has a fuse in it.
 
Last edited:

Valence

Well-known member
Steel Soldiers Supporter
2,112
555
113
Location
Davis County, UT
Thanks rustystud and m-35tom!

Question:
I ran the deuce, checked for air leaks (was a small leak on the air brake line leading from the governor, but that only required me to seat the line better) otherwise I didn't find any (soapy water test). The air system took noticeably longer to come up to pressure (I assume because it's basically adding another reservoir to the truck).

However, I went on a 60 mile drive and the I could quite easily hear the air-dryer expel/vent about once per minute. I counted ("1-one-thousand, 2-one-thousand..." etc) about a dozen times and it was very regular. After it'd expel, ~30 seconds later and I could hear that valve fully seal (kind of like a "sip" or "slurp" sound), then ~30 seconds after that a large expel.

I thought it was only suppose to do that every time the air compressor quit running? ( you know controlled via the governor). I have air assist steering but I was driving down pretty straight roads, constant motion, not stop-and-go traffic, and the intervals were far too regular. While driving I've been able to hear my air compressor cycle before (I wasn't able to tonight over the air dryer "breathing"), but the air compressor never ran THAT frequently before w/o lots of braking or turning. Is this normal behavior for an air dryer?
 

rustystud

Well-known member
9,280
2,987
113
Location
Woodinville, Washington
Thanks rustystud and m-35tom!

Question:
I ran the deuce, checked for air leaks (was a small leak on the air brake line leading from the governor, but that only required me to seat the line better) otherwise I didn't find any (soapy water test). The air system took noticeably longer to come up to pressure (I assume because it's basically adding another reservoir to the truck).

However, I went on a 60 mile drive and the I could quite easily hear the air-dryer expel/vent about once per minute. I counted ("1-one-thousand, 2-one-thousand..." etc) about a dozen times and it was very regular. After it'd expel, ~30 seconds later and I could hear that valve fully seal (kind of like a "sip" or "slurp" sound), then ~30 seconds after that a large expel.

I thought it was only suppose to do that every time the air compressor quit running? ( you know controlled via the governor). I have air assist steering but I was driving down pretty straight roads, constant motion, not stop-and-go traffic, and the intervals were far too regular. While driving I've been able to hear my air compressor cycle before (I wasn't able to tonight over the air dryer "breathing"), but the air compressor never ran THAT frequently before w/o lots of braking or turning. Is this normal behavior for an air dryer?
The air-dryer only vents when it gets it signal from the governor valve. Are you sure your not using air somewhere ? Have you watched the air gauge to be sure your not drawing down the air system ? If the compressor is totally off ( unloaders on) then you might have a problem in the air-dryer. I would take off the purge-valve assembly ( take the 3 bolts around the vent out and pry out the assembly) and make sure it has all it's 'O' rings on. It should have three 'O' rings, each larger then the other. There are some older models that have only two 'O' rings but you shouldn't have that. I will post a picture of what it should look like.
 

Valence

Well-known member
Steel Soldiers Supporter
2,112
555
113
Location
Davis County, UT
The air-dryer only vents when it gets it signal from the governor valve. Are you sure your not using air somewhere ? Have you watched the air gauge to be sure your not drawing down the air system ? If the compressor is totally off ( unloaders on) then you might have a problem in the air-dryer. I would take off the purge-valve assembly ( take the 3 bolts around the vent out and pry out the assembly) and make sure it has all it's 'O' rings on. It should have three 'O' rings, each larger then the other. There are some older models that have only two 'O' rings but you shouldn't have that. I will post a picture of what it should look like.
The air gauge was over 90, near 100 PSI, and as far as I could tell (while also still driving), wasn't moving.

Thank you rustystud. I will disconnect the system in the morning before further driving until I can pull the purge-valve assembly.
 

rustystud

Well-known member
9,280
2,987
113
Location
Woodinville, Washington
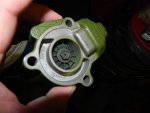
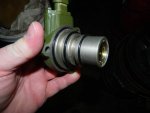
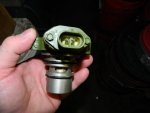
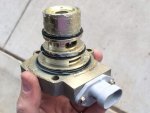
049.jpg051.jpg050.jpg052.jpg OK, I went down to the shop and got some pictures. Picture one shows the end that you will see when looking up at the air-dryer. There should be a stamp-steel housing on it with a round hole. Take the three bolts out and gently pry on the edges to remove it. In the second picture you can see the 'O' rings. On a side note, picture three shows the heating system connector. If you find a Bendix "AD-9" dryer but it is a 12 volt unit, you can buy this purge valve assembly in 24 volts and just replace it. If your really lucky you can find and replace the heater unit itself. You can see the two small bolts that hold it in. Once the bolts are removed you can "gently" pry it out and then install the heater unit from a 24 volt unit. I have yet to find a supplier that just sells the heater unit itself though. At work since we are a government agency we deal directly with " Haldex-Bendix" and they will sell us the heater units separately.
In picture four you see my "guards" on duty. I was forced to bribe them to allow me to pass !
 
Last edited:

rustystud

Well-known member
9,280
2,987
113
Location
Woodinville, Washington
Your cut-out pressure should be at 120psi, so if your not reaching it then you might have another problem. Unless your governor is set to 100psi which I have seen on our trucks before. It should be set to 120psi though.
 

Valence

Well-known member
Steel Soldiers Supporter
2,112
555
113
Location
Davis County, UT
You are a scholar and a gentleman! Thanks for the pictures. I'll report back what I find in there (probably a few days to be honest).

However, you've piqued my interest about the governor shutoff. I've not given it a lot of thought. But I have had passing thoughts wondering why it didn't pressurize to 120psi, but I just chalked it up to unknowable "safety" factors and inaccuracies of the gauge. I'll have a co-pilot tomorrow so I can get a second opinion on its reading though. ;). I thinking it does shut off at 100. I'll get pics too (of course!).


Cute cats by the way. They look like siblings. My mamma always told me, anyone who likes animals has got to be a good person. ;)
 

Valence

Well-known member
Steel Soldiers Supporter
2,112
555
113
Location
Davis County, UT
Reporting back on my air pressure governor. Nope. Cuts off at 120 PSI. My view angle from the driver's seat always made me think it was a little less.
 

Valence

Well-known member
Steel Soldiers Supporter
2,112
555
113
Location
Davis County, UT
No, I disconnected it and returned the air system back to stock configuration until I could pull the parts you showed.
 

Valence

Well-known member
Steel Soldiers Supporter
2,112
555
113
Location
Davis County, UT
View attachment 574172View attachment 574173View attachment 574174View attachment 574175 OK, I went down to the shop and got some pictures. Picture one shows the end that you will see when looking up at the air-dryer. There should be a stamp-steel housing on it with a round hole. Take the three bolts out and gently pry on the edges to remove it. In the second picture you can see the 'O' rings. On a side note, picture three shows the heating system connector. If you find a Bendix "AD-9" dryer but it is a 12 volt unit, you can buy this purge valve assembly in 24 volts and just replace it. If your really lucky you can find and replace the heater unit itself. You can see the two small bolts that hold it in. Once the bolts are removed you can "gently" pry it out and then install the heater unit from a 24 volt unit. I have yet to find a supplier that just sells the heater unit itself though. At work since we are a government agency we deal directly with " Haldex-Bendix" and they will sell us the heater units separately.
In picture four you see my "guards" on duty. I was forced to bribe them to allow me to pass !

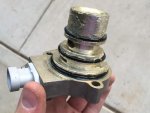
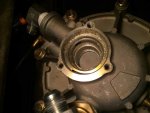
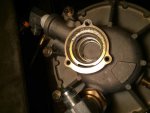
Finally pulled this off my air dryer. All 3 o-rings are there, but it is also covered in what appears to be dialectic grease too? I thought that was odd.

image.jpg image.jpg image.jpg image.jpg
 
Last edited:

rustystud

Well-known member
9,280
2,987
113
Location
Woodinville, Washington
When holding it in the first picture position, try and push on the center button on top. I should move about 1/2" in and bounce back. Make sure it moves freely not "catching" on anything. The spring pressure should be pretty hard also.
 

Valence

Well-known member
Steel Soldiers Supporter
2,112
555
113
Location
Davis County, UT
When holding it in the first picture position, try and push on the center button on top. I should move about 1/2" in and bounce back. Make sure it moves freely not "catching" on anything. The spring pressure should be pretty hard also.
Thanks rustystud for your continued help.

In the very center there is a rubber diaphragm of sorts which has a little bit of flex. But the whole metal center section does move freely. It did not seem to obviously catch on anything and was not easy to move.

Here's a pointless video I took ;)
(no, I'm not poking the rubber very hard with the phillips screw driver, just trying to show it does flex too)
https://www.youtube.com/watch?v=AHntLARCmuQ
 

rustystud

Well-known member
9,280
2,987
113
Location
Woodinville, Washington
Thanks rustystud for your continued help.

In the very center there is a rubber diaphragm of sorts which has a little bit of flex. But the whole metal center section does move freely. It did not seem to obviously catch on anything and was not easy to move.

Here's a pointless video I took ;)
(no, I'm not poking the rubber very hard with the phillips screw driver, just trying to show it does flex too)
https://www.youtube.com/watch?v=AHntLARCmuQ
It appears fine, but I was wondering about those lateral wear marks in the piston bore. Was this a rebuilt unit ? That grease is a special Moly grease that is impervious to water, though they really went to town on the amount used. That is another reason I am thinking this is a rebuilt unit. New units come with just the proper amount of grease on them (read the companies are cheap and don't want to waste money ! ). Also the color is a little off. The correct color for that grease is a slight pink. The next step is to take the "spitter" valve assembly apart. That is the valve your holding. On the bottom of that piston you where pushing on you will see 2 cut outs. Put a small piece of steel in them (from side to side) to hold it, then from the top using a 3/8" socket, take off that nut. The piston assembly will come out then. The piston should have a "square cut" 'O'ring on it. If it doesn't that would explain the constant leaking.
 
Top
AdBlock Detected

We get it, advertisements are annoying!

Sure, ad-blocking software does a great job at blocking ads, but it also blocks useful features of our website like our supporting vendors. Their ads help keep Steel Soldiers going. Please consider disabling your ad blockers for the site. Thanks!

I've Disabled AdBlock
No Thanks