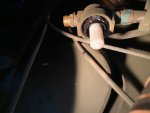
1990 M925A2 New to me truck about a week ago. Seller told me CTIS worked but doesn't appear to. First the Hwy button blinks and then all the buttons blink but haven't had any issues until yesterday I got to work and all the tires were low. Manually aired all to 65psi. On my way home there was clicking and air solenoid type noises around the winch control tower. Noticed tires were airing down again while on the road. Got home and tires were very low, Heard air leak under dash coming from what looks like a small dryer? Has one red hose going out the firewall and under truck, and a Green hose that goes into the winch tower (may curve around somewhere else) Does anyone know what this is? It's leaking from the bottom hole and I thought a cap was missing but there is paint on the threads so doesn't look to have had anything on it. I'll take it apart today after work to investigate further. Thanks!