• Steel Soldiers now has a few new forums, read more about it at: New Munitions Forums!

  • Microsoft MSN, Live, Hotmail, Outlook email users may not be receiving emails. We are working to resolve this issue. Please add support@steelsoldiers.com to your trusted contacts.


Artisan's M916

WillWagner

The Person You Were Warned About As A Child
Super Moderator
Steel Soldiers Supporter
8,370
2,326
113
Location
Monrovia, Ca.
A second cap could mean a second water intrusion point. If it were me, I would pull the tank...you'll probably want to pull it to cut/weld the 2nd neck on it any how and they come out fast when empty....and take it here.

Stanton Radiator
10645 Beach Blvd, Stanton, CA 90680

Phone: (714) 527-5894

I think Delbert still works there

They can clean it out and the paint will stay in tact. They did my Deuce radiator, built many cooling stacks for some of the repowers I did at Cummins, fixed the cooling packages that the engineers at Cummins designed all FUBAR, and they worked! And repaired many radiators for the place I worked for. They will even come pick it up...well, they used to anywho.

If you want help dropping it, call me. I work for beer!
 

Artisan

Well-known member
2,762
227
63
Location
CDA Idaho
A second cap could mean a second water intrusion point. If it were me, I would pull the tank...you'll probably want to pull it to cut/weld the 2nd neck on it any how and they come out fast when empty....and take it here.

Stanton Radiator
10645 Beach Blvd, Stanton, CA 90680

Phone: (714) 527-5894

I think Delbert still works there

They can clean it out and the paint will stay in tact. They did my Deuce radiator, built many cooling stacks for some of the repowers I did at Cummins, fixed the cooling packages that the engineers at Cummins designed all FUBAR, and they worked! And repaired many radiators for the place I worked for. They will even come pick it up...well, they used to anywho.

If you want help dropping it, call me. I work for beer!
THANK YOU WIll...

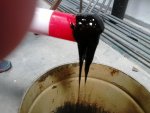
I have been experimenting and I have found that Alcohol cuts that nasty syrup that I still
believe are Asphaltenes. I ordered another 4" Aluminum filler neck and a locking non-vented
fuel cap and I have a welder bro who works for SpaceX that will weld it in for me.
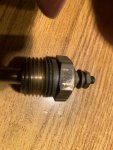
Here is where I got the filler neck and locking non vented cap from; 4" NPSL Aluminum Neck – Boyd Welding LLC (fueltankparts.com)

( I have hence learned that Xylene and Toluene "should" cut that Syrup / Asphaltenes as well )

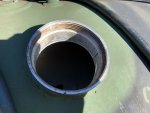
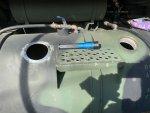
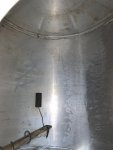
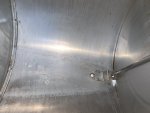
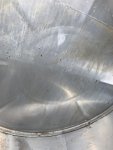
There is a baffle that splits the tank so there is no way to get to the front half of the tank.
I will be adding that clean out / filler neck. SEE PIC w/ baffle on left!

Back to Alcohol.
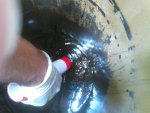
I dumped 1/2 a gallon of 70% Isopropyl Alcohol in the empty tank and SEALED the tank and walked away for 24 hours.
When I opened it, I saw the sludge / syrup had coagulated in the bottom of the tank and rolled off the sides!
Hey I am onto something here. Just the fumes seemed to make a reaction! There was some syrup on the chain
that hangs from the fuel cap and THAT syrup was breaking down too w/o touching the liquid alcohol.
(Note the Sun hit the tank making it hot, I am SURE that helped)

If I could get my paws down there I could scrap it up w/ a blade or putty
knife of sorts but it is impossible. My biceps are kinda big. So I fumbled around and did the stick w/ rag
on the end thing w/ little success. I drained down the alcohol getting more of that crap out and put in another
1/2 gallon of alcohol and walked away again. After 24hrs opened to same results. This time I dreamed
up dropping in a thick cotton type / bath towel type mop head w/ paracord tied to (for retrieval) and w/ the 1/2
gallon of alcohol still in it, using a piece of 1/2" EMT, I got busy scrubbing and it worked pretty darn good.

So I am onto to method of cleaning it's just tedious. I found some 99% Isopropyl Alcohol and ordered up
4 gallons of it. This is a TOUGH job... Even if I brought it to Stanton Radiator they can not gain access
to the front half of the tank because of that massive baffle.

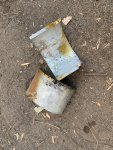
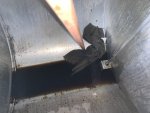
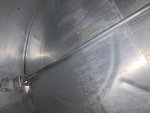
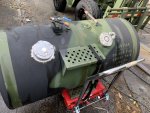
If you guys have this problem I found that shortening the OE welded in filler neck w/ a 2.5"
metal cutting wheel was absolutely beneficial. Here are pics of the after and the pieces I fished
out of the tank. Use a sawzall to slice 2 times BEFORE you use the wheel so you can fish it out.

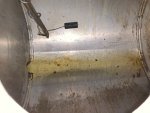
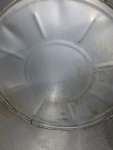
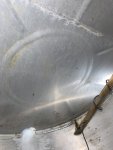
Also here is a pic of where I am on one side of the baffle to date. Originally the whole bottom
was VERY DARK BROWN w/ a THICK sludge that again I believe are Asphaltenes .

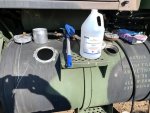
Hello to my new fuel treatments;
 

Attachments

Artisan

Well-known member
2,762
227
63
Location
CDA Idaho
Thanx Hammer but there is only a small opening at the very bottom of the baffle!
....and because I have been back flusihing w/ HOT water I believe the down tube ( Suction)
would block anything from getting past that small opening. The baffle is almost 100%

You can see the only passthru between the front and rear halves of the tank in this pic.
Just to the left of that opening is the suction tube!
 

Attachments

MAdams

Active member
373
123
43
Location
San Dimas, CA
Brad did you determine it if was algae? I have been having issues with asphaltene with my skid steer. Its a thick sticky black tar that settles in the filter. I've been doing research on it but there isn't a ton of info about it or how to get rid of it
 

Artisan

Well-known member
2,762
227
63
Location
CDA Idaho
Brad did you determine it if was algae? I have been having issues with asphaltene with my skid steer. Its a thick sticky black tar that settles in the filter. I've been doing research on it but there isn't a ton of info about it or how to get rid of it

I had Algae too! There is a "clear" difference between the two substances.

That sticky black stuff is the Asphaltenes I am quit sure of it. Here are two pics
of what you ( I believe ) and I have and here is the link to where I got these
pics from.
https://www.eng-tips.com/viewthread.cfm?qid=390979

The Algae gets suspended in the RAG LAYER which is where water and diesel
are separated ( If there is enough water ) It looked like baby chit brown cotton of sorts)
I captured for disposal MUCH of the initial drain down process waste and I could
clearly see said RAG LAYER in the holding tank I used for the really nasty stuff
at the bottom I used a pressure washer to loosen up, thus all the water.

Those 2 products I gave tech bulletins on, BIO-KLEEN and CLEAR-DIESEL
are supposed to do the trick for both. I wrote Power Service company and they replied to me
w/ those 2 products as recommended. I added those tech bulletins again.
Read them and tell me what you think.


How hard is it to pull your tank and do the radiator company trick or how much
for a replacement tank and feed lines ? It is a bi#ch to clean ...
 

Attachments

Artisan

Well-known member
2,762
227
63
Location
CDA Idaho
Brad are you filling up with biodiesel?
The last place I filled up was that big Indian casino / fuel stop heading to L.A. after Vegas.
I will NEVER get fuel there ever again if I can help it. When I use this truck it is always
on the open road so no, I am not filling up locally w/ the same stuff. I am not sure if
I ever threw Bio Diesel in it. Is it bad?
 

Artisan

Well-known member
2,762
227
63
Location
CDA Idaho
So I finally got the new 4" filler neck and cap and verified the diameter and drilled a 4.5" hole in
the tank on the other side of the baffle. Additionally I bought 4 gallons of 99% Isopropyl Alcohol
and dumped one gallon in and let it sit for 2 days. So I drill the hole and get access to the front
1/2 of the tank and the 99% Alcohol worked great! I found that the best thing is to stir it all around
and get the dark brown goop into a solution w/ the alcohol and quickly drain via the ball valve I added
in the bottom. After that a little more scrubbing and and dry rag wiping and I am looking
much better. In the pic you can see my 1/2" x 1/2" square steel rod that worked great to move
the rags around and scrub etc.

I dumped the 2nd gallon of 99% in and I will wait 24 hours and repeat and
I might be DONE w/ this thankless task. Here is a pic of the front half thru the hole I
drilled in the tank & the hole. You can see I had just got the syrup into solution and was ready
to dump. After 24 hours the brown syrup is congealed in the bottom and the alcohol
sits of top.
 

Attachments

Artisan

Well-known member
2,762
227
63
Location
CDA Idaho
THAT was a tough job. Alas I beat that goop!
A welder buddy of mine works at SpaceX as a welder.
He has some real talents... That new filler neck is Sch 40 and
the tank is .127

I am DONE cleaning. I will add a permanent lockable ball valve
in the bottom.
 

Attachments

frank8003

In Memorial
In Memorial
6,426
4,973
113
Location
Ft. Lauderdale, Florida
THAT was a tough job. Alas I beat that goop!
A welder buddy of mine works at SpaceX as a welder.
He has some real talents... That new filler neck is Sch 40 and
the tank is .127

I am DONE cleaning. I will add a permanent lockable ball valve
in the bottom.
Gee, That' pretty now. Work work work.
You will appreciate your efforts, work, and insight
Nice
 

Artisan

Well-known member
2,762
227
63
Location
CDA Idaho
Almost done...

Dropped the tank and took it to a pro-welder to get the 2nd Fuel Filler neck
welded in and and added some loops on the OE fuel cap so I could lock it
w/ a padlock. It will keep the honest man honest...
 

Attachments

Artisan

Well-known member
2,762
227
63
Location
CDA Idaho
THIS IS FOR RICK

Rick two of these pics have yellow arrows and labels, the 3rd is a pic of
the Tranny temp sender removed but you can see it anyways. It is on
the very front bottom of the trans.

This all assumes you have a CAT 7155 tranny.

Read my instructions carefully in the private message / conversation and you
should be done in no time.

PS, I threw in a pic of my wiring harness. You can see I tagged EVERY SINGLE wire . . .
It totally helps and saves you.
 

Attachments

Artisan

Well-known member
2,762
227
63
Location
CDA Idaho
So after I cleaned the tank and got the engine running again I encountered ANOTHER problem.
The engine starts and runs GREAT, but if you let off the throttle the engine DIES! I could coax
it to idle w/ much work, but IRL, that ain't happening. I can't have the engine dying on me.

I called a Fuel Injection shop and told the gent my issues and he said the governor is most
likely not "bouncing back" and I better pull the pump and bring it in for a rebuild
and test. THANK GOD for Will whom lead me to the correct wrenches to get the
pump off the engine. OMG, what a pains-taking job that inner bottom bolt is to
get off.

SO pump is at rebuilders.

When I went to take off the fuel pump I realized the POWER STEERING pump had to be
unbolted and backed off to be able to use the special wrench . SO I did that deed and
dam if the PS Pump HIT THE Fuel Pump and would not back all the way out of the way.
I used a hammer and screwdriver and gently tapped on the top of the PS pump reservoir
to clearance things...

SO I decided to barely refit the PS Pump's shaft and ready for when the Fuel Pump
is done and IT WOULD NOT GO BACK! I stuck my finger in the hole and dam if I did not
feel a COUPLING that had fallen off inside there! OMG! So off came the PS Pump extension
piece. I retrieved the coupling and put it back on. It will go on either way I found
out in retrospect but live and learn. If it comes off on you, it may be possible to finger
it back on thru the hole. Again, live and learn.

SO that coupling is Part #25 in the TM pick below, if you have to do this YOU will encounter it.

Also here is a pick of my pump, you can see where I hesitantly clearanced it. I have since
used a ball peen and hammered it down MORE. Also, the return line elbow was hitting
the Cam cover! I had to clearance it a smidge too! Arrgh!
 

Attachments

simp5782

Feo, Fuerte y Formal
Supporting Vendor
12,091
9,248
113
Location
Mason, TN
Injection pump comes off without removing the power steering pump.

Only " special wrench" you need is a 7/16" half moon wrench or obstruction wrench. But even that isn't necessary if you cut a 7/16 wrench in half. You get the lower engine side bolt with a 5/8 ratchet wrench down thru the hole on top where the 7/16 head 12pt is.

Sometimes the lower inside bolt is a 12pt but it is the same deal to get it out.

You can have the pump off in 20mins if you don't round a fuel line off
 

Artisan

Well-known member
2,762
227
63
Location
CDA Idaho
Injection pump comes off without removing the power steering pump.

Only " special wrench" you need is a 7/16" half moon wrench or obstruction wrench. But even that isn't necessary if you cut a 7/16 wrench in half. You get the lower engine side bolt with a 5/8 ratchet wrench down thru the hole on top where the 7/16 head 12pt is.

Sometimes the lower inside bolt is a 12pt but it is the same deal to get it out.

You can have the pump off in 20mins if you don't round a fuel line off
THANK U Wes... The crap I have to endure to LEARN HA~!
I did watch your Youtube on the 855 .
I am not looking forward to the re-install.
Remember, this is NOT one of those tiny little 5 tons...;) ( LOL I have one of them too! )
This is an M916 20 Ton BEAST and the top of the front fender is like 60" off
he ground! OMG... I'll getter done!

THANKS Again for the tips!
 

simp5782

Feo, Fuerte y Formal
Supporting Vendor
12,091
9,248
113
Location
Mason, TN
THANK U Wes... The crap I have to endure to LEARN HA~!
I did watch your Youtube on the 855 .
I am not looking forward to the re-install.
Remember, this is one of those tiny little 5 tons...;) ( LOL I have one of them too! )
This is an M916 20 Ton BEAST and the top of the front fender is like 60" off
he ground! OMG... I'll getter done!

THANKS Again for the tips!
I've got a 920. Fenders are much easier to deal with on a 916/920 than a 915a1. I am talking about pulling the pump from a big cam. I did one yesterday actually. Once you know what to do it's not soo bad.

Small cam pumps are easier cause they don't have the aneroid on the backside like the big cam

Hopefully they delete your aneroid valve on that pump. They stick horribly
 

Artisan

Well-known member
2,762
227
63
Location
CDA Idaho
Injection pump comes off without removing the power steering pump.

Only " special wrench" you need is a 7/16" half moon wrench or obstruction wrench. But even that isn't necessary if you cut a 7/16 wrench in half. You get the lower engine side bolt with a 5/8 ratchet wrench down thru the hole on top where the 7/16 head 12pt is.

Sometimes the lower inside bolt is a 12pt but it is the same deal to get it out.

You can have the pump off in 20mins if you don't round a fuel line off

WES!

You said ; " 5/8 ratchet wrench down thru the hole on top where the 7/16 head 12pt is."

Do you mean a 5/8" racheting box wrench like a gearwrench
or
A standard 3/8" drive rachet and a 5/8" short socket?
 

simp5782

Feo, Fuerte y Formal
Supporting Vendor
12,091
9,248
113
Location
Mason, TN
WES!

You said ; " 5/8 ratchet wrench down thru the hole on top where the 7/16 head 12pt is."

Do you mean a 5/8" racheting box wrench like a gearwrench
or
A standard 3/8" drive rachet and a 5/8" short socket?
Gear wrench.

Remove the top inside bolt. Gear wrench will go straight down to the bottom inside bolt. You have enough room to work between the pump and the block. Not alot of turn but it does work
 
Top
AdBlock Detected

We get it, advertisements are annoying!

Sure, ad-blocking software does a great job at blocking ads, but it also blocks useful features of our website like our supporting vendors. Their ads help keep Steel Soldiers going. Please consider disabling your ad blockers for the site. Thanks!

I've Disabled AdBlock
No Thanks