• Steel Soldiers now has a few new forums, read more about it at: New Munitions Forums!

  • Microsoft MSN, Live, Hotmail, Outlook email users may not be receiving emails. We are working to resolve this issue. Please add support@steelsoldiers.com to your trusted contacts.


Axle U-bolt Replacement

maxim

Member
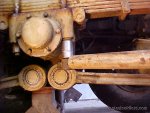
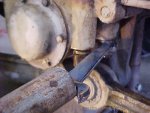
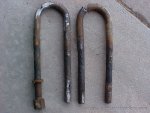
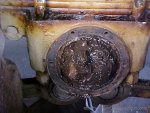
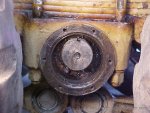
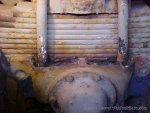
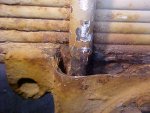
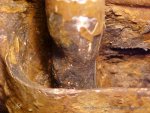
The rear axle u-bolts are showing the effects of northern winters and salt. The condition was in effect since I got the truck as I do not drive it in the winter and it stored inside. The heavy dose of paint hid this until recently when the rust started to come through.
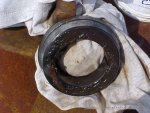
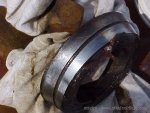
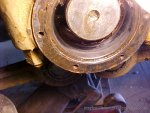
I have been encouraged by more than one person to replace the u-bolts. Today I scraped and blew out most of the crud and rust for inspection. Has anyone ever replaced these on the truck by removing one at a time. The TM showed the removal of the whole rear axle assembly, a huge task to say the least. I have a source that makes them for large trucks and can duplicate them if I have one for them to match. I hope to remove at least one of them intact without using a hot wrench so replacememts can be fabricated.
 

Attachments

1,331
5
0
Location
decatur alabama
Get the tap measure out and measure the width, length, and diameter of the U-bolt and tell the shop the specs, and they can just bend them up for you. If you want i can go to shop and get measurements of a U-bolt, so you can just take it to them and tell them what size you need. You can replace them one by one if you want and not have to worry about pulling the axle
 

WillWagner

The Person You Were Warned About As A Child
Super Moderator
Steel Soldiers Supporter
8,392
2,408
113
Location
Monrovia, Ca.
WOW :shock: Try filling the cavity with WD40, diesel or some other oil based liquid to try to soften the rust up and maybe a little heat, like a propane torch, not oxy/acet. heat, on the outside of the bearing housing. Be patient, don't get in a hurry when you start taking it apart.
 

gene

New member
90
0
0
Location
Northern Idaho
Maxim,

I replaced the tandem axil bracket and U bolts this last year without taking too much stuff out from underneath the truck. If you do a search for "trashed tandem axil bracket" or "tandem axil bracket replacement" you should find pictures of my adventure. I made blocks that fit between the axils and the frame where the overtravel pads had been before removal. This enabled the springs to "float" in a neutral position atop the axils. I also suspended the axils off the ground with 4 six tonne jack stands and removed the wheels. With this type of setup I was able to remove the spring pack with the use of penatrating oil, an appropriate punch and hammer, an old prybar for prying the springs off the spring seat, and the 3/4 socket set up with a 4 foot cheeter. It was kinda fun and kinda a PITA. Good luck and hope my 2 cents on this topic helps a bit. Stay safe.

Gene
 

Rattlehead

Member
645
3
18
Location
S.E. Michigan
I could see those breaking in two while trying to remove the nut. Maybe you could try and remove one of the better condition ones for matching? Either way, lots of soaking in PB Blaster or similar beforehand. Soaking them down each day over a couple of days will help.
 

Trango

Member
735
22
18
Location
Boulder, CO
I'd doubt those are too far siezed in there. Whereas I'd soak with PB out of habit, I'd probably just cut the "bottom of the U" off the old ubolts off with a cutoff wheel (rotary tool), and then hammer on the end if I didn't get traction on the remaining "stems" once I whaled on the attached nuts (probably siezed in place) with a big breaker bar.

Oh yes, and as has been mentioned, any spring shop can make new ubolts to spec, whether they are half-round or square.
 

maxim

Member
I worked on getting the rusted u-bolts out. The task was not an easy one. I used a long shank drill to drill out the rust and debris in the channels and soaked in Blaster more. I had to remove the wheels as to get a long enough throw for a 4’ cheater bar on the nuts. The nuts came off but the bolts would not budge. I had to cut them in half with a grinder to ease the pressure and help remove one side at a time. The air rattler on the bolt studs for while managed to loosen them but a couple hours of pounding and twisting they came out. The fixture with the center pivot bearing in it seems fine and while at it I disassembled the bearing cover and took off the nuts (same as the wheel nuts) and took out the outside bearing. The housing was packed with grease and it was clean with no water, rust, dirt. A good thing. The bearing showed very little wear and measured round so it was re-assembled and greased and put back together. While the springs were free I could check for movement in the bearing and housing and there was none. Another good thing. I used a method described by ‘gene’ in another post to support the axles and torsion bars to allow the spring pack to be free to move. This worked well. I only did one side yet. Having the u-bolt out I need to get some made. The old ones needed replacement.
I will put a grease zerk in the top of the bearing housing cup as suggested by ‘gringeltaube’ to keep the housing full of grease. While both wheels were off it was a good time to check the brake lines and adjust the brakes per the TM. I can see how neglect can cause the bearing to wear quickly in short order unless kept grease and how the new grease will force out the old and hopefully any water with it. There is tremendous down and side to side pressure on the center pivot. Complete removal of the entire rear axle assembly would be a huge task even with the proper equipment.
 

Attachments

doghead

4 Star General /Moderator
Staff member
Super Moderator
Steel Soldiers Supporter
26,247
1,168
113
Location
NY
FMJ, try a search for "spindle nut socket" and select find all terms. It is 3" and 8 sided. There are several manufactures and part numbers listed in previous posts. I remember OTC makes one, as well as a few other companies. OTC 1907 is it.
 

FreightTrain

Banned
2,730
13
0
Location
Gadsden,Al
same socket for the spindle nuts.I got mine at Napa for I think it was $30.Also,looks like you have the old solid bushing instead fo bearings.Not sure which is better but I kinda like hte solid best visually.More solid surface area touching instead of pin point of rollers.I wonder what mind looks like.I have never pulled them down on my truck or even greased them before.When I get both my rigs to Offroads place I might have to pull them both in teh shop....Err,Drag one and drive the other.....and pull down all the axles and the center pivot to insepct them.
 

5tonpuller

Member
572
24
18
Location
Thompson, Pa
My U bolts have silicone gasket sealer around them where they go thou the spring settle. I think sealling out the water helps but in time it might be sealling it in. My .05 worth
 

gringeltaube

Staff Member
Super Moderator
Moderator
Steel Soldiers Supporter
6,885
2,267
113
Location
Montevideo/Uruguay
FreightTrain said:
....Also, looks like you have the old solid bushing instead fo bearings.Not sure which is better but I kinda like hte solid best visually.More solid surface area touching instead of pin point of rollers...
Old? I think that this solid bushing setup has been (and is) an upgrade and that the military did install them when doing general overhaul. They definitely last longer than roller bearings, which I think are in the wrong place here!!!
Not sure how they keep the solids from turning (and "eating") on the spindle, though.

Anybody knowing what the A3 has ...?


G.
 
Top
AdBlock Detected

We get it, advertisements are annoying!

Sure, ad-blocking software does a great job at blocking ads, but it also blocks useful features of our website like our supporting vendors. Their ads help keep Steel Soldiers going. Please consider disabling your ad blockers for the site. Thanks!

I've Disabled AdBlock
No Thanks