• Steel Soldiers now has a few new forums, read more about it at: New Munitions Forums!

  • Microsoft MSN, Live, Hotmail, Outlook email users may not be receiving emails. We are working to resolve this issue. Please add support@steelsoldiers.com to your trusted contacts.

Beginning the Journey

CONJIN

Active member
71
118
33
Location
Northern California
I had a chance to get up to work on the truck earlier this week and got a couple material things done, namely 1) pulling the starter and tightening the flange bolts and 2) replacing the power steering box supply line coming from the power steering pump. I shot some video of the repairs that I’ll try to condense and post in the next week or so.

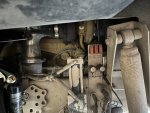
Starter Flange Bolts: I expected a bit of a challenge pulling the starter, but this thing was a real pain in the ass. I hope I don’t have to pull it again anytime in the near future. For reference I tried to remove as little engine hardware as possible to get the starter out - for example I left the power steering reservoir in place - not sure if this approach helped or hindered me in the long-run, I’d be curious to hear what other folks have done when they have pulled the starter.

My first stumbling block was that I couldn’t get my 12 point sockets to mate up to the two 12-point flange bolts. I turns out this was due to interference with he starter casing - after a bit of a panic, a steelsoldiers Hail Mary and some googling it turns out that all I needed was a regular way closed end 10mm wrench for the two flange bolts. The last and third bolt just needed an 8mm hex head.

The next issue I ran into was getting the starter wire off of the starter solenoid. The starter wire is on the back-side of the solenoid and after 30 mins of trying to back the nuts off the starter post I was unsuccessful. The real issue here is that the post has two nuts that sandwich the terminal with a star washer and they had fused together - there just wasn’t enough space to get a wrench onto one of the nuts and a driver on the second. I even went so far as to pull the starter out and drop it down a few inches (I had it supported with a rope) so that I had better access to the starter post - still no joy. I ended up cutting the starter wire at the terminal and remaking a connection - I should have done that from the beginning and saved myself half an hour.

After pulling the starter I found that 4 of the 5 flange bolts were loose and one of the bolts was sheared off. In what turned out to be the one easier than expected moment of the repair - drilling and extracting the broken bolt was quick and easy. I chased all five holes with a 5/16 tap to ensure they were all clear - no problems there. I went down to the hardware store and bought 5 new 5/16 x 18 socket head hex bolts - what could go wrong. I started installing the first bold and quickly saw that it was hanging up on the recessed hole. Out came the calipers and it turns out the socket head was 0.465”, the recess was 0.460” and the OEM bolts were 0.455” . . . So I threw the flange in the vise and drilled out all of the recesses to accommodate the larger hex heads. I mated the nose of the starter, clocked it properly and installed all five flange bolts (with loc-tite).

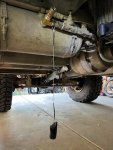
To re-install the starter I initially struggled with trying to lift it up from underneath the engine into position and realized quickly I would end up damaging the starter, myself or both. I have a light material handling crane in the bed of the truck and I moved it from the back of the truck up to the front drivers side position and dropped the line down through the engine compartment and hooked it to a rope I had around the starter (it was actually a pretty straight pull-line with the crane). Using the crane remote with one hand I was able to gently navigate the starter back up to position and get it mated with the transmission. This part proved easier than expected and while tightening the three starter bolts was tedious the rest of the re-assembly was easy (electrical reconnections, etc.).

I do hope (knock wood) that I don’t have to pull the started again anytime soon as it is a pain in the ass and not that rewarding an exercise.

Power Steering Hydraulic Line: A couple of weeks ago while doing a PM once over on the truck I noticed that the hydraulic supply line going into he power steering box was showing crush damage. The outer skin of the hose was abraded while the steel mesh underlayment was intact. I tried to figure out how this happened and it became clear that the Pitman Arm was contacting the hose and crushing it against the front bumper. I think what happened is that a prior owner installed aftermarket BO lights and when they did that they routed the hydraulic hose under (as opposed to above) the BO light putting it in conflict with Pitman Arm.

I pulled the hose off easily enough and the most challenging part was loosing some of the hose brackets that were difficult to access. After pulling the hose off I ran it down to Napa to have a new hose made up. The one wrinkle here is that they didn’t have any JIC fittings for dash 8 hoses so I had them make up the hose with dash 6 instead and kept the original hose so I can get a proper replacement made up. $125 later I was on my way back to finish work on the truck.

I installed the new hose, re-routing it to avoid coming into conflict with the Pitman Arm and secured all the hose brackets.

With those two repairs done I re-attached the main battery connections, crossed my fingers and hit the remote start switch. She fired right up and while the engine got warm I checked the power steering fluid levels and dropped the cab. I took her for a 30 min drive and all went well.

At the end of the drive i checked the transmission fluid and its a bit low so I’ll need to top that off next time. I also took hub temp readings (99 and 101 on the front and 112 and 114 on the back - seems in-line with what i have read).

Lastly, my spare tire hydraulic cylinder decided to lock itself up (both for the AHU and manual) so I think it is either in the cylinder itself or in the hydraulic manifold. I’ll see if it is the cylinder check valve issue that others have referenced but that will have to be another day.

Gavin
 

gslader

Well-known member
106
288
63
Location
California
Nice write up Gavin! So I assume the starter flange bolts are a common issue? Also, there's a remote start swithch? Where?
Apparently the broken flange bolts can be a sign of out-of-balance drive-lines and a precursor to bigger headaches down the road. After replacing the flange bolts I pulled both of the drivelines and had them balanced and I also installed all new u-joints. When they balanced the drive shafts both of the splined shafts had so much play in them that they both needed to be replaced as well.

The remote start switch is behind the front co-driver (passenger) tire. Flip the left most switch up then the middle switch is a momentary starter switch. See picture below.

IMG_3490.jpg
 

CONJIN

Active member
71
118
33
Location
Northern California
Apparently the broken flange bolts can be a sign of out-of-balance drive-lines and a precursor to bigger headaches down the road. After replacing the flange bolts I pulled both of the drivelines and had them balanced and I also installed all new u-joints. When they balanced the drive shafts both of the splined shafts had so much play in them that they both needed to be replaced as well.

The remote start switch is behind the front co-driver (passenger) tire. Flip the left most switch up then the middle switch is a momentary starter switch. See picture below.

View attachment 871766
That switch must be an A1 thing, definitely don't have that on my A0.
What kind of mileage was on your shafts? I lubed mine, but hoping to defer that for awhile if I can.
 

gslader

Well-known member
106
288
63
Location
California
No, not many miles at all. As I learned since getting my truck the driveline angles on the A0 and A1 variants are steep which enable them to carry vibrations more so than “horizontal” or more horizontal drive lines and this can lead to the cracked engine housings at some of the noted stress risers (around the air compressor bracket and behind the turbo) so I just decided to bite the bullet and get them balanced.
 

CONJIN

Active member
71
118
33
Location
Northern California
No, not many miles at all. As I learned since getting my truck the driveline angles on the A0 and A1 variants are steep which enable them to carry vibrations more so than “horizontal” or more horizontal drive lines and this can lead to the cracked engine housings at some of the noted stress risers (around the air compressor bracket and behind the turbo) so I just decided to bite the bullet and get them balanced.
I get the steep angle and all, but they come balanced out of the factory or at least I think they do. So I don't understand why they go out of balance, unless they never were?
 

GeneralDisorder

Well-known member
Steel Soldiers Supporter
2,038
5,225
113
Location
Portland, OR
I get the steep angle and all, but they come balanced out of the factory or at least I think they do. So I don't understand why they go out of balance, unless they never were?
They sometimes get assembled incorrectly when soldiers remove them and reinstall them - not properly aligning the slip yoke splines. Even assembling them 180 degrees out so they *appear* to be aligned can result in them being out of balance. There's also some question as to the quality of the balancing that was done on the early trucks - the driveshaft balance and steep angles was responsible for a lot of things breaking and coming loose and it had to be addressed in later revisions of the trucks with things like the addition of Nord-Lock washers to critical fasteners, and eventually the high-pinion intermediate axle being modified for use on the LMTV's to eliminate the steep driveline angle.

It is well worth the trouble to have them professionally balanced.
 

GENX

Active member
129
218
43
Location
TX
Nice rig. I am getting an 05 tomorrow. What kind of trans fluid is in yours? 15w40 oil or red ATF?
 

Mullaney

Well-known member
Steel Soldiers Supporter
Supporting Vendor
7,716
19,766
113
Location
Charlotte NC
Nice rig. I am getting an 05 tomorrow. What kind of trans fluid is in yours? 15w40 oil or red ATF?
.
Gotta remember too that the US Military has a much fatter wallet than you (no insult intended). Plus they have just about any amount of money they want to spend in Research & Development. If that fluid was good enough for them - I would bet it would be for you too.

There is a way to reprogram the shift points on M107x and M108x trucks.
I would guess it is the same on your HMMWV.
 

GENX

Active member
129
218
43
Location
TX
.
Gotta remember too that the US Military has a much fatter wallet than you (no insult intended). Plus they have just about any amount of money they want to spend in Research & Development. If that fluid was good enough for them - I would bet it would be for you too.

There is a way to reprogram the shift points on M107x and M108x trucks.
I would guess it is the same on your HMMWV.
That fluid might be good enough for the military fleets when they regularly auction 20 year old trucks with less than 10,000 miles, the military probably didn't make the decision to use one fluid based on what's best for the transmission and extending it's life.
What is the reason(s) guy's reprogram shift points? I am interested in that from a knowledge standpoint, not to hijack this thread though..
 

Mullaney

Well-known member
Steel Soldiers Supporter
Supporting Vendor
7,716
19,766
113
Location
Charlotte NC
That fluid might be good enough for the military fleets when they regularly auction 20 year old trucks with less than 10,000 miles, the military probably didn't make the decision to use one fluid based on what's best for the transmission and extending it's life.
What is the reason(s) guy's reprogram shift points? I am interested in that from a knowledge standpoint, not to hijack this thread though..
.
@Ronmar might want to jump in on this, but reprogramming shift points is partly because through the years of use - things get repaired - and sometimes the changes don't cooperate with the transmission. Parts (TCM etc) get replaced and nothing is done to notify that the engine and so the transmission just does what it always did. Reprogramming helps get those two pieces of hardware "back in sync".

Mine wanted to "shift hard" and with a really easy "learn me" session, those up and down shifts softened up those "shift points".
 

INFChief

Well-known member
722
1,348
93
Location
New York
That fluid might be good enough for the military fleets when they regularly auction 20 year old trucks with less than 10,000 miles, the military probably didn't make the decision to use one fluid based on what's best for the transmission and extending it's life.
What is the reason(s) guy's reprogram shift points? I am interested in that from a knowledge standpoint, not to hijack this thread though..
Actually the military has done numerous oil studies.
 

Ronmar

Well-known member
3,848
7,480
113
Location
Port angeles wa
It is not reprogramming, but relearning.

The Throttle position sensor info plays a big part in how the transmission shifts. On the A0 there is a cable actuated throttle position sensor that serves this purpose exclusively. Also using throttle cable to actuate the governor, the possibility of something getting out of sync and causing issues is more likley.

On the A1, the engine is throttle-by-wire and the ECU shares that info with the transmission. Since this info controls the engine, it is far less likley that a TPS issue would not be noticed.

For the other reasons noted though, relearning the shift points is not a bad thing to do…
 

gslader

Well-known member
106
288
63
Location
California
It's been a while since I've updated you all. Lot's of small projects like adding an air quick connect off the wet tank - which took a bit more effort than I expected.
IMG_3806.jpg

I've also made some good progress on larger projects - most specifically new seats for the cab and soundproofing/insulating the cab. Over the last few days I got both the new seats installed and the floor insulated and recovered. I know there are lots of different ways out there to do this, so let me add to that compendium of knowledge.

After pulling the OEM seats out I first vacuumed the floors thoroughly, then scrubbed them with a degreaser (I really like the Super Clean brand degreaser which I cut 1 part degreaser to 3 parts water) and washed the interior out "gently" with a hose. After the interior was dry I wiped the floor down with acetone and let that dry as well.

IMG_3902.jpg

After the acetone was dry I sprayed on a single coat of rust inhibitor along the entire floor and hit any areas with screw holes through to the exterior with a second coat. I then let this dry over night.

IMG_3905.jpg

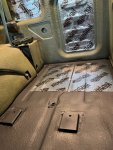
After the rust inhibitor was dry I then put Kilmat down in any spots where the floor sounded hollow or "tinny" - there were only two of these spots one at the rear of the cab and another up at the front of the cab where my left foot rests while driving.

IMG_3906.jpg

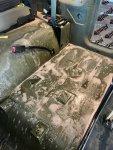
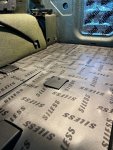
After the Kilmat went down I covered the entire floor in 4mm Siless closed cell foam (I found it interesting this stuff is made in Russia - who knew?). Cutting the templates for the Siless and flooring was the most painful, time consuming and tedious portion of this whole process. For that reason I'm planning on having a real car upholstery professional do the upholstery for center hump . . . no way that I can do that and have it look anything but embarrassing. Also, this Siless stuff is super sticky - you don't get a second chance with it so where ever you put it down is where it is staying.

IMG_3908.jpg

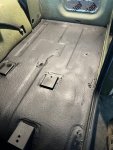
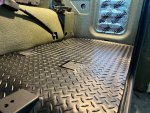
Lastly I put down the actual flooring. I used this diamond pattern rubber flooring. Initial impressions are that it is nice and pliable, seems relatively robust and should be wear resistant and easy to clean. The only concern I have so far is that cuts seem to propagate in it relatively easily. For example at the corners of the cut outs for the seat brackets where my cuts met up I can see that there are small tears propagating in the flooring. This would be a natural area for stress risers to occur so we'll see how this does over time. I just secured the flooring with a few strips of carpet tape as I want to have the ability to replace it if I am unhappy with the performance of other aspects of it. BTW - choosing the flooring was tough for me and I didn't ever feel like I landed on a GREAT option so if others have suggestions that they are happy with I'd love to hear about them.

IMG_3909.jpg

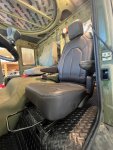
Lastly I put the seat in. I should mentioned that I built up and dry fit the seat while the cab floor was still bare so I wouldn't be tearing up the flooring. I used 1 1/4" x 1/8" cold rolled steel flat bar stock to fab up the mounting brackets. I do have to say that there was never any easy way that I found to reach the back to hex bolts to attach the seat rails to the cab mounts - those were just a pain every time I had to put them in - if there is an easier way that I am missing let me know! I opted for the go to Chrysler Pacifica seats which so far feel like a nice upgrade.

IMG_3910.jpg

Next up is to finishing insulating / sound proofing the rest of the cab and running wires for lighting and sound.
 

gslader

Well-known member
106
288
63
Location
California
I had a chance to do a little work on the truck today. Was hoping to get both sub woofers installed but the going was slower than expected, really for no good reason. A couple small screw ups here and there that I had to redo but generally it ran pretty smoothly, just took a longer than expected.

So the plan is to drop to 8” “under seat” powered subwoofers into the dead space behind the driver and co-driver seats. I’m using the under seat subs because they are thin enough to fit in the void in the truck wall. Given how thin the skin (internal and external) is on the truck I’m concerned about vibrations and am doing several layers of insulation - will see if it works or not.

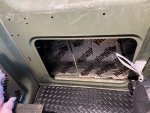
So here is the first step - Kilmat on the truck skin both the exterior skin (which you can see below) but also on the interior skin - which I applied on the interior facing portion so you can’t see it - but it’s there.
1C1D5EAC-0163-483A-ABBE-660AC5729E72.jpeg

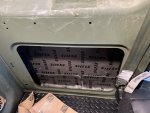
After the Kilmat I applied 4mm Siless closed cell foam
31C7453A-0F86-409D-AD44-2163A544725F.jpeg

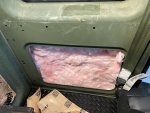
Lastly I used regular fiberglass insulation to provide some baffling and more thermal and acoustic abatement.
13E1AE16-F217-49B7-B0CA-1A044E96811F.jpeg

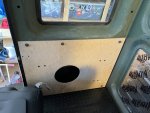
That was all relatively easy and quick. After that I used the original plastic paneling as a template to create two new panels out of plywood. This part was a real time suck - I think primarily because of the large number of holes that need to be drilled in each piece of plywood and relative precision required, even with a template. I then cut holes for the subwoofer and speaker grill. After all the drilling, cutting and sanding I did a dry fit to check for hole alignment - which was acceptable.
DEDA8F78-9835-4212-A7D4-7B89A9AA4269.jpeg

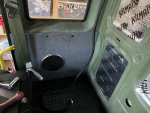
Lastly I upholstered the new panel and attached the subwoofer to the back, put the grill on and fished the wiring up to the ceiling of the cab. Hoping to get the second one installed tomorrow and make some incremental progress beyond that.
370BF9BC-60E7-4DA1-9B96-271A625D4988.jpeg
 

CONJIN

Active member
71
118
33
Location
Northern California
I had a chance to do a little work on the truck today. Was hoping to get both sub woofers installed but the going was slower than expected, really for no good reason. A couple small screw ups here and there that I had to redo but generally it ran pretty smoothly, just took a longer than expected.

So the plan is to drop to 8” “under seat” powered subwoofers into the dead space behind the driver and co-driver seats. I’m using the under seat subs because they are thin enough to fit in the void in the truck wall. Given how thin the skin (internal and external) is on the truck I’m concerned about vibrations and am doing several layers of insulation - will see if it works or not.

So here is the first step - Kilmat on the truck skin both the exterior skin (which you can see below) but also on the interior skin - which I applied on the interior facing portion so you can’t see it - but it’s there.
View attachment 877903

After the Kilmat I applied 4mm Siless closed cell foam
View attachment 877904

Lastly I used regular fiberglass insulation to provide some baffling and more thermal and acoustic abatement.
View attachment 877905

That was all relatively easy and quick. After that I used the original plastic paneling as a template to create two new panels out of plywood. This part was a real time suck - I think primarily because of the large number of holes that need to be drilled in each piece of plywood and relative precision required, even with a template. I then cut holes for the subwoofer and speaker grill. After all the drilling, cutting and sanding I did a dry fit to check for hole alignment - which was acceptable.
View attachment 877906

Lastly I upholstered the new panel and attached the subwoofer to the back, put the grill on and fished the wiring up to the ceiling of the cab. Hoping to get the second one installed tomorrow and make some incremental progress beyond that.
View attachment 877907
Nice job, hope it works out for you! I think you are on the right track. No such thing as to much insulation! Will be doing something similar sometime in the future.
 
Top
AdBlock Detected

We get it, advertisements are annoying!

Sure, ad-blocking software does a great job at blocking ads, but it also blocks useful features of our website like our supporting vendors. Their ads help keep Steel Soldiers going. Please consider disabling your ad blockers for the site. Thanks!

I've Disabled AdBlock
No Thanks