• Steel Soldiers now has a few new forums, read more about it at: New Munitions Forums!

  • Microsoft MSN, Live, Hotmail, Outlook email users may not be receiving emails. We are working to resolve this issue. Please add support@steelsoldiers.com to your trusted contacts.

Bought Someone’s M1078 Camper Project- Seeking Direction on a Couple Issues

VoslickZ

New member
7
20
3
Location
Alaska
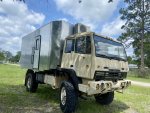
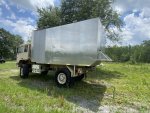
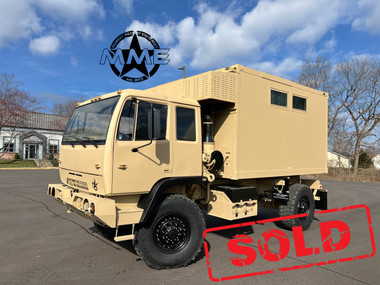
With my paramedic background, I originally wanted to build out an old ambulance as a camper. The idea of external locking storage and so on was alluring. Then I started pricing 4x4 models with the specs I wanted (I live in Alaska so it’s a must), and it stopped making financial sense. Fast forward a couple months and I found myself perusing the marketplace and stumbled on something that piqued my interest. It’s a 1997 M1078A0 with a custom aluminum habitat mostly complete minus the floor. It offered a larger platform and more capability than I would ever have with an ambulance based damper. I’ve built out a similarly sized off grid cabin in Alaska and lived in it for a couple years; this is basically the same concept with wheels right? At least that’s what I convinced myself. I know the cheapest thing about these things is the initial purchase price, but the barrier to entry was lower than I would’ve spent on an ambulance platform. I thought it over for a couple weeks and then made a somewhat impulsive decision to purchase it.

Since this time, I’ve researched many of the builds from fellow members on here trying to figure out what direction I want to go with things and learn from others. Of course some of this research would’ve been more productive prior to purchase- hence the aforementioned impulsive piece. But also the pervasive attitude of “figure it out and adapt” was very present when mulling things over. This research mostly left me with a sense of apprehension as I watched the professional level builds progress- knowing their skills and access to tools far exceeded mine. I’m still excited for the challenge, but I’m reinforcing my predetermined fate of a slow build riddled many lessons and mistakes as well.

But one concern I have with the rig is how it’s currently mounted to the subframe. It’s currently bolted directly from the LMTV frame to the subframe. Most the projects I’ve sought to emulate have some sort of system (accomplished through varying means) of allowing the frame to flex independently of the habitat subframe. My question is to what degree is this necessary? Both projects that come to mind are longer which will experience a greater amount of deflection. These builds were also built with steel vs. the aluminum on mine. Can I get away with a little more flex because of the metallurgical properties of aluminum compared to steel? I want to make sure before I go forward I’m not skipping steps that need to be addressed now. I’m tempted to find some varied terrain and test and see, but the rig is not in front of me now so everything is stuck in the theoretical realm for now.

For reference this rig is currently located in Florida, but will eventually be driven back to Alaska (after 1:1 hub conversion kit of course) where it will see lots of off pavement time. And it will not be babied.

Further questions to source the crowd. It currently has a rolled aluminum roof. The previous owner and builder stated he planned to redo it with a sandwich core panel for better insulative properties and moisture resistance. My hesitancy with this is in my experience two different products with different specific heat properties will condensate moisture when exposed to large temperate differences. Which will be a regular occurrence when winter camping in Alaska. Do y’all think the effects of this would be enough to warrant going a different route (or keeping the existing roof)? Or maybe once I spray foam the sides the difference would be marginal? Looking forward to hearing your thoughts and what other things I should be considering.
 

Attachments

ramdough

Well-known member
1,554
1,729
113
Location
Austin, Texas
You will want a compliant way to mount the box. The aluminum is going to crack at the welds if you leave it hard bolted.

The problem with stud toy walls (and joist type roofs), is the stud usually touches the outer skin and the inner wall skin. That creates a thermal bridge. You will get mold or condensation along those lines. I would come up with a way to insulate the studs from the inner skin since you already have so much work already done in the outside.


Sent from my iPhone using Tapatalk
 

coachgeo

Well-known member
5,150
3,466
113
Location
North of Cincy OH
yep...... your concern is a big one. That set up will rip apart. IMHO this may well be why project stopped and did not move forward. Would need complete re-done in mounting department. Was aware of this rig for sale and asked the seller about it. Was not in the market myself.... but saw that as a huge RED flag.

We need pics of truck chassis to camper to offer any suggestion. Wood strip on chassis .... yes/no.... if box lays on chassis rails yes. Xpedition type campers usually do not/should not.

PS- please take pics of how the builder did the area around the transmission. Am considering same concept on mine. PS- Also as you build a more appropriate sub chassis for this box to sit on... that area will have to be enlarged around transmission for more clearance.
 
Last edited:

Mullaney

Well-known member
Steel Soldiers Supporter
Supporting Vendor
7,767
19,872
113
Location
Charlotte NC
With my paramedic background, I originally wanted to build out an old ambulance as a camper. The idea of external locking storage and so on was alluring. Then I started pricing 4x4 models with the specs I wanted (I live in Alaska so it’s a must), and it stopped making financial sense. Fast forward a couple months and I found myself perusing the marketplace and stumbled on something that piqued my interest. It’s a 1997 M1078A0 with a custom aluminum habitat mostly complete minus the floor. It offered a larger platform and more capability than I would ever have with an ambulance based damper. I’ve built out a similarly sized off grid cabin in Alaska and lived in it for a couple years; this is basically the same concept with wheels right? At least that’s what I convinced myself. I know the cheapest thing about these things is the initial purchase price, but the barrier to entry was lower than I would’ve spent on an ambulance platform. I thought it over for a couple weeks and then made a somewhat impulsive decision to purchase it.

Since this time, I’ve researched many of the builds from fellow members on here trying to figure out what direction I want to go with things and learn from others. Of course some of this research would’ve been more productive prior to purchase- hence the aforementioned impulsive piece. But also the pervasive attitude of “figure it out and adapt” was very present when mulling things over. This research mostly left me with a sense of apprehension as I watched the professional level builds progress- knowing their skills and access to tools far exceeded mine. I’m still excited for the challenge, but I’m reinforcing my predetermined fate of a slow build riddled many lessons and mistakes as well.

But one concern I have with the rig is how it’s currently mounted to the subframe. It’s currently bolted directly from the LMTV frame to the subframe. Most the projects I’ve sought to emulate have some sort of system (accomplished through varying means) of allowing the frame to flex independently of the habitat subframe. My question is to what degree is this necessary? Both projects that come to mind are longer which will experience a greater amount of deflection. These builds were also built with steel vs. the aluminum on mine. Can I get away with a little more flex because of the metallurgical properties of aluminum compared to steel? I want to make sure before I go forward I’m not skipping steps that need to be addressed now. I’m tempted to find some varied terrain and test and see, but the rig is not in front of me now so everything is stuck in the theoretical realm for now.

For reference this rig is currently located in Florida, but will eventually be driven back to Alaska (after 1:1 hub conversion kit of course) where it will see lots of off pavement time. And it will not be babied.

Further questions to source the crowd. It currently has a rolled aluminum roof. The previous owner and builder stated he planned to redo it with a sandwich core panel for better insulative properties and moisture resistance. My hesitancy with this is in my experience two different products with different specific heat properties will condensate moisture when exposed to large temperate differences. Which will be a regular occurrence when winter camping in Alaska. Do y’all think the effects of this would be enough to warrant going a different route (or keeping the existing roof)? Or maybe once I spray foam the sides the difference would be marginal? Looking forward to hearing your thoughts and what other things I should be considering.
.
Well, I can't help but wonder if you couldn't have found a truck a little further away from you up there in Alaska... That is going to be a drive for sure and you may as well pay for a second seat on the airplane to get you and some tools down to the truck. Or maybe you are planning to drive a pickup truck with even bigger toolboxes and a friend.

Best I can tell, from the bottom tip of Alaska down to Branford, Florida (there in the bend of the state) it will be about 60 hours (4086.4 miles) in a passenger car. The tires on this M1078 need to be very carefully looked at. Maybe even be really smart for you to have a few NEW (Not New Old Stock) tires already mounted on rims. Heck for that matter, if it was me there would be 4 brand new tires on the truck before you start that trip. With date stamps that are less than a year old... Also need to have a jack or two and some wood "cribbing" to go along with the really big box of tools.

Are you a diesel mechanic? Do you work on this type of equipment? If not, without insulting you - do you have deep enough pockets to pay for this M1078 to go to the local CAT dealer to be checked out? Every piece of rubber on that engine should be replaced. It is 20+ years old and you will be striking out on a four thousand mile road trip. Naturally the engine oil and filters should be changed, the fuel filters need to be changed and I would buy a case of fuel filters - just in case.

And there is more. A lot more. The rubber cab bushings most likely need to be replaced too. You also need to confirm that the cab tilt functions. Does the air ride (air bags) on the cab of the truck function? Are the bags without weather cracks?

Again, not trying to talk you out of it but you couldn't have picked a much more difficult "recovery" for a new-to-you truck.

Welcome to the Outfit!

Download the Technical Manuals (TM's).

There are several thousand pages of reading. The "Dash 10" (ending in -10) tells you the basics. Worth a look. The other books that are problem determination flow charts and parts manuals. On the side of the road and broken - those will be really helpful.

So far as the bed attachment is concerned, direct bolt isn't good. Affixed at the cab end and large springs to allow movement will be important. I'm sure the guys who have done this will chime in.

Best to you.
This is going to be an adventure!
 

FarmingSmallKubota

Well-known member
Steel Soldiers Supporter
486
1,151
93
Location
Wapakoneta, Ohio
I do not have a comment on the habitat part but what a trip that will be all the way back to alaska. I am 13 months into a truck that was a 1997 with 3500 miles and I still am not prepared to go outside of a 20 mile radius because of all of the little stuff it takes to bring these trucks back up to reliable conditions. Deep pockets, patience, lots of new tools you have never needed, Parts that take a week or a month to get is in your near future. Good luck to you
 

TechnoWeenie

Well-known member
Steel Soldiers Supporter
1,657
1,676
113
Location
Nova Laboratories, WA
I drove my M934 from Bragg to Lewis.. ~3000 miles.... Replaced all fluids, did as good of a check as I could.

Lost a tire in MN I think it was, and had to bypass air dryer in OH because of a stuck blow off valve...Also had numerous air line failures.

Anything you think of that can fail, fix beforehand. Easier to replace something, like a belt, before you leave, than lose all your drive accessories on the side of the highway and have to find a replacement AND try to fix it.
 
Last edited:

chucky

Well-known member
Steel Soldiers Supporter
6,640
19,014
113
Location
TN .
With my paramedic background, I originally wanted to build out an old ambulance as a camper. The idea of external locking storage and so on was alluring. Then I started pricing 4x4 models with the specs I wanted (I live in Alaska so it’s a must), and it stopped making financial sense. Fast forward a couple months and I found myself perusing the marketplace and stumbled on something that piqued my interest. It’s a 1997 M1078A0 with a custom aluminum habitat mostly complete minus the floor. It offered a larger platform and more capability than I would ever have with an ambulance based damper. I’ve built out a similarly sized off grid cabin in Alaska and lived in it for a couple years; this is basically the same concept with wheels right? At least that’s what I convinced myself. I know the cheapest thing about these things is the initial purchase price, but the barrier to entry was lower than I would’ve spent on an ambulance platform. I thought it over for a couple weeks and then made a somewhat impulsive decision to purchase it.

Since this time, I’ve researched many of the builds from fellow members on here trying to figure out what direction I want to go with things and learn from others. Of course some of this research would’ve been more productive prior to purchase- hence the aforementioned impulsive piece. But also the pervasive attitude of “figure it out and adapt” was very present when mulling things over. This research mostly left me with a sense of apprehension as I watched the professional level builds progress- knowing their skills and access to tools far exceeded mine. I’m still excited for the challenge, but I’m reinforcing my predetermined fate of a slow build riddled many lessons and mistakes as well.

But one concern I have with the rig is how it’s currently mounted to the subframe. It’s currently bolted directly from the LMTV frame to the subframe. Most the projects I’ve sought to emulate have some sort of system (accomplished through varying means) of allowing the frame to flex independently of the habitat subframe. My question is to what degree is this necessary? Both projects that come to mind are longer which will experience a greater amount of deflection. These builds were also built with steel vs. the aluminum on mine. Can I get away with a little more flex because of the metallurgical properties of aluminum compared to steel? I want to make sure before I go forward I’m not skipping steps that need to be addressed now. I’m tempted to find some varied terrain and test and see, but the rig is not in front of me now so everything is stuck in the theoretical realm for now.

For reference this rig is currently located in Florida, but will eventually be driven back to Alaska (after 1:1 hub conversion kit of course) where it will see lots of off pavement time. And it will not be babied.

Further questions to source the crowd. It currently has a rolled aluminum roof. The previous owner and builder stated he planned to redo it with a sandwich core panel for better insulative properties and moisture resistance. My hesitancy with this is in my experience two different products with different specific heat properties will condensate moisture when exposed to large temperate differences. Which will be a regular occurrence when winter camping in Alaska. Do y’all think the effects of this would be enough to warrant going a different route (or keeping the existing roof)? Or maybe once I spray foam the sides the difference would be marginal? Looking forward to hearing your thoughts and what other things I should be considering.
Well if your going to keep it start drilling hole in the studs to pre run wires /pex then put you a floor in it of sheet metal down first then stud the floor out so they can sprayfoam the floor after the walls are sprayed then put ADVANTECH flooring on top of the floor studs so the floor and walls and ceiling are
insulated all in sprayfoam then screw your ceiling up next with whatever you want plywood / plastic then the walls which helps hold up the ceiling edges now you have a box thats waterproof ! Now let your mind run wild on where you want stuff to go and rethink that 4 or 5 times till your sure you didnt waste 1 in of room and you will have a blast building it ! Its not rocket science we came from caves to cabins to skyscrapers just dont get in a rush ! And dont use stuff in the build that you cant get/replace/fix at a lowes/homedepot/walmart so you have an endless back-up spare parts !
 

sue

Active member
437
359
43
Location
tulsa OK
With my paramedic background, I originally wanted to build out an old ambulance as a camper. The idea of external locking storage and so on was alluring. Then I started pricing 4x4 models with the specs I wanted (I live in Alaska so it’s a must), and it stopped making financial sense. Fast forward a couple months and I found myself perusing the marketplace and stumbled on something that piqued my interest. It’s a 1997 M1078A0 with a custom aluminum habitat mostly complete minus the floor. It offered a larger platform and more capability than I would ever have with an ambulance based damper. I’ve built out a similarly sized off grid cabin in Alaska and lived in it for a couple years; this is basically the same concept with wheels right? At least that’s what I convinced myself. I know the cheapest thing about these things is the initial purchase price, but the barrier to entry was lower than I would’ve spent on an ambulance platform. I thought it over for a couple weeks and then made a somewhat impulsive decision to purchase it.

Since this time, I’ve researched many of the builds from fellow members on here trying to figure out what direction I want to go with things and learn from others. Of course some of this research would’ve been more productive prior to purchase- hence the aforementioned impulsive piece. But also the pervasive attitude of “figure it out and adapt” was very present when mulling things over. This research mostly left me with a sense of apprehension as I watched the professional level builds progress- knowing their skills and access to tools far exceeded mine. I’m still excited for the challenge, but I’m reinforcing my predetermined fate of a slow build riddled many lessons and mistakes as well.

But one concern I have with the rig is how it’s currently mounted to the subframe. It’s currently bolted directly from the LMTV frame to the subframe. Most the projects I’ve sought to emulate have some sort of system (accomplished through varying means) of allowing the frame to flex independently of the habitat subframe. My question is to what degree is this necessary? Both projects that come to mind are longer which will experience a greater amount of deflection. These builds were also built with steel vs. the aluminum on mine. Can I get away with a little more flex because of the metallurgical properties of aluminum compared to steel? I want to make sure before I go forward I’m not skipping steps that need to be addressed now. I’m tempted to find some varied terrain and test and see, but the rig is not in front of me now so everything is stuck in the theoretical realm for now.

For reference this rig is currently located in Florida, but will eventually be driven back to Alaska (after 1:1 hub conversion kit of course) where it will see lots of off pavement time. And it will not be babied.

Further questions to source the crowd. It currently has a rolled aluminum roof. The previous owner and builder stated he planned to redo it with a sandwich core panel for better insulative properties and moisture resistance. My hesitancy with this is in my experience two different products with different specific heat properties will condensate moisture when exposed to large temperate differences. Which will be a regular occurrence when winter camping in Alaska. Do y’all think the effects of this would be enough to warrant going a different route (or keeping the existing roof)? Or maybe once I spray foam the sides the difference would be marginal? Looking forward to hearing your thoughts and what other things I should be considering.
Good for you!!! I would recommend a rubber donut mount system? Find a 8 foot metal break to bend some “.032 aluminum (T-3 temper) make 2 inch “C”
channels for your stiffeners (studs) run all your 110 ac and 12 volt dc then attach.020 aluminum or plastic wall sheets like a lot of RVs and use spray foam insulation before assembly. And get a
Aircraft Spruce catalog before doing anything!!!!
They have everything you will need. Everything!!
Military hardware, 12volt, 24 volt, etc
If your doing a camper build and don’t know what
“Clip nuts” are they are a life saver. Any rivit etc.
Long drive up to the land of midnight sun.
but this time of year you can cross breed your mosquitoes with Florida’s
Good luck !!!!!
 

serpico760

Well-known member
Steel Soldiers Supporter
704
1,796
93
Location
San Diego, CA
When factory trucks are equipped with van bodies, they use the same system of a 1" thick wooden runner on both sides of the frame and the same bolting pattern as a cargo bed.

At least that is what I've found on trucks like the deuce M109 and the expansible vans on 5-tons.
The m1079s and the m1087s use spring bolts at least on one end. You can see photos of the mounting system here:
I suggest for a lightweight aluminum habitat like that that you contact Dave Anderson at https://www.rvglobetrekker.com/. Check out their subframes and they also sell the separate components in addition to the whole frame systems. If you you can't afford one of their subframes you can always use that system for inspiration to design your own!
 

coachgeo

Well-known member
5,150
3,466
113
Location
North of Cincy OH
mount..... just need better pics to really offer advice.

Looks from these small amount of info the builder copied the cargo bed design. Has an Aluminum C channel on bottom that bolts to truck chassis. Not sure if it is bolted same way as bed with plates or what.

Anyway..... if he blocks up the box... unbolts from chassis...... lower Air in tires...... orrrr something similar to create space...... he might could then get in there to box the aluminum C channel to add rigidity???... then re-mount habitat same way as M1079 box.... .... maybe though with that dog house design around the transmission. do it Captured Spring in "rear"... and fixed in front.).

if aluminum body still flexes some Ive got some ideas on how to mount the interior cabinets etc. in a way that has points that would allow for box walls to move about yet not break the cabinets apart..... much less add random nonflexing stress points in a frame that flexes... PM me hard to explain.
 
Last edited:

VoslickZ

New member
7
20
3
Location
Alaska
Everyone, thank you for the replies! I’ll go through and touch on each one here shortly. But I wanted to clarify something important I may have mislead some on. I do intend to drive this thing to Alaska, BUT this will be sometime end of next summer. I have a year to replace all the rubber (tires and lines) and get it sorted for the road trip. I’m currently living in Alabama for work for the next year and some change. Hence the reason for purchasing the vehicle down here.

I’ll get better pictures this weekend for the current mounting situation.
 

VoslickZ

New member
7
20
3
Location
Alaska
The truck made the 250mi drive from Florida with no issues fortunately. I drove overnight to take advantage of less traffic and cooler temps in hopes of reducing the chance of a tire separating from heat, especially since my spare has a date code from 2001.

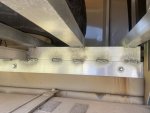
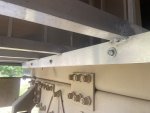
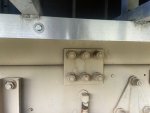
The subframe is direct bolt-mounted to the existing frame. Pictures are attached below. My limited research leaves me to believe a pivot style torsion-less system is the best subframe mounting option. I’m not sure how easily I could modify the current mounting to that style. The other option would be a captured spring style system. It’s seems like this would be a simpler system to adopt, but I’m not clear on the drawbacks. I believe if I went with the captured spring system, I could replace the OEM mounting plates with new plates that incorporated the captured springs. And I would not need to lift the box off the frame to complete the install. I plan to call Dave Anderson on Monday and get his professional opinion, but I’m curious to hear the forums’ thoughts as well.

Coachegeo- to address your question from earlier in the thread, the skins are attached with 3M VHB tape. And the roof is secured with fasteners and 5100 over the top of the fasteners.
 

Attachments

Last edited:

coachgeo

Well-known member
5,150
3,466
113
Location
North of Cincy OH
Builder left you in good position to move forward.

Sounds like you do know this type truck with a box was designed for the military using captured spring mounts. (M1079) This truck is a semi clone of the Steyr 12M18 and they too used captured springs to mount their command boxes.

IMHO it looks like your best route is captured spring but with most fixed mount at front of box and sprung at rear. (opposite M1079) This will work better with your trans tunneled camper chassis design. Camper builders do either or. IMHO you could consider adding reinforcements/additional framing to the steel military C channel sub-frame that was once the subchassis for the flat bed so it has ZERO flex/twist in it forcing all flex into the captured spring. This will further reduce any flex being introduced into the aluminum camper frame above it.

Keep in mind the pivoting sub frame option installed under the camper.. will raise the whole camper box another 6 to 10 inches in overall height.

Did a search for 5100 but only came up with a 3m reflective tape. What am I missing?
 
Last edited:

ramdough

Well-known member
1,554
1,729
113
Location
Austin, Texas
The truck made the 250mi drive from Florida with no issues fortunately. I drove overnight to take advantage of less traffic and cooler temps in hopes of reducing the chance of a tire separating from heat, especially since my spare has a date code from 2001.

The subframe is direct bolt-mounted to the existing frame. Pictures are attached below. My limited research leaves me to believe a pivot style torsion-less system is the best subframe mounting option. I’m not sure how easily I could modify the current mounting to that style. The other option would be a captured spring style system. It’s seems like this would be a simpler system to adopt, but I’m not clear on the drawbacks. I believe if I went with the captured spring system, I could replace the OEM mounting plates with new plates that incorporated the captured springs. And I would not need to lift the box off the frame to complete the install. I plan to call Dave Anderson on Monday and get his professional opinion, but I’m curious to hear the forums’ thoughts as well.

Coachegeo- to address your question from earlier in the thread, the skins are attached with 3M VHB tape. And the roof is secured with fasteners and 5100 over the top of the fasteners.

Just shooting from the hip here:

Captured spring designs are for durable and reasonable stiff boxes. Even if you put that box on another subframe, you need to ask yourself how durable and torsion resistant that box is. Every spring mounted torsion free frame will have some twist.

Those welds look a little rough (not super clean and professional) and VHB may not last forever. I would probably consider this box as not overly durable. I cannot judge how stiff it is.

Commenting on @coachgeo comments. For springs, the rear end is the most structurally sound place to mount. That portion of the frame has the least stress on it, bumps do not cause the rear end to bounce, and your fixed point is closest to your tires so your clearance requirements are less. With that said, most people with passthrough opt for front fixed mounts (like me).

I would probably opt for a 3 point pivot system for that truck given your box design.

Hope that helps.


Sent from my iPhone using Tapatalk
 

coachgeo

Well-known member
5,150
3,466
113
Location
North of Cincy OH
Just shooting from the hip here:

Captured spring designs are for durable and reasonable stiff boxes. E....
If it were not for the added height issue.... would agree that pivoting subframe is best. Agree also on captured spring needs fairly rigid box.. hence the suggestion to mods to the sub chassis little more. Other way's this has been compensated for is adding more spring mounts. Numerous of the more flexy boxes out there; that used captured springs, have 3 to 4 sets mounted down each side. Some don't even have a fixed point. They use vertical plates to limit side travel and on rare occasion some have used Track Bars.

Looking at his pics on how the aluminum box is framed up around his transmission. This is why suggested up front being more of a fixed point. That trans tunnel design creates similar limitations as does a crawl thru.
 
Last edited:
Top
AdBlock Detected

We get it, advertisements are annoying!

Sure, ad-blocking software does a great job at blocking ads, but it also blocks useful features of our website like our supporting vendors. Their ads help keep Steel Soldiers going. Please consider disabling your ad blockers for the site. Thanks!

I've Disabled AdBlock
No Thanks