Chief_919
Well-known member
- 2,050
- 105
- 63
- Location
- Western NC
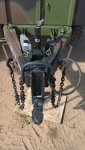
I had a lot of folks asking for details on my conversion on my 105 at the GA rally, and while it is not done yet I have it hooked up and working. I am starting this now and will update as I go with what I change. I will put links to anything I use to make it easy to find, and am going to write it so all the folks new to MV's who may find this from a search will be able to follow.
First some basics- your M105, M200 or similar trailers are air over hydraulic systems, meaning air activates a master cylinder. In recent years commercial trailer makers have started making electric/hydraulic setups more common and now actuators are out there that can be adapted.
From my research it looked like two models of actuator were the best candidates- the Dexter K7-650-00 or the BrakeRite 4822500. I went with the Dexter because all other things looked the same but the Dexter is in an all aluminum case that looks much stronger.

This thing has a MASSIVE brake fluid reservoir 24oz of fluid i got and paid a fortune for at the local parts store didn't even come close to filling it- best to get a big 32oz or bigger jug of DOT-5 silicone brake fluid. Make sure you sue DOT-5, that is what your trailer had with it from the military. If you switch you will need to really do a good job flushing it.
It is easy enough to hook up- there are 4 wires- 12v hot that provides constant power, control from the brake actuator, 12v from the breakaway kit, and ground. These will be wired into your civilian wiring harness, either a 7 pole or 6 pole. I used a 6 because the local Northern Tool was out of 7, but 7 is more common. I will probably switch at a later date to one of these really nice cables with the junction box.
Your master cylinder on your trailer is really simple- one brake line comes out facing the rear of the trailer:

Take that line loose and attach it to the actuator- on my M105 I required a 7/16-3/6 adapter, I used an Edelmann 258430 fitting and it worked perfectly. I have not checked fitting sizes on M200's or other trailers, so check before you buy. On my Dexter actuator it looked like I could remove the fitting and thread a bigger one or maybe direct into the housing, but whatever sealant they used at the factory was so strong it held so tight the fitting started to bed before it would come loose, so I quit trying that and went out and found the adapter at O'Rielly.

While I had the actuator plumbed and wired, while it was still sitting on an ammo can under the trailer, I bled the brakes. Since the actuator is equipped for a breakaway switch that turns it on via a small battery I simply connected the breakaway wire to the 12v lead- when you do the actuator starts pumping and keeps doing so until power is removed. This is to lock the brakes up if your hitch fails, but it makes it super easy to bleed the brakes- just apply power to that wire and open the bleeder valves, started with the farthest from the actuator (in length of the lines). Open it until fluid runs constant with no air or sputtering, close it, move to the next farthest away. I would only run the actuator no more than about 2 minutes without stopping to let it cool just to be safe, but I didn't feel any heat when I did mine. Easiest brake bleeding job ever.
Since I wasn't sure this was even going to work, and was also rushed to be ready to go to the GA Rally, I didn't mount it permanently yet, it is ratchet strapped to the frame with a pad between it and the frame. Permanent mount to follow soon now that I have proven it works, but still have some fine tuning to do.

Next post- test drive and kinks to be worked out.
First some basics- your M105, M200 or similar trailers are air over hydraulic systems, meaning air activates a master cylinder. In recent years commercial trailer makers have started making electric/hydraulic setups more common and now actuators are out there that can be adapted.
From my research it looked like two models of actuator were the best candidates- the Dexter K7-650-00 or the BrakeRite 4822500. I went with the Dexter because all other things looked the same but the Dexter is in an all aluminum case that looks much stronger.
This thing has a MASSIVE brake fluid reservoir 24oz of fluid i got and paid a fortune for at the local parts store didn't even come close to filling it- best to get a big 32oz or bigger jug of DOT-5 silicone brake fluid. Make sure you sue DOT-5, that is what your trailer had with it from the military. If you switch you will need to really do a good job flushing it.
It is easy enough to hook up- there are 4 wires- 12v hot that provides constant power, control from the brake actuator, 12v from the breakaway kit, and ground. These will be wired into your civilian wiring harness, either a 7 pole or 6 pole. I used a 6 because the local Northern Tool was out of 7, but 7 is more common. I will probably switch at a later date to one of these really nice cables with the junction box.
Your master cylinder on your trailer is really simple- one brake line comes out facing the rear of the trailer:
Take that line loose and attach it to the actuator- on my M105 I required a 7/16-3/6 adapter, I used an Edelmann 258430 fitting and it worked perfectly. I have not checked fitting sizes on M200's or other trailers, so check before you buy. On my Dexter actuator it looked like I could remove the fitting and thread a bigger one or maybe direct into the housing, but whatever sealant they used at the factory was so strong it held so tight the fitting started to bed before it would come loose, so I quit trying that and went out and found the adapter at O'Rielly.
While I had the actuator plumbed and wired, while it was still sitting on an ammo can under the trailer, I bled the brakes. Since the actuator is equipped for a breakaway switch that turns it on via a small battery I simply connected the breakaway wire to the 12v lead- when you do the actuator starts pumping and keeps doing so until power is removed. This is to lock the brakes up if your hitch fails, but it makes it super easy to bleed the brakes- just apply power to that wire and open the bleeder valves, started with the farthest from the actuator (in length of the lines). Open it until fluid runs constant with no air or sputtering, close it, move to the next farthest away. I would only run the actuator no more than about 2 minutes without stopping to let it cool just to be safe, but I didn't feel any heat when I did mine. Easiest brake bleeding job ever.
Since I wasn't sure this was even going to work, and was also rushed to be ready to go to the GA Rally, I didn't mount it permanently yet, it is ratchet strapped to the frame with a pad between it and the frame. Permanent mount to follow soon now that I have proven it works, but still have some fine tuning to do.
Next post- test drive and kinks to be worked out.