- 8,698
- 3,204
- 113
- Location
- Monrovia, Ca.
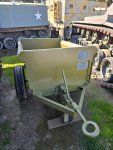
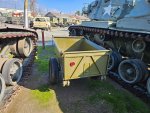
Figured i'd show the Converto we dug out of the back and sorta restored it.
This, as far as Craig can remember, was acquired from a municipality, years ago. It is one of two. There were holes drilled in it everywhere, hooks mounted all over the place, some rot in the bed and on the gate. The dump linkage was frozen, wheels had been added to the rear, there were tail lights on it and a very bad wiring job, the little sliding gate was missing on the tail gate and a civilian ball hitch had been welded over the pintle.
I prepped the tub for hole plugging by removing all of the hooks, chamfering the holes and then using a thick aluminum bar as a backer, welded the holes with the MIG. Next, onto the floor. I decided to leave two holes in the front corners to let water drain out but filled the rest, cleaned the rot areas on the floor, it was not as bad after it was cleaned up, ended up only being aps 1 inch long and not too wide, so filling it was simple. Surprisingly, the thickness was still there! We did remove the wheels, but, when they were installed, another hole was put into the skid, so, we just cleaned up the wheels and re installed them with some new bolts. At least they roll now! I also took some time attempting to straighten out the bed rails, they were pretty banged up and bent.
Onto the tailgate and dump mechanism! The two angled stiffeners were rotted off about 2 inches up from the bottom, the reflector was gone and the housing was smashed. The sliding door was missing. I cut off the two rotted stiffeners and removed one of the straps for the sliding door. Removed the reflector, prepped the gate, welded up MORE holes. I was able to find a 10ft piece on channel in the metal pile that was an exact match for the stiffeners! Fabbed up a sliding door and handle and proceded to glue the parts back onto the gate. Out in the parts train, I knew I had seen reflectors. A bit of a search turned up a stack of NOS, Korean war era, red reflectors. Dates on packaging was 1951! Got it glued to the gate by covering the reflector with a wet towel and two quick spot welds. The dump mechanism was frozen. With the help of a sponsor of the Museum, B'laster Products, We were able to free up the rear latches, get the rod out, clean it up and re install it. It moves very easily now. The rest was just cleaning things up and lubing. We did have to "borrow" the rod from the other trailer due to the one on this trailer being cut and missing about 6 inches off of the latch end. We also had to fabricate the front safety hook as it wasn't there. Luckily we have a manual for it so that we could see what the original looked like. The second trailer is also missing this.
With the bed now being able to un lock, un latch and dump, it was time to move onto the time consuming part, the pintle and, as I found out a bit later, the landing leg. It was tough to remove the welded on civi hitch. It was an old cast iron clam shell type affixed to the pintle with 3/8 plate. It took some doing to surgically cut the welds and plate so that I didn't cause too much damage to the ring, but I got it done. I only nicked it once but the weld had some penetration and had caused low spots at the weld/pintle joint. I was able to fill and grind the spots and finished the surface up with a needle scaler so it wasn't grinder/flap wheel smooth. Came out alright!
The leg needed some work. The original lock pin wasn't there, it was just a bolt with a chain welded on it. The locking holes, both for locking up and down, were all wallowed out. I ended up looking through the manual and found an image of the gear. The original pin was a T handle type, held in with a spring between the chassis and a roll pin through the pin. I did my best to re create it, it turned out good. I also had to fix the ovaled out holes in the leg. A bit of grinding, a bit of welding and then a bit more grinding, and it came out almost new! The leg pivoted smooth and locked securely in both positions.
Time for paint! We decided to use the tires that were on the trailer partly due to us not having any WWII era NDT style tires off of wheels on hand AND, the manual shows that it had the rib style tires, like the ones on it, when delivered.
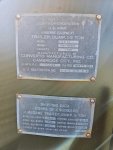
Data plates were removed, wheels removed, bearings greased and a nice coat(s) of urethane paint laid down. After it was all cured, the plates were riveted back on. We still need to do some stenciling. You can see on the pic of the data plates that this was painted yellow, so is the other one. I was very surprised that there was very little rust/rot on this. It has been sitting in the back yard since the 70s when the Museum mobed from Bell to South El Monte. It was located against the east fence, behind some large items and was tough to extract from it's resting spot.
The work done on this was by 3 people, myself, a volunteer named Didi, a very meticulous, patient, Frenchman that is a Baker and volunteers occasionally and one of the volunteer kids. Didi did his magic on the stuck pieces and moving parts on the dump, the young man volunteer did a fantastic job of sanding and prepping for paint and I took care of the hole filling, patching, welding and fabricating of pieces parts. I did take pictures of this project as it happened, as the trailer was , the repairing of it, etc. but I can't find them, sorry.


