• Steel Soldiers now has a few new forums, read more about it at: New Munitions Forums!

  • Microsoft MSN, Live, Hotmail, Outlook email users may not be receiving emails. We are working to resolve this issue. Please add support@steelsoldiers.com to your trusted contacts.


Core plug issues-question

shootist

Member
182
0
16
Location
RI
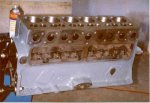
Ok so finally after getting the motor completed and installed
After running her in etc
I took it on the road after a 1/2 hr run in driveway.
All appeared fine so off we went
After a mile and a half she over heats....
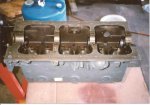
Open the hood and a core plug ( some people call it a
"freeze plug" ) had fallen out.....
So the following day another was put in its place.
Did same routine ran her up to temp for around a 1/2 hr
All appeared fine and took her out again.....
After a 2 mile drive all **** broke loose under hood
I was a few hundred feet from house when the Temp went from fine
To buried (max reading)
Truck shut itself down and barely coasted into drive way
For some reasons batteries went dead (they are 2 weeks old)
Anyhow no steam no nothing , I open the hood and a different
Core plug fell out.....
Before the rebuild the core plugs were never an issue
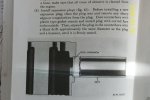
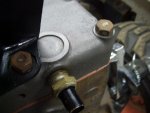
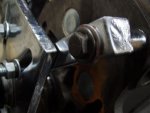
Now here's the question: the plugs are convex disc type
So if I remember right the originals were perfectly flat
When sitting in position.
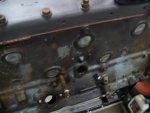
These appear still convex after installed. Am I correct
In assuming they weren't installed correctly?
If anyone has a sec to get a good photo of one of theirs
It would be a great help in determining whether it should sit
Flat or remain convex
 

Cav Trooper

New member
110
0
0
Location
Hamilton, Ohio
To install core plugs/freeze plugs the plugs are pushed into the holes and swaged into place by flattening the dome with a piece of bar stock and a hammer. This flattens the dome and forces/locks the plugs into the hole making them water and pressure tight. The plugs must be the correct size for the hole also or even when swaged they won't hold. I normally use a little Permatex No. 2 or Indianhead gasket sealer around the perimeter of the hole where the plugs will seat, just as an extra measure for sealing.
 

shootist

Member
182
0
16
Location
RI
Ok so if I am reading correctly
They should be flat if installed correctly not
Remain slightly convex?
If so they were installed wrong
I knew the originals were perfectly flat
 

Bill W

Well-known member
1,985
42
48
Location
Brooks,Ga
In this pic you can ( barely ) see how the center of the plugs are punched in to seal/seat them to the block.
 

Attachments

Last edited:

Tanner

Active member
1,013
11
38
Location
Raleigh, NC
Interesting. I've always seen core/casting plugs installed concave to the outside/dome inward, and inserted with a bit of sealer. The design of the plug should have the plug dome facing inward so that the coolant pressure pushes outward against the dome, 'locking' plug into bore.

Similar to this installation of later style lipped plugs in Chevy engine... Freeze Plugs - Tips For Leak-Free Plugs - Circle Track Magazine > installed dome inward.

What does engine shop manual show?

'Tanner'
 

G-Force

Member
622
8
18
Location
allendale nj
These are different plugs than what is usually used on automotive blocks if I'm not mistaken (correct me if I'm wrong). The plugs he has are actually just concave and have no lip like on regular core plugs. There is a shoulder inside the bore of the block where the plug goes. You put the plug in to the shoulder with the concave side facing out and then you hit the center with a large punch to put a nice dent in it. This expands the plug and locks it into place. And putting sealer around the edge does help it seal and prevent leaks.
 

shootist

Member
182
0
16
Location
RI
thanks for all the replies.
I should've mentioned they are the disc type
so they seat against a ridge in the block.
Tanner mentioned something about the "dome" side
facing in.
Also the napa guys said the same "dome" faces water jacket.
now I am really confused....
TM1840a does not show the installation.
it just appears that dome side into water jacket wont expand the plug.
i am wondering at this point having to remove the fender and all the peripherals
to seat these once I finally figure which way they go in order to hit them straight
on, if I should just tap the holes and put pipe plugs in?
my concern is on two occasions I lost a plug...
I am beginning to loose faith in the vehicles "working order"
I really just want to enjoy it not worry about it popping plugs every two miles aua
 

G-Force

Member
622
8
18
Location
allendale nj
Shootist,
On the disc type the dome faces out. Seal the edge with some permatex and put it in place and then tap the center in with a ball peen hammer or you can get a socket the same diameter as the plug and use that with the ratchet side of the socket facing the plug. You want to collapse the dome of the plug which will expand it and lock it into the block. There is no way that the pressure of the cooling system will cause the plug to straighten out or the dome part will hold it in. I've never heard of that before. Just take a hammer and collapse them in some and you'll be ok.
 

WarrenD

New member
726
8
0
Location
CT
Be sure you have the correct low pressure radiator cap, I was told that in no uncertain terms when I bought my truck last year.
 

shootist

Member
182
0
16
Location
RI
Going to attempt to remove the peripheral items and
Fender in the next day or so and remove the 4 plugs I can
see and replace them with another five new ones.
On drivers side. Now I know where those are also one in the
back that I can't get to because of firewall and the one
behind or below the water pump also inaccessible
where are the other 4 for some reason I thought there
were 11?
Warren I am running a 4 pound cap and a 180 tstat
 
Last edited:

shootist

Member
182
0
16
Location
RI
Thanks for the picture a Bill
I'm only seeing 6 in the pictures
I know there's one behind the plate under the water
pump near the timing chain cover and I thought
For sure there was another just above where
The tranny bolts up. I'm not sure why I thought
there were so many

Warren I had a cap that I got from vintage
On it that doesnt have the pressure marked on it
but after the plugs started falling out
I switched it back to its original cap which is a 4 pound
one. Hoping that may help....but nope

Anyhow after I disassemble all my hard work :shock:
I let you guys know how I made out.
Hopefully these don't fall out
 

shootist

Member
182
0
16
Location
RI
This is from TM 9-1840A ( Engine and Clutch T-245 )
I must have went right by it !! :doh:


Great pictures guys.

Well I got the peripherals removed tonight on the right
Gonna pull the remaining plugs over the next day
or so
Bert did you use a ball peen on those?
 
Last edited:

T. Highway

Well-known member
Steel Soldiers Supporter
1,232
52
48
Location
S.E. WI & S.E. TN, USA - Earth
I used a 24 OZ ball peen and set them with one swing each. You will be a little leary of hitting it too hard the first time but I bet you will set the second one perfect the first time.

Make sure to post a picture when your done Shootist.

Bert
 
Top
AdBlock Detected

We get it, advertisements are annoying!

Sure, ad-blocking software does a great job at blocking ads, but it also blocks useful features of our website like our supporting vendors. Their ads help keep Steel Soldiers going. Please consider disabling your ad blockers for the site. Thanks!

I've Disabled AdBlock
No Thanks