lino
Member
- 148
- 2
- 18
- Location
- Wake Forest, NC
Hey All,
I found several threads (from circa '08 ) on how to crimp the standard connectors (that we call Packard) on deuces, but I haven't found much lately.
Also, a simple mod that I made to my crimp tool made it much easier to use, so I thought I'd post a summary.
First of all, the connectors in kit form are available from Erik's like this: http://www.eriksmilitarysurplus.com/rushcoq10ms.html, or they can be found on ebay as well. (I found Erik's to be cheapest).
Please note that there are different part numbers for each size of wire.

The inserts look like this on the connection end:

And like this on the wire end:

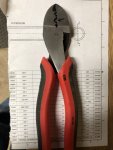
The crimp tool is known as an AF-8 (among other names). It's made by several manufacturers.


The full part number is M22520/1-01
That final -01 is important. It determines the wire size range of the crimp tool. The proper range is 12-26 ga wire. The -02 goes to higher numbers (smaller wire).
And a closeup of the selector (of the proper size)

Ebay is a good source for these. New they are very expensive.
There is also a dazzling number of postioner and turret options, that can be extremely confusing (and spendy). The short answer is that you don't need either one. And, unless you are rewiring a complete truck, you probably don't even want one.
They fit onto the back of the tool (same side as the wire size selector) and allow you to drop your insert in and the positioner holds it at the right height for the crimp fingers to act in the right place on the insert. Turrets allow you to select more than one type or size of insert without removing the positioner.
It turns out that your hands and eyes working together can do an equally good job. So unless you are making hundreds of connections and want to save a total of about 5 minutes while doing so, I'd advise against a positioner.
Here's what happens to the insert when you squeeze the lever:

Now, I also found in old threads, that folks needed to remove the ring on the connector (see right side of second pic) in order to fit it thru the hole in the crimp tool. Some had made jigs to help with the removal. The ring then had to be re-installed after crimping (this ring is on the connection side of the insert, not the crimp side).
I had the same issue, but I also found that the male inserts didn't quite fit in the crimp tool either (a much bigger issue).
They were really close. Some fit, some didn't.
So I measured every insert I had, and the largest ones were .221 diameter. The hole thru the crimp tool was about .220.
Since I just got it and wasn't that attached to it yet, I figured it was time to "fix" the crimp tool...
There is a wire drill sized at .221 (#2), but I wanted a little space, so I grabbed the #1 bit (.228 diameter), put it in my hand drill, took a deep breath, and...
...drilled out the center of the crimp tool.
It's hard steel, but with patience and care (and a sharp bit), it was easy to do. BE SURE THE HANDLE IS OPEN, or you will cut off the fingers and destroy your crimp tool.
Looking at the fingers on mine, there is no evidence that the drill bit touched them.
All connectors that I have (you saw my stash of them in the first pic) now fit easily thru the tool. Crimps on 16ga presotlite wire pass the "pull really hard" test.
Hope that helps.
ciao
lino
I found several threads (from circa '08 ) on how to crimp the standard connectors (that we call Packard) on deuces, but I haven't found much lately.
Also, a simple mod that I made to my crimp tool made it much easier to use, so I thought I'd post a summary.
First of all, the connectors in kit form are available from Erik's like this: http://www.eriksmilitarysurplus.com/rushcoq10ms.html, or they can be found on ebay as well. (I found Erik's to be cheapest).
Please note that there are different part numbers for each size of wire.
The inserts look like this on the connection end:
And like this on the wire end:
The crimp tool is known as an AF-8 (among other names). It's made by several manufacturers.
The full part number is M22520/1-01
That final -01 is important. It determines the wire size range of the crimp tool. The proper range is 12-26 ga wire. The -02 goes to higher numbers (smaller wire).
And a closeup of the selector (of the proper size)
Ebay is a good source for these. New they are very expensive.
There is also a dazzling number of postioner and turret options, that can be extremely confusing (and spendy). The short answer is that you don't need either one. And, unless you are rewiring a complete truck, you probably don't even want one.
They fit onto the back of the tool (same side as the wire size selector) and allow you to drop your insert in and the positioner holds it at the right height for the crimp fingers to act in the right place on the insert. Turrets allow you to select more than one type or size of insert without removing the positioner.
It turns out that your hands and eyes working together can do an equally good job. So unless you are making hundreds of connections and want to save a total of about 5 minutes while doing so, I'd advise against a positioner.
Here's what happens to the insert when you squeeze the lever:
Now, I also found in old threads, that folks needed to remove the ring on the connector (see right side of second pic) in order to fit it thru the hole in the crimp tool. Some had made jigs to help with the removal. The ring then had to be re-installed after crimping (this ring is on the connection side of the insert, not the crimp side).
I had the same issue, but I also found that the male inserts didn't quite fit in the crimp tool either (a much bigger issue).
They were really close. Some fit, some didn't.
So I measured every insert I had, and the largest ones were .221 diameter. The hole thru the crimp tool was about .220.
Since I just got it and wasn't that attached to it yet, I figured it was time to "fix" the crimp tool...
There is a wire drill sized at .221 (#2), but I wanted a little space, so I grabbed the #1 bit (.228 diameter), put it in my hand drill, took a deep breath, and...
...drilled out the center of the crimp tool.
It's hard steel, but with patience and care (and a sharp bit), it was easy to do. BE SURE THE HANDLE IS OPEN, or you will cut off the fingers and destroy your crimp tool.
Looking at the fingers on mine, there is no evidence that the drill bit touched them.
All connectors that I have (you saw my stash of them in the first pic) now fit easily thru the tool. Crimps on 16ga presotlite wire pass the "pull really hard" test.
Hope that helps.
ciao
lino
")