• Steel Soldiers now has a few new forums, read more about it at: New Munitions Forums!

  • Microsoft MSN, Live, Hotmail, Outlook email users may not be receiving emails. We are working to resolve this issue. Please add support@steelsoldiers.com to your trusted contacts.

CTIS controller printed circuit repair?

Guruman

Not so new member
Steel Soldiers Supporter
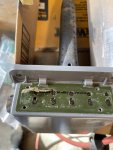
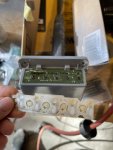
So... I made a huge boo boo.

I was trying to clean up my CTIS controller. A fresh coat of paint, and a new keypad.

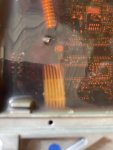
When peeling off the old keypad, the entire printed circuit tore off.....

Has anyone experimented with swapping the keypad circuit? Anyone have a dead unit they might part with?

I've got a new one coming from Christian, so it's not the end of the world, but dang I hate to hoop a perfectly good unit.
 

coachgeo

Well-known member
5,150
3,466
113
Location
North of Cincy OH
so was the whole green panel portion suppose to come out along with the keypad?

how did you end up getting the rest out?

Curious; in part, cause myself and others have a new keypad to put in.. and don't want to run into same issue.
 

TomTime

Well-known member
Steel Soldiers Supporter
676
1,664
93
Location
MD.
Wow, sorry to hear and see your bad luck.
I have a replacement keypad for the CTIS controller, but after seeing your issues with yours, I’m reconsidering replacing mine now.
 

Guruman

Not so new member
Steel Soldiers Supporter
so was the whole green panel portion suppose to come out along with the keypad?

how did you end up getting the rest out?

Curious; in part, cause myself and others have a new keypad to put in.. and don't want to run into same issue.
In short, no. The green part is part of the metal housing.

The control pad is a bit of a complicated sandwich. The printed plastic circuit, a spacer, some metal disks for the button presses, and a plastic cover with the functions printed on it. It's all held together using some pretty strong adhesive.

The damage I have is because I knew none of this when trying to replace the plastic cover. I did not take the time to remove the new replacement parts from the kit beforehand, or I might have realized.

I used a razor to peel up the corner, not knowing that I was getting the whole sandwich instead of just the printed cover. Because the adhesive was so strong, I did not realize until it was too late that I tore the printed circuit right off.
 

Guruman

Not so new member
Steel Soldiers Supporter
Wow, sorry to hear and see your bad luck.
I have a replacement keypad for the CTIS controller, but after seeing your issues with yours, I’m reconsidering replacing mine now.
See my post above, but if you are just trying to replace the cosmetic outer layer like I was, knowing now a bit about how it goes together, it shouldn't be too bad.
 

Guruman

Not so new member
Steel Soldiers Supporter
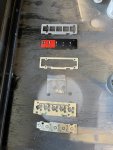
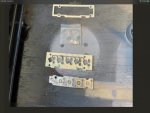
So here's a visual aid:

IMG_2323.jpg

At the top is the metal mask/guard

then the printed button cover

then a spacer

then another spacer that makes room for the metal disks to fit. these disks flex when pressed, and make contact with the traces on the printed circuit.

lastly, the printed circuit that is supposed to remain attached to the controller.


I hope this helps someone....

Edit: I may or may not have the correct orientation and or order in the pic. I just threw it together to show others real quick.
 

Guruman

Not so new member
Steel Soldiers Supporter
I never tried to open one because they are so potted sealed. I probably have a bad controller around. Maybe the potting can be dissolved with something that wont damage the components
I'm not sure about dissolving, but mine is potted with relatively soft silicone I think. I thought maybe it could just be carved away to get to the ribbon connector.... Maybe.
 

Ronmar

Well-known member
3,881
7,549
113
Location
Port angeles wa
I think the membrane and ribbon are supposed to be one piece, joined where I circled in red. The ribbon then plugs onto a connector on the main board before the potting is poured… it has been so long since I dissected mine, I just don’t remember, but that is the way a membrane keypad is typically employed, ribbon and membrane as one piece, as the membrane is made the same way the ribbon is. Then the conductive buttons with separating “springs” then the actual key face membrane that you touch with your fingers…

4F5A42F5-20AC-49C8-9301-DDCE8CB14B0A.jpeg
 
Top
AdBlock Detected

We get it, advertisements are annoying!

Sure, ad-blocking software does a great job at blocking ads, but it also blocks useful features of our website like our supporting vendors. Their ads help keep Steel Soldiers going. Please consider disabling your ad blockers for the site. Thanks!

I've Disabled AdBlock
No Thanks