• Steel Soldiers now has a few new forums, read more about it at: New Munitions Forums!

  • Microsoft MSN, Live, Hotmail, Outlook email users may not be receiving emails. We are working to resolve this issue. Please add support@steelsoldiers.com to your trusted contacts.


Fixing up a MEP-802A

Dieselmeister

Active member
Steel Soldiers Supporter
166
232
43
Location
Flagstaff, Az
Picked up a MEP-802A off GL in Lockbourne in January with 500hrs. No signs of water damage on the muffler or in the crankcase. Turning
the fan turns the engine (only moved it a little, not to scrape the cylinders until I get some oil in there). The only obvious damage was a broken drain wellnut on the tank. I replaced that with the brass tank fitting/O-rings.

I checked the quad windings (all ok) and installed the varistor and fuse.
I have the cylinders soaking in Marvel Mystery oil while I go through the rest of the machine. (Had some minor signs of wet stacking).

This generator was fitted with a remote control, using two timer relays. Most of the wires on the S1 switch were disconnected, and wired
through an added terminal strip to the remote-control relays. Since I don’t plan on using the remote, I plan on reconnecting the S1 switch per the wiring diagrams in the TM. I have heard that there are some errors in the TM’s.

Are the wiring diagrams for the S1 switch correct? Or do I need to look out for any surprises?

Are there any schematics available for the A1 voltage regulator? Hopefully I won’t need it, but would like to have it, in case the regulator ever
fails. The regulators seem to be virtually unavailable.

This generator came bolted to an apparently custom made aluminum frame and baseplate about 3" larger than the outline of the generator. Any idea what that was for?

Diesel fumes and CARC paint are apparently addicting. All I wanted was a MEP-016D. That turned into two, then an M-1102, and now a MEP-802A. What’s next???

Thanks to all members for the excellent postings. This has definitely made my project that much easier.
 

Guyfang

Moderator
Staff member
Moderator
15,871
22,098
113
Location
Burgkunstadt, Germany
The schematics are right for the S1.
No schematics for the A1. Pluck and chuck.
The base plate? Doesn't sound milatary. But could be. Send a picture.
Wet stacking is not that big of a problem, easy fix. Load er up.

Sounds like a winner. You might take the rear top off and look for mice motels.
 

Dieselmeister

Active member
Steel Soldiers Supporter
166
232
43
Location
Flagstaff, Az
I found a inventory sticker, indicating the unit came out of the Army ECBC. This unit was exceptionally clean, other than some cobwebs in the control box. The S6 switch was broken off the mount, but I was able to fix that. The casters on the base are my HFT addition. Some minor sheet metal damage, and dislocated relays make me think this unit was knocked over or dropped on its left side at one time. I have not seen any mechanical damage though, so I am keeping my fingers crossed. Need to complete rewiring the S1 switch, and get some batteries. This is the first time I am uploading pictures, so lets see what happens.

802A (5).jpg802A (2).jpg802A (6).jpg802A (7).jpg
 

Guyfang

Moderator
Staff member
Moderator
15,871
22,098
113
Location
Burgkunstadt, Germany
The base plate is not military, but someone in he military may have made it. Very nice! I had one something like it in Graf, but more primitive. Very handy.
 

Dieselmeister

Active member
Steel Soldiers Supporter
166
232
43
Location
Flagstaff, Az
No, it didn't, but does now. The first thing I did was check the resistance of the Quad winding. All was good, so I added the fuse and varistor. If the Quad winding would have been bad, that would have been a wallet buster! To rewind a stator is about U$D 950.00 definitely not cheap.
 

Dieselmeister

Active member
Steel Soldiers Supporter
166
232
43
Location
Flagstaff, Az
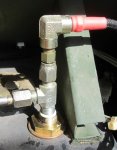
Had some more time to work on the set today. Replaced the upper well nut, and replaced the fuel return hose. I had to fish the fitting in with a wire. My arm made it into the tank, but could not get to the fitting. Those brass & O-ring fittings should last for the life of the set. I used some adhesive lined heat shrink to make the hose connection better, although that was overkill. The top fitting was much easier to replace than the bottom one. At least I did not have to modify any sheet metal there.

802A (11).jpg
 

Farmitall

Well-known member
Steel Soldiers Supporter
544
274
63
Location
Eubank, KY
Had some more time to work on the set today. Replaced the upper well nut, and replaced the fuel return hose. I had to fish the fitting in with a wire. My arm made it into the tank, but could not get to the fitting. Those brass & O-ring fittings should last for the life of the set. I used some adhesive lined heat shrink to make the hose connection better, although that was overkill. The top fitting was much easier to replace than the bottom one. At least I did not have to modify any sheet metal there.

View attachment 722449
Nice job!
 

Dieselmeister

Active member
Steel Soldiers Supporter
166
232
43
Location
Flagstaff, Az
I decided to pull off the radiator hoses today, since I heard and felt a significant "crunch" when I squeezed the hoses. Turned out the springs inside the hoses were rotted away. Lucky I caught that, before circulating spring particles through the cooling system. (The cooling system was drained before I received the unit.)

What really surprised me was that the thermostat housing, and part of the upper hose were completely plugged with this clear/white hard jelly like substance. Are those silicates, or something else? I was able to dig out the goo with a screwdriver, and hot water helped dissolve and wash away the rest. The radiator had a lot of sludge in the bottom, but that washed away with hot water.

Once I complete the rest of the work, I plan on running the engine with distilled water, until I get clean water coming out. Any other recommendation for cleaning up the engine before refilling with antifreeze? Should I use some type of radiator flush chemicals?

Thanks,

H.
 
Last edited:

Light in the Dark

Well-known member
Steel Soldiers Supporter
3,575
5,113
113
Location
MA
I would run it a few times with just regular tap water from a hose. Then after a couple runs, put with distilled and get up to temp, drain that... and move to HD coolant of your choice.
 

Light in the Dark

Well-known member
Steel Soldiers Supporter
3,575
5,113
113
Location
MA
And since you are already messing around, I would personally swap the thermostat with a new one, when you are all done flushing, and are at the final fill stage.
 

Dieselmeister

Active member
Steel Soldiers Supporter
166
232
43
Location
Flagstaff, Az
Had some more time to work on the set again. Cleaned up the fuel tank, replaced all fuel lines, installed a new "FERNCO" coupling and took "Light in the Dark's" advice and replaced the thermostat. Glad I did. The picture of the thermostat and housing are self explanatory. Amazing what shows up in cooling systems. The radiator had the same stuff in the bottom.

802A (30).jpg802A (29).jpg802A (28).jpg802A (27).jpg
 
Last edited:

Light in the Dark

Well-known member
Steel Soldiers Supporter
3,575
5,113
113
Location
MA
When you think you have flushed it enough, flush it one more time.​ Pretty gross, right?
 

CapePrep

Active member
263
178
43
Location
MA
What the he$% is that sh$%????I have worked on many engines and have never seen that!! Any thoughts on what it is and how to avoid it happening??? Good God!
Had some more time to work on the set again. Cleaned up the fuel tank, replaced all fuel lines, installed a new "FERNCO" coupling and took "Light in the Dark's" advice and replaced the thermostat. Glad I did. The picture of the thermostat and housing are self explanatory. Amazing what shows up in cooling systems. The radiator had the same stuff in the bottom.

View attachment 723328View attachment 723327View attachment 723326View attachment 723325
 
Top
AdBlock Detected

We get it, advertisements are annoying!

Sure, ad-blocking software does a great job at blocking ads, but it also blocks useful features of our website like our supporting vendors. Their ads help keep Steel Soldiers going. Please consider disabling your ad blockers for the site. Thanks!

I've Disabled AdBlock
No Thanks