• Steel Soldiers now has a few new forums, read more about it at: New Munitions Forums!

  • Microsoft MSN, Live, Hotmail, Outlook email users may not be receiving emails. We are working to resolve this issue. Please add support@steelsoldiers.com to your trusted contacts.

FLU fuel issues

The FLU farm

Well-known member
Steel Soldiers Supporter
3,338
1,319
113
Location
The actual midwest, NM.
Okay, I'm nearing the end of solving this particular problem on my (formerly) parts SEE.
Today it was confirmed that there are no air leaks left after the valve (thanks mostly to new copper washers from Bel-Metric at the banjo fittings) by having created a vacuum in the strainer.
After driving, and getting the out-of-fuel symptoms, I closed the valve. The strainer bowl stayed in place after loosening the screw. When I removed it, there was a slight sucking sound, then bubble sounds.

Like General Hood's, the tank was a mess. I never did more than rinse it out several times, getting maybe half a pound of crud out of it. The black coating (apparently a result of GP putting JP8 instead of diesel in there) was left in there.
I'm guessing that the additives I've been using has loosened this stuff up, so like General Hood, I'm getting generous amounts of what looks like coffee grounds in the strainer.

In my case it's easier said than done to drop the tank, so I'll have to drain it, "shovel" as much as possible of the crud over to the drain and rinse it out.
Then blowing some compressed air from the valve into the tank (which I've done before) should clear out the pickup tube - which appears to be my problem at this point.

Without getting the crud out of the tank first, the pickup will keep clogging up, so it's a short lived victory if you blow the line out and the engine runs fine afterwards. Been there, done that.

It's been covered in the "Owners thread", but I've had good luck with eliminating air leaks by using a Clamp-Tite tool on the plastic hose where age has made it a loose fit on the barbs.

By the way, it's not a complete coincidence that it turns out that the air leaks are gone now; yesterday I ordered more hose, washers, and new banjo fittings from Bel-Metric to go with the two new strainers I had bought.
Oh, well, I should've believed what the test hose told me last week; there were no bubbles, so the air leaks were apparently already taken care of. That includes the NAPA O-ring I'm using as a seal for the strainer. The vacuum in the strainer made the coin fall down, finally.
 

General Hood

Member
712
2
18
Location
Fort Towson, OK
Okay, I'm nearing the end of solving this particular problem on my (formerly) parts SEE.
Today it was confirmed that there are no air leaks left after the valve (thanks mostly to new copper washers from Bel-Metric at the banjo fittings) by having created a vacuum in the strainer.
After driving, and getting the out-of-fuel symptoms, I closed the valve. The strainer bowl stayed in place after loosening the screw. When I removed it, there was a slight sucking sound, then bubble sounds.

Like General Hood's, the tank was a mess. I never did more than rinse it out several times, getting maybe half a pound of crud out of it. The black coating (apparently a result of GP putting JP8 instead of diesel in there) was left in there.
I'm guessing that the additives I've been using has loosened this stuff up, so like General Hood, I'm getting generous amounts of what looks like coffee grounds in the strainer.

In my case it's easier said than done to drop the tank, so I'll have to drain it, "shovel" as much as possible of the crud over to the drain and rinse it out.
Then blowing some compressed air from the valve into the tank (which I've done before) should clear out the pickup tube - which appears to be my problem at this point.

Without getting the crud out of the tank first, the pickup will keep clogging up, so it's a short lived victory if you blow the line out and the engine runs fine afterwards. Been there, done that.

It's been covered in the "Owners thread", but I've had good luck with eliminating air leaks by using a Clamp-Tite tool on the plastic hose where age has made it a loose fit on the barbs.

By the way, it's not a complete coincidence that it turns out that the air leaks are gone now; yesterday I ordered more hose, washers, and new banjo fittings from Bel-Metric to go with the two new strainers I had bought.
Oh, well, I should've believed what the test hose told me last week; there were no bubbles, so the air leaks were apparently already taken care of. That includes the NAPA O-ring I'm using as a seal for the strainer. The vacuum in the strainer made the coin fall down, finally.
Each step can be counted as progress, even though the end is no where in sight. Let us know how your tank reaming turns out
 

The FLU farm

Well-known member
Steel Soldiers Supporter
3,338
1,319
113
Location
The actual midwest, NM.
Today I learned several things while spending a few hours trying to clean out the tank. One is that the (formerly) parts SEE really is a SHEE.
Since this particular tank won't come out easily, the cleaning consisted of draining, scraping, wiping, and scrubbing. This was repeated three times, while wishing that the pressure washer somehow could be made to spray diesel instead of water.
Partway through, the line from the valve to the pickup was blown out with compressed air since yesterday's adventures indicated that the pickup was blocked, again.

Maybe half a coffee cup's worth of crud came out this time, making the total about three or four full cups. Surely there's more towards the rear of the tank, which I couldn't reach.
What likely happened is that the solidified "JP8 chemical reaction remains" got loosened up once subjected to anti-gel and other additives, turning into crud with particles ranging in size from fine sand to coffee grounds and slightly larger.

Took a test drive and got about twice as far as yesterday before fuel starvation symptoms set in again. Not enough fuel flow to support 2,300 rpm in high gears - which is something I would normally never aim for, but I want this fuel problem fixed.

One final (desperate?) thought was to clean the strainer's filter. While the cup has been cleaned out numerous times, I don't think that I ever cleaned the filter itself. This bright idea was triggered after seeing how much fine stuff was floating around in one of the pails the fuel had been drained into. I'm used to just dumping out the big stuff, not paying attention to the filter itself.
Took some parts cleaner and sprayed away, reinstalled (there was very little crud in the strainer this time, by the way) and took another test drive. Finally! No guarantees, but that might have been the final thing. Well, until more crud plugs up the pickup and/or strainer, anyway.

So what I've learned is that if there's a vacuum in the strainer, there are no air leaks farther upstream.
Having chased air leaks for a long time, it seems that an empty (no fuel) strainer is a sure sign of air leaks. Before or after the strainer.
New copper washers are so worth it. In my trials with an electric pump, there were never any visible leaks, yet things improved with new washers.
A bad pickup tube (pinhole) could make the vehicle run only with a certain amount of fuel in the tank. Thankfully, that's not something I've experienced, yet.
Not enough fuel, but the strainer is full, may indicate a bad vent on the tank or a blocked pickup tube.

Now that the SHEE runs better than ever, perhaps an explanation of that new name is in order.
SHEE needs constant attention, or gets moody. Even after installing new shoes, SHEE wasn't happy for very long. Then there's the leak in the rear which isn't constant, but periodic.
I could go on, but you get the idea.DSCN0393[1].jpgDSCN0394[1].jpgDSCN0395[1].jpg
 

911joeblow

Active member
508
68
28
Location
Utah
I hate reading this only because my SEE is running really really well BUT if I wait a week and try to start it I see lots of air when I use the primer heading back to the tank. I really dont want to dig in but my perfection side is kicking in.....arrrrg!
 

The FLU farm

Well-known member
Steel Soldiers Supporter
3,338
1,319
113
Location
The actual midwest, NM.
Does it need to be primed after sitting for a while, or do you just do it? I don't think I ever had to prime them even if they've been sitting for months.
Either way, now I feel that fixing air leaks is easy. Other than installing new hose on the barbed fittings (using a hair dryer to heat the hose), which can end up less than perfect.

Start with looking for hose connections that can be rotated on the barb. My preferred method these days is the Clamp-Tite. Or new hose, if the old one is past its best-by date.
Another suspect area (to me, anyway) is the gasket on the strainer. And if I could get to them on the SHEE, I'd replace the short hoses on the sending unit.
Other than that, it seems that it's really only a matter of having good washers and gaskets in the primer/filter/pump area.
In your case, if there's nothing obvious, try putting a electric pump between the tank and valve, temporarily. If things are clean, and your SEE sure seems to be, you should be able to see fuel leaking out somewhere after a while.
 

911joeblow

Active member
508
68
28
Location
Utah
Does it need to be primed after sitting for a while, or do you just do it? I don't think I ever had to prime them even if they've been sitting for months.
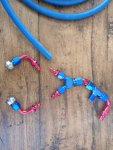
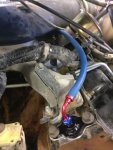
Mine will start but it needs a lot of cranking if I dont prime it after sitting a week or more. I am saving some of that cranking time by priming it first. I know there is something bleeding down. I am tempted to put the Teflon lined hose I use on my HMMWV cooling upgrade kits to change out the hard plastic stuff. I do like seeing through the hose but the Teflon stuff is so much better and easier to work with. I am also thinking about tapping into the ICE system to be able to read fuel pressure and such but that is pretty far down the want list... Here is the hose I am going to use...

IMG_20170404_130450.jpgIMG_20170416_160107.jpg
 

The FLU farm

Well-known member
Steel Soldiers Supporter
3,338
1,319
113
Location
The actual midwest, NM.
There's a check valve in one of the banjo bolts that I have yet to mess with, which could be part of that problem. But when you say it needs priming, do you prime only or also bleed it?
I've found the SHEE to be very tolerant when it comes to air in the system. It'll start and run - run crappy for a while if there's lots of air - but it'll still start.

Part of that discovery is due to laziness. It's a pain to slide the hood to the left, enough to get to the bleeder screws, while trying not to damage the brake and clutch lids - and I don't even bother with latching the hood. I was also afraid of wearing out the threads for the bleeder screws in the new filter housing, and the primer pump itself.
Lately, all i do is give the primer pump a few pumps, maybe four or five, if I've drained the strainer. That's a big difference from when I had to fill the strainer, then pump and bleed frantically. Life without air leaks is so much easier.

I'm curious about your see-through hoses, though. That's something I've never seen on a FLU, except for on Bel-Metric's temporary test hose setup. It would be a nice feature to have, that's for sure. Do you have a photo, and maybe even a source for whatever material those hoses are?
It was tempting to switch to rubber hose and hose clamps for simplicity, but the more I learned about the factory setup, the more I liked it.
Oh, that test hose has provisions for measuring fuel pressure, by the way. Must be easier than tapping into the diagnostic system.
 

911joeblow

Active member
508
68
28
Location
Utah
My current hoses are OEM Mercedes plastic clear hose. The blue hose above is hard teflon inside but soft outer. I think it will do a better job and is more flexible too.

I dont bleed it, I just prime it a bit watching the clear return hose and keep going until there are no bubble passing.
 

The FLU farm

Well-known member
Steel Soldiers Supporter
3,338
1,319
113
Location
The actual midwest, NM.
Dang, I didn't know there was clear hose available. But it figures...now that I just ordered more black hose.
In reality, I think any hose with the correct ID that is resistant to diesel and has at least some tolerance for heat, would work. After all there's no pressure, positive or negative, to speak of in the system.
If I drove my FLUs beyond walking distance I'd switch to regular rubber hose. Or bring a few feet of the plastic hose, some rubber hose, and the Clamp-Tite tool.
Rubber hose would be quicker to field repair, so it would be my first choice.
 

alpine44

Member
397
17
18
Location
Asheville, NC - Elkton, MD
Hi FLU farm. It looks like you have what the Migginsbros called "Dieselpest" (literally translated to Diesel's Black Plague) or Diesel bug. There are several dozens of known microorganisms that -given enough time, which they had in Texas- will make a diesel tank their home. What you repeatedly find in your strainer is the detritus of their presence.

The straight way to a reliable fuel supply, would be to ditch the tank, buy a new one, add a product like Biobor, and save yourself a lot of time and aggravation.
 

peakbagger

Well-known member
734
360
63
Location
northern nh
One thing not to do is use any biodiesel before you get a handle on this. It acts as a solvent on the crud that builds up in fuel systems and will clean it out eventually but in the short term it will add to the pain.

My 1300L also has crud in the fuel system from sitting in a depot somewhere. Its in theory the same vintage (1300Ls were being built at the same time as SEEs worth but it was a "clean sheet" design in the late eighties versus the SEE which was a clean sheet in the late 1960s). One major plus on the 1300L is there is a visible fuel filter in line after the fuel pump. The filters are standard NAPA filters and are clear. I can change them with no need to prime.

Realistically the tank needs to come out even if you need to cut the straps off and build new ones. There are several companies who sell tank lining kits, here is example (but no endorsement implied) http://www.por15.com/POR-15-Fuel-Tank-Repair-Kit_p_62.html the tank may not need to be lined but the prep steps are probably what you need to do to really get the tank cleaned out. Ideally with the tank sending unit out, you need to hit hard with something that will eat off whatever is on the tank walls. I am not sure what is the best product for etching aluminum.

I am familiar with microorganisms in diesel fuel tanks. Boat owners seem to get it the worst, I haven't heard it on trucks that often. The tanks are frequently odd shaped and built into the boat. Most folks I knew would just overdose with Biobor. Note Biobor is really toxic stuff available through most marine stores.
 

The FLU farm

Well-known member
Steel Soldiers Supporter
3,338
1,319
113
Location
The actual midwest, NM.
The straight way to a reliable fuel supply, would be to ditch the tank, buy a new one, add a product like Biobor, and save yourself a lot of time and aggravation.
If you're correct, alpine44 (which I hope you're not), and that crud is indeed bacteria rather than leftovers of JP8 and consequent chemical reactions, I have to start with a chemical warfare approach.
Since the forward bracket for the tank is easily removed, and the straps have been loosened already, I'm halfway there. The problem is with the rear bracket.
On this particular SEE the tank sits so close to the bed that the metal tubing on the sending unit is higher than the lateral supports of the bed above it. What that means is that with the rear bracket still in place, the tank won't come out.

One way would be to build some kind of tool to get to the nuts for the rear bracket (as I recall, nothing I have would work). Another way would be to cut the bracket off, then weld it back together afterwards. Or, I could unbolt and lift the bed a bit.
In comparison, using chemicals seem very appealing.
 

The FLU farm

Well-known member
Steel Soldiers Supporter
3,338
1,319
113
Location
The actual midwest, NM.
One thing not to do is use any biodiesel before you get a handle on this. It acts as a solvent on the crud that builds up in fuel systems and will clean it out eventually but in the short term it will add to the pain.
Maybe biodiesel would be the simple solution? I suspect that my use of additives is what loosened up the previously largely solidified crud. Yes, there was a lot of loose stuff in there from the beginning, most of which I managed to flush out, but now the part that looked like spray-on bedliner is coming off.
If I can find biodiesel somewhere, then fill the tank with it and let it sit for a while, drain that out and rinse with diesel, maybe the tank would get clean?

I just hope that I didn't use any of the fuel that has been in this tank in another vehicle. If alpine44 is right and there are "SEE bugs" in there, I don't want them to move in elsewhere.

I have lined a pair of diesel tanks (for use as holding tanks on a trailer), but it wasn't with POR15 product. The prep was the killer. Used a piece of chain, among other things, but it's not that easy to play maracas with a polished 38 gallon tank. The SEE tank (if I could get it off) could be rolled down a hill, or towed across a field.

But this gave me an idea; since the tank is a bit balloon shaped (partially from being pressurized by me), I could try to suck it into a more concave shape, which just might allow it to come out.
 

The FLU farm

Well-known member
Steel Soldiers Supporter
3,338
1,319
113
Location
The actual midwest, NM.
To put things in perspective, here's a normal tank. A bit concave, even.DSCN0399[1].jpg

Then there's the one I'd like to be able to remove.DSCN0401[1].jpgActually, access to the hoses on the sending unit looks better in the photo than it is in reality.
I thought my pressurization was largely responsible for this tank's shape, but maybe bacteria burps?
 

peakbagger

Well-known member
734
360
63
Location
northern nh
Maybe biodiesel would be the simple solution? I suspect that my use of additives is what loosened up the previously largely solidified crud. Yes, there was a lot of loose stuff in there from the beginning, most of which I managed to flush out, but now the part that looked like spray-on bedliner is coming off.
If I can find biodiesel somewhere, then fill the tank with it and let it sit for a while, drain that out and rinse with diesel, maybe the tank would get clean?

I just hope that I didn't use any of the fuel that has been in this tank in another vehicle. If alpine44 is right and there are "SEE bugs" in there, I don't want them to move in elsewhere.

I have lined a pair of diesel tanks (for use as holding tanks on a trailer), but it wasn't with POR15 product. The prep was the killer. Used a piece of chain, among other things, but it's not that easy to play maracas with a polished 38 gallon tank. The SEE tank (if I could get it off) could be rolled down a hill, or towed across a field.

But this gave me an idea; since the tank is a bit balloon shaped (partially from being pressurized by me), I could try to suck it into a more concave shape, which just might allow it to come out.
If its truly an intentional coating, I don't think biodiesel will clean it out. Biodiesel acts like soap (glycerin a very polar molecule is an annoying byproduct of making biodiesel). Polar molecules are great at attacking old grease and crud but not so good with a coating designed to resist fuel. I expect mechanical methods are required to remove the coating as its most likely inert to the biodiesel. I am surprised that the prefilter on the sending unit would allow big chunks to get to the strainer. Of course it may be doing so when the rig is in operation but when the engine shuts down the crud could fall back down into the tank.

Looking at the photos I don't see why cutting the straps or brackets off wouldn't allow removal. Granted you will need to either weld the old ones or fab new ones.

I seriously doubt that on a vented tank that biology would have ballooned it out. Far more likely a recent or past experiment to pressurize the tank because the fuel system had issues like you are having. Playing around with vacuum to get a tank back into shape does come with some risk. Just like compressed air in a tank, applying a vacuum stores a lot of energy in the tank volume. The term I usually see used for a tank like your is its been "oil canned" In theory applying a vacuum may restore it but it also may end up with a very concave top and bottom. Ideally filling it full with liquid and sucking out the liquid would give the process a lot more control. Then again If I remember correctly the sending units baseplate isn't that beefy and there is possibility that you may damage it before the tank pops back. I have seen large industrial tanks sucked in by a plugged vent at a papermill. The pulp used to make the paper will set up like a rock on the head space of the tank and over time a vent can get sealed. If a pump is turned on at the base of the tank is can suck the sides in very effectively. I have also seen it with tanks that don't even have pumps on them, just opening the drain without a vent can do the same thing. Once they suck in the walls, getting them back into the right shape is not easy and inevitably the tank looks real lumpy.

I still like my boat tank solution made permanent ;) https://shop.hamiltonmarine.com/products/fuel-tank-12-gal-high-profile-low-perm-23104.html https://shop.hamiltonmarine.com/products/fuel-line-assembly-3-8--univ-style-80--low-perm-23066.html. Get the right quick disconnect bayonet to fit the tank and install a second one for the fuel return line and you are good to go. My test rig has the same parts but I went with a 3 gallon tank as it was on sale and portability was more important than capacity. If I went with an ag fuel tank for off road use I would use the same setup and put some three way valves in the supply and return line with quick disconnects. The issue as others have commented on is how quickly the system flushes the dye out and how effective adding a bit of used motor oil works to further reduce the dye color. I expect the primary fuel filters may be the problem as they have lot of surface area that could grab the dye and release it slowly, so maybe I need to install a set up a bypasses around the main filters and have removable second set for AG fuel.
 
Last edited:

The FLU farm

Well-known member
Steel Soldiers Supporter
3,338
1,319
113
Location
The actual midwest, NM.
If its truly an intentional coating, I don't think biodiesel will clean it out. Biodiesel acts like soap (glycerin a very polar molecule is an annoying byproduct of making biodiesel). Polar molecules are great at attacking old grease and crud but not so good with a coating designed to resist fuel. I expect mechanical methods are required to remove the coating as its most likely inert to the biodiesel. I am surprised that the prefilter on the sending unit would allow big chunks to get to the strainer. Of course it may be doing so when the rig is in operation but when the engine shuts down the crud could fall back down into the tank.

Looking at the photos I don't see why cutting the straps or brackets off wouldn't allow removal. Granted you will need to either weld the old ones or fab new ones.

I seriously doubt that on a vented tank that biology would have ballooned it out. Far more likely a recent or past experiment to pressurize the tank because the fuel system had issues like you are having. Playing around with vacuum to get a tank back into shape does come with some risk. Just like compressed air in a tank, applying a vacuum stores a lot of energy in the tank volume. The term I usually see used for a tank like your is its been "oil canned" In theory applying a vacuum may restore it but it also may end up with a very concave top and bottom. Ideally filling it full with liquid and sucking out the liquid would give the process a lot more control. Then again If I remember correctly the sending units baseplate isn't that beefy and there is possibility that you may damage it before the tank pops back. I have seen large industrial tanks sucked in by a plugged vent at a papermill. The pulp used to make the paper will set up like a rock on the head space of the tank and over time a vent can get sealed. If a pump is turned on at the base of the tank is can suck the sides in very effectively. I have also seen it with tanks that don't even have pumps on them, just opening the drain without a vent can do the same thing. Once they suck in the walls, getting them back into the right shape is not easy and inevitably the tank looks real lumpy.

I still like my boat tank solution made permanent ;) https://shop.hamiltonmarine.com/products/fuel-tank-12-gal-high-profile-low-perm-23104.html https://shop.hamiltonmarine.com/products/fuel-line-assembly-3-8--univ-style-80--low-perm-23066.html. Get the right quick disconnect bayonet to fit the tank and install a second one for the fuel return line and you are good to go. My test rig has the same parts but I went with a 3 gallon tank as it was on sale and portability was more important than capacity. If I went with an ag fuel tank for off road use I would use the same setup and put some three way valves in the supply and return line with quick disconnects. The issue as others have commented on is how quickly the system flushes the dye out and how effective adding a bit of used motor oil works to further reduce the dye color. I expect the primary fuel filters may be the problem as they have lot of surface area that could grab the dye and release it slowly, so maybe I need to install a set up a bypasses around the main filters and have removable second set for AG fuel.
It's definitely not a coating that is intentional. It appears to be leftovers of the (whatever) fuel that was in the tank, and covered only the bottom 20%, or so, of the tank. And if normal additives can loosen it up, maybe biodiesel would do it more effectively? It'd be nice to get that crud out of there faster.

Cutting the rear bracket would certainly allow the tank to be removed, it's just that I'd rather not do that. As explained earlier, the front bracket and straps have already been off, which is how i know that the tank won't come out with the rear bracket in place.
Actually, the cutting would be the easy part. Welding it back up with the tank in place is the trickier bit. Of course, if the tank can be made to fit with the bracket in place, it would make the process far simpler. Now I can't remember if the brackets lend themselves to having new holes drilled in them, about an inch higher up. If so, that would be a good and simple solution.

Placing the tank under a vacuum to lessen its height would indeed come with some risks, but it would be far from the riskiest one on the list of things I do on a weekly basis.
I suppose that making a "C" to slide over the tank from the side, then using the Porta-Power to press it into a slightly concave shape, would likely work. But using vacuum would be so much less work.
And I'm not worried about the integrity of the sending unit's base plate. If it's strong enough to hang in there when held only by the screws (under pressure), it should be strong enough to withstand vacuum, when it's supported by the entire overlapping area on the tank.
 

911joeblow

Active member
508
68
28
Location
Utah
So I just started getting fuel starvation issues after operating and driving at speed for over an hour today. Opened the fuel cap and I had a huge rush of air. I pulled the breather valve and it was blocked. I am not sure with what but after a lot of compressed air and some scraping a ton of hard stuff worked out and now it vents properly and the tank is not starving the fuel pump. What a joy to be able to drive at 50-55 mph and carry 2000 lbs of gravel and a auger on the back at the same time!
 

peakbagger

Well-known member
734
360
63
Location
northern nh
My vent was full of paint. I tried various chemicals to clean it out but the paint is pretty tenacious. The vent is aluminum so I couldn't go real aggressive. There is manufacturer name cast in the valve and with some google searching I found an exact replacement. Unfortunately it was early on when I bought it and I have no idea where. Hot Rodders who build custom tanks use the same type of valve and I found several functional equivalents before I found the exact replacement.

Wow, the handling characteristics must be a lot better with a load of gravel or you have different tires to drive 50 to 55 MPH. Unloaded, I don't dare run over 35 mph.
 

911joeblow

Active member
508
68
28
Location
Utah
I have heard that about the speed before but other than airing up the Michelins to 50psi it is all standard FLU419. Perhaps I am just more comfortable with the truck at speed than others. I did add some toe-in and bent the track bars a bit to get the rear axle tracking right.
 
Last edited:
Top
AdBlock Detected

We get it, advertisements are annoying!

Sure, ad-blocking software does a great job at blocking ads, but it also blocks useful features of our website like our supporting vendors. Their ads help keep Steel Soldiers going. Please consider disabling your ad blockers for the site. Thanks!

I've Disabled AdBlock
No Thanks