• Steel Soldiers now has a few new forums, read more about it at: New Munitions Forums!

  • Microsoft MSN, Live, Hotmail, Outlook email users may not be receiving emails. We are working to resolve this issue. Please add support@steelsoldiers.com to your trusted contacts.

Fuel Gauge Problem

AGE|kshaufl

Member
185
4
18
Location
Senecaville, OH
Okay so I am ready to take a beating on this one. I have already searched the forums and the three threads that I have found were of no help.

First off I want to state that:

I have replaced the gauge and the sending unit with n.o.s. (Both bench tested good).
Bench tested with 24V power source. Works Great.
Checked the grounds.
I have 25 Volts at Pin 28.
6.5 volts at sending unit.
I ran a 24 volt positive straight from the battery to gauge and a new wire from sending unit to the gauge.

When the power is applied it immediately pegs.

I must be missing something.

Besides using a stick and the odometer are there any suggestions?
 

Flyingvan911

Well-known member
4,709
158
63
Location
Kansas City, MO
Most of the time the fuel gauge is not accurate anyway. Most guys disregard it. I don't blame you for wanting it to work. Try cleaning the grounds.
 

Clay James

Member
524
4
18
Location
Reno/NV
The one on my M35A2 has the same problem as yours but I've never gotten around to fixing it. I did pound on top of the sending unit and the gauge pegs to just under full now:roll: The one on my M109A3 is pretty accurate. It stopped picking up fuel right when the gauge was on E. :grin:
 

cranetruck

Moderator
Super Moderator
Steel Soldiers Supporter
10,350
75
48
Location
Meadows of Dan, Virginia
A pegged needle indicates "open" circuit.
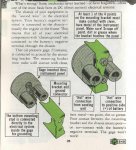
The fuel sending unit is probably not grounded properly. The unit is grounded via the mounting screws to the tank, via the tank to the fuel pump mounting plate and on to the connector for the fuel pump. From there it's the #79 wire to the frame and from the frame to the battery.

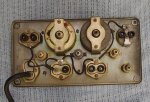
Run a dedicated wire from the fuel sending unit to the frame at least. Also, the instrument panel is grounded via the 1/4 turn fasteners and the pointed mounting bracket on the gauge itself. See my solution below, ground wires on all gauges to the Batt/Gen gauge, which has a dedicated ground wire to the battery for accuracy.

Edit: BTW, the gauge(s) are very accurate when everything is done right. The height adjustment on the level sending unit must be known also, so that "full" has a meaning.
Images below refer to the xm757 8x8 (the fuel tank on this series trucks has 3 grounds, one for the fuel pump, one for the sending unit and one "static" ground to the tank proper. The dash panel is electrically isolated via rubber shock mounts and has dedicated wires for 24VDC supply and ground, improvements that can easily be made on any other vehicle as well...).
 

Attachments

Last edited:

AGE|kshaufl

Member
185
4
18
Location
Senecaville, OH
@ Cranetruck.

Great Idea. I had not thought of the grounds on the back of the instruments.
I will let you know how I make out with it. I will get around to it tomorrow. I will also run a dedicated ground to the frame.

Cross your fingers.
 

AGE|kshaufl

Member
185
4
18
Location
Senecaville, OH
Thanks guys. I checked the wiring again and had an open to ground on the tank. I ran a direct ground from the sending unit to the frame (Same Place as Ground Strap).

Shazaam! It worked.

I had even checked this with a very expensive Fluke Multi-Meter the first time.

I am going to also run the grounds to the ammeter as shown in your picture. This will alleviate any future open ground issues at the gauges.

Thanks again! [thumbzup]
 

doghead

4 Star General /Moderator
Staff member
Super Moderator
Steel Soldiers Supporter
26,246
1,179
113
Location
NY
Simply drilling a hole and installing an 8-32 screw as a stud, on the gauge panel, is a good way to resolve the ground issue. Of course, another good ground stud under the dash, to the body is needed, and a wire. You'll still need a good body to frame ground.
 

cranetruck

Moderator
Super Moderator
Steel Soldiers Supporter
10,350
75
48
Location
Meadows of Dan, Virginia
Thanks guys. I checked the wiring again and had an open to ground on the tank. I ran a direct ground from the sending unit to the frame (Same Place as Ground Strap).

Shazaam! It worked.

I had even checked this with a very expensive Fluke Multi-Meter the first time.

I am going to also run the grounds to the ammeter as shown in your picture. This will alleviate any future open ground issues at the gauges.

Thanks again! [thumbzup]
Glad you got it working...when adding ground wires, remember to use the "star" washers (hardened and cad plated) to punch through any paint and create a gas tight connection to the chassis.
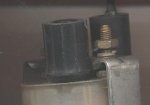
The gauge mounting bracket has two pointed ends for this purpose as seen in the image below.
NOTE: The "ribbed" Packard connector goes to the sending unit, the PS mag illustration got it reversed.
 

Attachments

Last edited:
Top
AdBlock Detected

We get it, advertisements are annoying!

Sure, ad-blocking software does a great job at blocking ads, but it also blocks useful features of our website like our supporting vendors. Their ads help keep Steel Soldiers going. Please consider disabling your ad blockers for the site. Thanks!

I've Disabled AdBlock
No Thanks