• Steel Soldiers now has a few new forums, read more about it at: New Munitions Forums!

  • Microsoft MSN, Live, Hotmail, Outlook email users may not be receiving emails. We are working to resolve this issue. Please add support@steelsoldiers.com to your trusted contacts.


G506 Class 525 (G7133) restore

m1010plowboy

Well-known member
Steel Soldiers Supporter
3,791
2,308
83
Location
Edmonton, Canada
That cab is just a piece of artwork. All the round metal, the harmony, balance, the flowing lines. I gotta find something round to work with.

One of our seldom visiting Steel Soldiers recently took a museum based autobody class and he's all over a few new rust products. I'll dig up his favorite brand names.

Inspiring, thanks for sharing.
 

jeffhuey1n

SMSgt, USAF (Ret.)
Steel Soldiers Supporter
1,806
1,239
113
Location
Laramie County, Wyoming
Slowly working through the pile of parts off the G506. Todays effort was focused on the step supports on both sides. The right hand (passenger) side was fairly simple. Stick part in sand blaster cabinet and remove old paint, rust, etc. the drivers side is a different story. I’m not sure who would have welded these brackets to the step supports but I would hope they were penalized for a horrible welding job. I’m not a welder but I think I could do better than this:
 

Attachments

nattieleather

Well-known member
1,884
134
63
Location
Cleveland, OH
Someone should have said "put the stick down and walk away from the welder!" Wow I'm not the best welder in the world and I can do better than that. Well time for the grinder....
 

m1010plowboy

Well-known member
Steel Soldiers Supporter
3,791
2,308
83
Location
Edmonton, Canada
I can weld like that if you need to match something for historical reasons. I use damp 1078 rods, don't clean the surface, put the ground a mile away and spray a little wd40 down first.

This build has me eyeing every round cab I see so watching you aim for that crazy detail is inspiring. Sure like to find a G506 that needs work but any round cab has me looking now.
 

Attachments

jeffhuey1n

SMSgt, USAF (Ret.)
Steel Soldiers Supporter
1,806
1,239
113
Location
Laramie County, Wyoming
I can weld like that if you need to match something for historical reasons. I use damp 1078 rods, don't clean the surface, put the ground a mile away and spray a little wd40 down first.

This build has me eyeing every round cab I see so watching you aim for that crazy detail is inspiring. Sure like to find a G506 that needs work but any round cab has me looking now.
That 5 window pickup would make one awesome restoration project. Just finding one these days can be considered close to a miracle.
 

jeffhuey1n

SMSgt, USAF (Ret.)
Steel Soldiers Supporter
1,806
1,239
113
Location
Laramie County, Wyoming
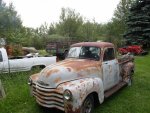
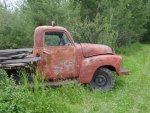
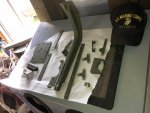
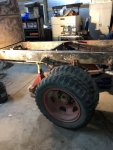
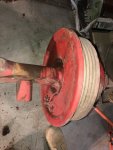
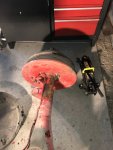
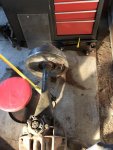
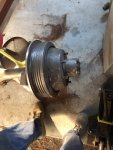
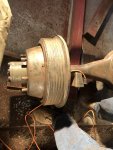
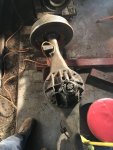
I’ve got to be more diligent in my posts. I spent the last year+ cleaning things up in the shop. Got a long ways towards being able to find stuff again. Also, after looking at the G506 for that time, I’ve decided to abandon the fire truck plan. I just don’t have enough to put one together. The water pump that was basically the heart of the fire truck is non repairable with my level of abilities. So, scrap all other plans and focus on building the truck back into a cargo. It was delivered as a cargo, minus the bed. Turning it back into cargo is doable. I’ll have to find a spare tire carrier, pintle hook, bumperettes and some other parts and pieces.
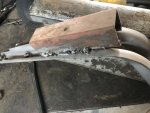
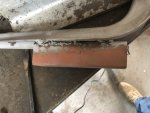
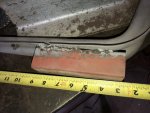
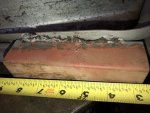
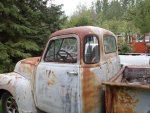
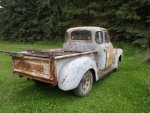
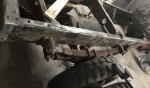
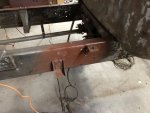
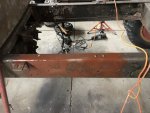
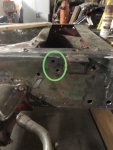
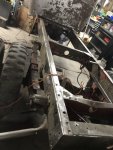
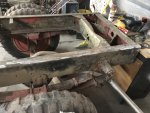
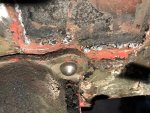
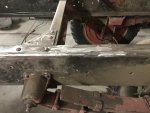
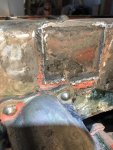
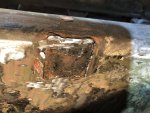
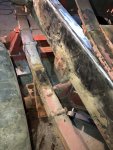
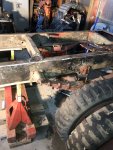
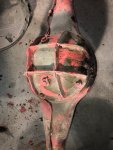
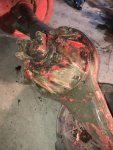
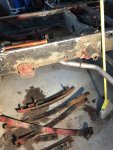
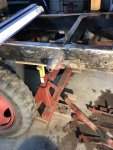
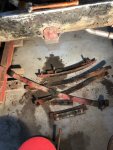
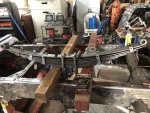
With all that, I’ve been removing the metal plates that are welded to the frame. First one took my over an hour. I’ve got it down to about 15 minutes to get the rest off. Still have 4 plates to go, then clean up the welds. After that, remove the cab for repairs and sandblast the frame and cab. The last two pics show the point where the aft cargo bed mounts used to be. I’m looking for replacements for them as well. No going to make any schedule out this time around, do what I can, when I can.
If anyone has any the parts I need, and would be interested in getting rid of, please let me know.
 

Attachments

jeffhuey1n

SMSgt, USAF (Ret.)
Steel Soldiers Supporter
1,806
1,239
113
Location
Laramie County, Wyoming
All the plates are now gone. The last four took about 5 minutes each to remove. Those welds were pathetically poorly made. Most of the welds after removal of the plates could be easily removed using a hammer and chisel. Anyway, I ground down all the welds then cleaned that up with a flap disc. On to the next step: remove the rear axle. Attached are pics of the welds and the after clean up pics.
 

Attachments

Mullaney

Well-known member
Steel Soldiers Supporter
Supporting Vendor
7,251
18,796
113
Location
Charlotte NC
All the plates are now gone. The last four took about 5 minutes each to remove. Those welds were pathetically poorly made. Most of the welds after removal of the plates could be easily removed using a hammer and chisel. Anyway, I ground down all the welds then cleaned that up with a flap disc. On to the next step: remove the rear axle. Attached are pics of the welds and the after clean up pics.
.
Definitely "Bubble Gum" welding - but that made your job a lot easier...
 

jeffhuey1n

SMSgt, USAF (Ret.)
Steel Soldiers Supporter
1,806
1,239
113
Location
Laramie County, Wyoming
Got the rear axle off today. Took a bit of hammer work to knock the u-bolts loose. I’ll roll it out the next semi-warm day and sand blast it. After that, replace the input seal and look at the wheel bearings. The brakes were gone through by a local shop for the previous owner. Hope I don’t find any issues…
 

Attachments

jeffhuey1n

SMSgt, USAF (Ret.)
Steel Soldiers Supporter
1,806
1,239
113
Location
Laramie County, Wyoming
Rear axle work continues. Got it completely disconnected from the springs. Pulled off all 4 wheels so I wouldn’t mess up the tail pipe. Started scraping and brushing off years of dirt, grease, oily dirt, greasy dirt, and a couple layers of thick red paint. Fortunately, the paint is flaking off (mostly) and a paint scraper is getting a lot of it off. I’ve got to locate a rear axle input seal. I’ll give NAPA a call and see what they can do. Pics:
 

Attachments

Mullaney

Well-known member
Steel Soldiers Supporter
Supporting Vendor
7,251
18,796
113
Location
Charlotte NC
Rear axle work continues. Got it completely disconnected from the springs. Pulled off all 4 wheels so I wouldn’t mess up the tail pipe. Started scraping and brushing off years of dirt, grease, oily dirt, greasy dirt, and a couple layers of thick red paint. Fortunately, the paint is flaking off (mostly) and a paint scraper is getting a lot of it off. I’ve got to locate a rear axle input seal. I’ll give NAPA a call and see what they can do. Pics:
.
It looks amazingly clean even though you see the very slow leaks that trapped dirt over the years... It might be worth removing the yolk off the pinion. Then you might be able to wipe down the seal. Maybe that way you could go to NAPA with the part number in hand.

As I get older, the mobile phone with a nice camera makes it easy to read those part numbers :cool:
 

WW2Chevy

Active member
112
56
28
Location
Bloomington, IL
Hi Jeff,
I just rediscovered your G506 firetruck thread again today; and have been looking through your posts from the past couple of years. Your last set of pictures of the rear axle made the lightbulb above my head turn on... I just realized you're also on the G506 CHEVROLET WWII TRUCKS Facebook group as Jeff K. If you look there under "Files", you find some helpful documents for beraings and seals. A couple are Timken interchange manuals that cover most everything. They can be a bit overwhelming, so you'll also find a couple lists I've made specific to the G506 trucks. Keep up the good work, and stop by my photo album posted in the 'other' G506 FB group.
 

jeffhuey1n

SMSgt, USAF (Ret.)
Steel Soldiers Supporter
1,806
1,239
113
Location
Laramie County, Wyoming
Hi Jeff,
I just rediscovered your G506 firetruck thread again today; and have been looking through your posts from the past couple of years. Your last set of pictures of the rear axle made the lightbulb above my head turn on... I just realized you're also on the G506 CHEVROLET WWII TRUCKS Facebook group as Jeff K. If you look there under "Files", you find some helpful documents for beraings and seals. A couple are Timken interchange manuals that cover most everything. They can be a bit overwhelming, so you'll also find a couple lists I've made specific to the G506 trucks. Keep up the good work, and stop by my photo album posted in the 'other' G506 FB group.
Thank you! I’ll look into this.
 

jeffhuey1n

SMSgt, USAF (Ret.)
Steel Soldiers Supporter
1,806
1,239
113
Location
Laramie County, Wyoming
Hi Jeff,
I just rediscovered your G506 firetruck thread again today; and have been looking through your posts from the past couple of years. Your last set of pictures of the rear axle made the lightbulb above my head turn on... I just realized you're also on the G506 CHEVROLET WWII TRUCKS Facebook group as Jeff K. If you look there under "Files", you find some helpful documents for beraings and seals. A couple are Timken interchange manuals that cover most everything. They can be a bit overwhelming, so you'll also find a couple lists I've made specific to the G506 trucks. Keep up the good work, and stop by my photo album posted in the 'other' G506 FB group.
Excellent resource thank you. I trust Timken products better than most others including factory originals.
 

jeffhuey1n

SMSgt, USAF (Ret.)
Steel Soldiers Supporter
1,806
1,239
113
Location
Laramie County, Wyoming
And the paint removal goes on. Some of the paint needing removal must have been made out of unobtainium, the hardest substance in the universe. Thank goodness for a good grinder and some heavy duty steel wire wheels.
 

Attachments

jeffhuey1n

SMSgt, USAF (Ret.)
Steel Soldiers Supporter
1,806
1,239
113
Location
Laramie County, Wyoming
Paint removal 95% complete. Waiting for some parts to fix leaking seals. Once those are fixed, I’ll give it a good cleaning with alcohol and start painting it.
 

Attachments

jeffhuey1n

SMSgt, USAF (Ret.)
Steel Soldiers Supporter
1,806
1,239
113
Location
Laramie County, Wyoming
I’ve got the entire left rear area completely torn down. I’ve cleaned up the leaf springs, u bolts and overload limiters (at least I think that’s what their called) stripped and in the case of the limiters, primed and ready for the next steps. The pics I took during the tear down. I’ll get more pics the next time I can. Son-in-law is in the hospital and I’ve got to set things aside until his situation gets resolved.
 

Attachments

jeffhuey1n

SMSgt, USAF (Ret.)
Steel Soldiers Supporter
1,806
1,239
113
Location
Laramie County, Wyoming
One cleaned up spring stack. Since I have the overload parts and spring leaves, I’ll go ahead and use them, once I clean them up. The bolts that hold the stack together are all worn. Not too badly but why chance it. The center bolt is 7 inches long. I’m pretty sure they’re available at any parts story.
Question for any G506 Cargo owners. What is the length of the u-bolts that bolt the bed support to the frame,
 

Attachments

Top
AdBlock Detected

We get it, advertisements are annoying!

Sure, ad-blocking software does a great job at blocking ads, but it also blocks useful features of our website like our supporting vendors. Their ads help keep Steel Soldiers going. Please consider disabling your ad blockers for the site. Thanks!

I've Disabled AdBlock
No Thanks