• Steel Soldiers now has a few new forums, read more about it at: New Munitions Forums!

  • Microsoft MSN, Live, Hotmail, Outlook email users may not be receiving emails. We are working to resolve this issue. Please add support@steelsoldiers.com to your trusted contacts.


Galvanized Deuce Wheels

cucvmule

collector of stuff
1,129
552
113
Location
Crystal City Mo
Amazing how many mechanical uses that baby powder can be used. My first 16" split rim that I mounted many moons ago, Pop showed me that and I thought he was silly. I still mount all my tires except for auto's. Last pair were 13.6x28 for my tractor, when it was still warm out.

Thanks rustystud, mounting tires has a lot of propriety tricks, steps involved. Using the brain, most important.
 

royalflush55

Well-known member
Steel Soldiers Supporter
643
513
93
Location
Reydon, OK
I haven't seen very many "professional" tire shops take the time to let the air out and relax the tube in the last ten years. I have also seen a lot of folded creases in the tubes that caused flats! This is a very important step.

I was also taught to never think a split ring tire was "safe" to air up without putting in a cage or mounting on the truck!! I have been to a few farm sales where the owner was killed when one of these split ring assemblies separated while being aired up.
 

rustystud

Well-known member
9,071
2,387
113
Location
Woodinville, Washington
I haven't seen very many "professional" tire shops take the time to let the air out and relax the tube in the last ten years. I have also seen a lot of folded creases in the tubes that caused flats! This is a very important step.

I was also taught to never think a split ring tire was "safe" to air up without putting in a cage or mounting on the truck!! I have been to a few farm sales where the owner was killed when one of these split ring assemblies separated while being aired up.
True. I should have specified that as long as the tire does not move from the wheel rim it is safe to re-inflate. Now if after you let all the air out from the tire and it moves from the wheel rim then "Yes" put it back in the "tire cage" or remount it on the truck to inflate the tire. It is the "slamming" (the popping sound) of the tire against the ring that causes the problem, especially if the ring was not properly seated. I've re-inflated semi-trucks that had gone flat with no problem, as long as the tire is still against the rim of the wheel. If the tire comes off the rim then you must take off the wheel and safely re-inflate it, unless the ring is already facing against the truck body. Then your "Golden" ! Just inflate away !
As far as letting all the air out after the first inflation, well I guess I'm "old school" now. That was how I was taught and how I always did it even now in my retirement.
Most mechanics today really don't know much about tire tubes anymore. All "over the road" vehicles today are tubeless except for "vintage" vehicles like our Deuce. The only ones who really know anything are AG mechanics who are still working on older tractors and such.

There was something else I forget to mention in my tutorial, and that is "you can use Radial inner-tubes in a Bias Ply tire, but never use a Bias Ply inner-tube in a Radial tire" . The Bias Ply inner-tube cannot take the heat that is generated in the Radial tire.
 
Last edited:

Finallygotone

Member
73
26
18
Location
South Louisiana
Those rims and rings really look nice, that is the way to go, I just finished putting seven 6X20"s on a Ford Model AA (dual wheel) it was a 1930 and the spare must have been the originally it crumbled, got the buyer to sand blast and prime it, did not have a cage for the rims just make sure the tires were seat and the rings seated put the air and walked out of the shop for a few minutes, all went well might post the before and after pics of the truck that had been setting since 1990, it show room ready now.
 

rustystud

Well-known member
9,071
2,387
113
Location
Woodinville, Washington
Well as promised here is my little tutorial on "breaking down" a Deuce (or 5 ton) wheel.

First off take out the "Schrader Valve" from the tire valve stem.

deuce tires 002.jpgdeuce tires 004.jpg

Now your ready to bust the bead which can be the hardest part of the whole job.
 

rustystud

Well-known member
9,071
2,387
113
Location
Woodinville, Washington
There are several tools available for this task. I've found there are three which are the best.
The first one is the "Duck Bill Sledge hammer" .

Duck bill sledge.jpg
It works Ok, but takes a lot of strength and energy. Here's a tip if you use this one, use soapy water on the wheel. This allows the wedge part to slide easier between the tire and rim.

The next one is the "Long Slide Hammer" .

Slide Hammer Bead Breaker.jpg
This works much better then the Duck Bill and doesn't damage the rim as much. No missed swings ! Still this unit takes strength and lots of energy to use.

The third and best one is the portable "Hydraulic Bead Breaker" .
This is mine pictured here.

deuce tires 005.jpgdeuce tires 006.jpg
These units sell from as cheap as $350.00 to over $1000.00 . Mine cost in the $800.00 dollar range due to the upgraded hose and pump.
Before you say there is no way you will spend that much money on a bead breaker, I just want you to know I spent just over one hour busting down ten deuce tires. That is with a bad back and bad knees and shoulders ! This tool makes that much difference. If you have to do a lot of tires (for me that is 10 or more) then this tool is worth the price.
 

rustystud

Well-known member
9,071
2,387
113
Location
Woodinville, Washington
So with your trusty bead breaker in hand start with the ring side up.

deuce tires 007.jpgdeuce tires 008.jpg
Usually it will take two to three positioning's of the tool to bust the bead.

Once the bead is broken you can take your "Ring" pry bar (a special pry bar for split ring wheel with a 3/4" wide straight tip at one end and a 3/4" wide curved end at the other) , and with a hammer pry out the end of the ring.

deuce tires 010.jpg With your pry bar's straight end in the rings slot, take your mini maul (3 Ibs hammer) and strike the pry bar hard. This should force the ring downward and allow you to put the pry bars "curved" end into the slot and pull it backwards towards the center of the wheel. This will pull the ring up and out of it's groove.

deuce tires 035.jpgdeuce tires 015.jpg Since I'm not as strong as I once was, I use another long pry bar to assist in this procedure.
Once the ring has started to come out, alternate prying with the two pry bars along the ring until it is free of the wheel.
deuce tires 016.jpgdeuce tires 017.jpg

Now you must flip the wheel over and free the bead on the other side.
deuce tires 020.jpgdeuce tires 021.jpg

Now the tire is "almost" ready to come off. The last thing to do is to get the inner-tube valve stem out of the way. I've seen mechanics beat the crap out of wheels trying to get the tire off, when in fact it is a pretty simple procedure.

Stand the tire up with the valve stem down. Now take a rounded pry bar and shove in the valve stem towards the tire. Taking a screwdriver, push down on the valve stem (at the same time as pushing in with the pry bar) until it is under the rim of the wheel.
deuce tires 027.jpgdeuce tires 028.jpg

Now it is just a matter of pulling the rim from the bottom and top. Alternating until the rim comes free of the tire

deuce tires 031.jpgdeuce tires 029.jpgdeuce tires 032.jpg
deuce tires 033.jpg Six to seven minutes is all it takes to demount a deuce tire. Of course I was probably taking closer to ten minutes at the end ! Flipping those tires is hard work !
 

rustystud

Well-known member
9,071
2,387
113
Location
Woodinville, Washington
Well after galvanizing 23 wheels I'm getting ready to galvanize 10 more. This time though I'm welding the seams shut. It seems that the last batch of 10 had crud in the seams and even after sand-blasting they still had crud that exploded in the galvanizing tank. Made the galvanizers pretty upset. Also made my wheels look like crap ! They said I had to seal that seam on the wheels or they would not guarantee the results. On the old "riveted" style wheels that means welding on both sides plus the area where the valve stem come through. Takes me about an hour each wheel to weld them and then clean-up all the splatter and such. I have two more to do this weekend then I'm taking them back to the sand-blasters to remove the "new" surface rust (already had them blaster once so I could weld them) and clean the welds so there is no slag residue on them.
Then it's back to the galvanizers.
Here's some pictures showing what I mean.
I had planned on doing the last 14 wheels this summer, but this is costing a small fortune so maybe that plan will be put on hold for now.
 

Attachments

Privatewrench

Member
127
19
18
Location
Kentucky
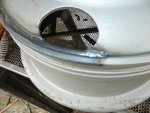
Well to continue my little tutorial on mounting tires, here I'm installing the assembled tire unit to the wheel.

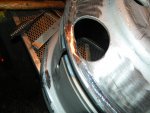
View attachment 782181 Align the valve stem with the wheel cut-out and lower the tire down at an angle.

View attachment 782182

Then push down the valve stem towards the cut-out and slowly push the tire into the wheel.

View attachment 782183

Once the valve stem is inside the wheel you can then lift the tire up (behind the valve stem area) and it will slid right down on the wheel. This is another reason to use the baby powder. It prevents the friction you normally have with rubber.


View attachment 782184 View attachment 782185

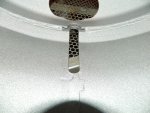
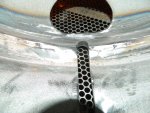
Make sure the valve stem is centered in the wheel cut-out. If it isn't then you can rotate the tire until it is. This is an important step, as it prevents the stem from becoming damaged due to rubbing against the wheel. I've seen many tires leak from this simple problem.

View attachment 782186

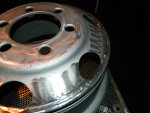
Now walk on the tire and make sure it will drop down below the ring mounting groove. If it doesn't you will need to let out some air from the tire. This step makes it so much easier to mount the ring.

View attachment 782188

Now your ready to install the ring. Make sure the rings gap is opposite the valve stem. With your foot, hold down on the rings end making sure it is in the ring groove. Using a hammer tap the rings outer edge, working it around the wheel until it goes down into the groove.


View attachment 782190 View attachment 782191 On my wheels I used a pry bar and a rubber mallet as I didn't want to mar my galvanized finish.
Once the ring is on, go around it again with the hammer making sure the ring is fully seated in the groove.

At this point I usually add a little bit of air to make sure the tire is held in place so the valve stem doesn't get moved out of position, then I place it in my tire cage to air up.
Now I know most people don't have a tire cage, so the best and safest way to air up a tire is to mount it back on the truck with the ring facing inwards towards the truck body. You only need two lug nuts to hold the wheel on.

Once the tire is fully seated and aired up to the proper pressure I remove it and lay the tire back down on the ground and remove the Schrader valve letting all the air out. This allows the inner-tube to fully relax so it does not create any over-lapping creases in the rubber which can cause a blow-out latter on when the wheel gets hot from driving. If the tire stays in contact with the rim after you let the air out, you can safely air the tire back up without the tire cage. If the tire does come loose from the rim you must put it back in the tire cage or remount it to the truck to safely re-inflate it.
I know many people don't go to all these measures to mount a tire, but it is one of the best ways to prevent any inner-tube issues later on. I know many truck tire shops use "tire gels" to mount the tires. I don't like using any "liquid" on my tires as I don't want to make it any easier to rust the wheels then is necessary.
The baby powder system has worked well for me and other mechanics for decades now. Plus it is easier to paint the wheels later on without having to wash off the tire goo. Just take a air blow gun and blow away the powder.

View attachment 782192
Thanks for taking the time to show us the steps to mount these tires. It's very informative.
 

joedafireman

New member
4
3
3
Location
FL
New member to SS, I just read your forum and found it very informative. I'm in the process of purchasing my first duece, an M35A2C and matching M105 trailer, looking at a M35A3 with 18' bed that folds on passenger side, told rare duece that may have been one of 12 to haul missles, (unconfirmed). My wifee thinks I'm obsessed and crazy, I just tell her they are a part of history and WAAAY COOL, big boy toy. I have watched many videos on changing the tires, one mentioned reverse mounting on the truck to use as a tire cage, great idea, I want to put the 11:00 x 20's on with combat rims when I get it and can find some. Glad to be a part of SS, and look forward to the posts, pics of the girl in a couple of weeks when I get her home.
 

rustystud

Well-known member
9,071
2,387
113
Location
Woodinville, Washington
Got the last two wheels welded up today. A little touch-up with the sander to get rid of the welding splatter and now this Monday they will go back to the sand-blasters to get the welds blasted. Don't want any welding slag underneath the Galvanizing.
 

Attachments

Top
AdBlock Detected

We get it, advertisements are annoying!

Sure, ad-blocking software does a great job at blocking ads, but it also blocks useful features of our website like our supporting vendors. Their ads help keep Steel Soldiers going. Please consider disabling your ad blockers for the site. Thanks!

I've Disabled AdBlock
No Thanks