o1951
Active member
- 899
- 155
- 43
- Location
- Bergen County, NJ
If you mean yours have Radium inside, strongly suggest you do not open them, much less disturb very fine dust inside.I want my gauges to glow again. It would be very handy at night.
Steel Soldiers now has a few new forums, read more about it at: New Munitions Forums!


If you mean yours have Radium inside, strongly suggest you do not open them, much less disturb very fine dust inside.I want my gauges to glow again. It would be very handy at night.


PLUS 1!!! Good job kcollum!Now that's the way to go "kcollum" ! Instead of just throwing parts away, try and fix them ! On our trucks the military went with the manufacturer that could meet there specifications at the best price. Sometimes this doesn't always work, but most times it does. So keep the military parts !
 . I just replace all of my gauges. Its nice having everything light up on the dash and bright!
Correct; just pry up a tiny bit at a time and do several passages. Otherwise the metal is expanded too much and will crack.I am about to attempt this myself. Before I do the gauges I want to use on my truck, I am going to practice with some old ones from a parts truck. So just to confirm, the best way to remove the bezel (the outer ring of the gauge) is to use a good quality small flat head screwdriver and to carefully pry the crimp up?
Yes, you need to do this with a small shop press and at least two molds (= cups) for each size gauge; one that conforms to the front side of the bezel; the other one to press its back side with the crimped-up edge back down in place.Has anyone found a method of recrimping after restoration?
Don't... You will find that in most cases it is not necessary.what is the best way to remove the needle from the gauge
My face plate is bent and it looks like the best way to straighten it out is to remove it. To do this I have to pull the needle.Don't... You will find that in most cases it is not necessary.
Okay, after reading this, can't stand it any longer... Sorry for the little detour here, but I've read many of your posts, on many topics, and I've PM'd you a time or two for your opinion. I'm very impressed with your range of knowledge, the CAD drawings you come up with, etc. If you wouldn't mind, could you please give us a brief rundown on where you gained the skillset(s) that you share with us, i.e. schooling, training, fields/trades you've worked in etc.? I'm sure I'm not the only one who's curious (unless it's one of those "I could tell you, but then I'd have to kill you" type deals).Correct; just pry up a tiny bit at a time and do several passages. Otherwise the metal is expanded too much and will crack.
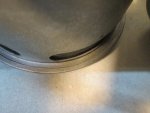
It is not necessary to do 360°; about 3/4 of the circumference and it may come apart already.
Yes, you need to do this with a small shop press and at least two molds (= cups) for each size gauge; one that conforms to the front side of the bezel; the other one to press its back side with the crimped-up edge back down in place.
I said at least two, because we want to get the metal back into the exact original shape and that normally requires working in several steps, using cups with more- and then with less chamfer, progressively.
I'm sure you get the idea. It sounds complicated but you will see, it isn't at all.
If done right, one can barely notice that it had been opened. The attached picture is one example...
Don't... You will find that in most cases it is not necessary.
G.
 )
)