• Steel Soldiers now has a few new forums, read more about it at: New Munitions Forums!

  • Microsoft MSN, Live, Hotmail, Outlook email users may not be receiving emails. We are working to resolve this issue. Please add support@steelsoldiers.com to your trusted contacts.


Gen 2 mount problems etc

Does anyone have a picture of the gen 2 mount, without the alternator in place.

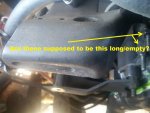
I just had mine seize and I think the bracket may be bent as the alternator pulley always seemed a little off square.

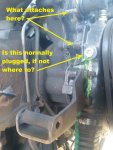
Is there a piece of mount or something else missing?

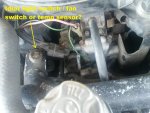
And isn't the idiot light switch on the drivers side head somewhere?

What I have is in attached pics. Perusing the TM's now.
 

Attachments

cucvrus

Well-known member
11,277
9,614
113
Location
Jonestown Pennsylvania
You are showing a HMMWV crossover coolant manifold. That has plugs in for sensors.
Nothing has to attach to the M8 stud bolts. You should have a spacer between the lower bracket the alternator and the block that an M10 1.5 bolt passes thru to attach Gen 2.
Once again the long empty bolt studs are fine. if the bother you or are in the way cut the studs off or replace the bolts with M8 1.25 bolts. Good Luck. I hope that answers your easy questions. lets make the next ones a bit harder. Please? :)
 
could you send a pic of the missing lower bracket spacer? The PO seems to have lost it. Unless someone has a spare I will have to try to create one.

Could I run an additional heater core off that water pump plug? planning to do an insulated 3/4" copper tubing run (that also includes the fuel line for very cold climates) to a camper (with quick disconnects).
 

cucvrus

Well-known member
11,277
9,614
113
Location
Jonestown Pennsylvania
It is just a simple spacer. A pipe nipple will work. And as far as making a fitting into the water pump. I would just T or Y the current heater hoses and put a ball valve in line on the auxiliary heater lines. I had a rear heater in my M1009 when my boys were younger. I have a few rear heaters yet. New ones with fans and all. But they were very easy to install. I just removed the fuel fill cover and ran the hoses down thru that area. I made a new fuel fill cover and caulked it in place. I did not want to drill/saw holes thru the cargo floor. It worked well after the air was purged from it. Melted all the snow from the entire rear cargo roof and rear window. Tee shirt weather inside at 10 degrees. Have a good day. Look in the frame area and the sway bar bracket area. the spacer may be down in there trapped. But if not a $2. pipe nipple with the threads cut off will work.
 

cucvrus

Well-known member
11,277
9,614
113
Location
Jonestown Pennsylvania
Generator 2 spacer

I hope this helps someone out. DSCF3449.jpgDSCF3448.jpgDSCF3447.jpg1 3/4" 3/8" hole. A pipe nipple works perfect. This part has been discontinued for years as is the bolt. The bolt is M10 X 1.5 metric. Good luck. I wanted to get this picture the other day but I was busy.
 
Top
AdBlock Detected

We get it, advertisements are annoying!

Sure, ad-blocking software does a great job at blocking ads, but it also blocks useful features of our website like our supporting vendors. Their ads help keep Steel Soldiers going. Please consider disabling your ad blockers for the site. Thanks!

I've Disabled AdBlock
No Thanks