• Steel Soldiers now has a few new forums, read more about it at: New Munitions Forums!

  • Microsoft MSN, Live, Hotmail, Outlook email users may not be receiving emails. We are working to resolve this issue. Please add support@steelsoldiers.com to your trusted contacts.

Glow Plug Relay Only Thing Missing?

Bownut

New member
31
0
0
Location
LaCrosse/WI
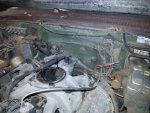
So I started digging into the M1009's engine bay a little tonight. Noticed some wires not connected on the fusible plug, which I reconnected. There was a couple more that didn't have a home and some screws on the firewall that appeared to have attached something. From digging around on the search engine, it appears it's for the glow plug relay, but am I missing something else? I found the thread below with info on alternate relays to replace, but are these that much smaller? It appears these cover all the wires needing a home yet, but the three screws spread so far apart don't make sense as to what goes there.

Below is also a pict of my firewall to show what area I'm looking at.

Can anyone toss a similar pict up for me of their's with the components intact?

Thanks.

http://www.steelsoldiers.com/showthread.php?42953-Converting-glowplug-relay
 

Attachments

85CUCVtom

Active member
712
26
28
Location
Lakewood, Ohio
Anyone have a part number for the resistor at the local parts store like there was for the GP on the attached link I found?
If I recall, the glow plug resistors are not avalable at a part store. The resistors were specific to the CUCV and not a commercial part.

You can feed 12v to the relay from the 12v buss bar in the firewall next to the relay itself. Eliminates the need for the resistors all together.
 
Last edited:

Recovry4x4

LLM/Member 785
Super Moderator
Steel Soldiers Supporter
34,012
1,810
113
Location
GA Mountains
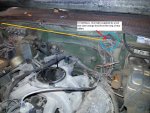
To help give a little better understanding, have a look at the pic attached. The 12V block on the firewall (circled in blue) normally has a red wire with a fusible link running to it. It follows the orange line and attaches to the battery cable that goes from the positive of the front battery to the negative of the rear battery. Instead of putting the resistor back in place, you can draw power from this block to feed the GP Relay thats missing. Is there any possibility that this CUCV has been converted to 12 volt? Both alts in place and wired up?
 

Attachments

Bownut

New member
31
0
0
Location
LaCrosse/WI
I don't believe it was converted. It came straight from Fort McCoy through the Gov't Liquidators auction. Both alternators are on, and I believe they were wired, but I'll double check tonight as it was just something I assumed they were.

It didn't have the batteries in it or the starter when I picked it up. There were two battery cables were inside the cab as well. One was the lead to the starter, which had been pulled out of the eyelet as that was still on the starter from when they removed it. I also noticed last night when looking at the firewall that it appeared something had been unbolted from the buss bar. There are still battery cables running from the bar into the cab for juice to I assume the radio unit, and then those going to the front for jump starting. I'll pull the wiring diagram off the sticky on the site so I can see what it may have been in the empty spots. I'll also snap a close up of the fusible link, the wires loose around it as well as the buss bar to show which terminals no longer have connections attached.


Thanks guys for all the feedback so far.
 

Warthog

Moderator
Super Moderator
Steel Soldiers Supporter
13,774
232
63
Location
OKC, OK
Before hooking up the batteries lets make sure ALL the wiring is where it should be.

I'll post some diagrams to help out.

We will need some additional picture of you battery cables and the 24v buss bar behind the rear battery
 

Warthog

Moderator
Super Moderator
Steel Soldiers Supporter
13,774
232
63
Location
OKC, OK
I just noticed that the 12v feed wire for the entire truck is also missing.

We will need to start from scratch and take it one step at a time.
 

Bownut

New member
31
0
0
Location
LaCrosse/WI
Thanks guys again for all the input. more pictures will be loaded up tonight.

Sierra, thanks for the offer. Actually, I know a guy with a 1008 just donw the road from me. A stop at his place is on my list of things to do this weekend!

This is going to be a fun project. Like I posted in my other thread this week about finally getting one, I've had 6 Blazers over the years and a good 10 trucks of this vintage as well. I love this body style and am very familiar with the civilian versions. Actually have an '84 Blazer I'm redoing as well, which I'll have to throw a pict up of......4" spring lift, 383 stroker, T400, 3/4T running gear, etc., but this CUCV' version is throwing me a little twist and getting me out of my comfort zone, but in a good way!
 

Bownut

New member
31
0
0
Location
LaCrosse/WI
Just a quick update. I hadn't posted any picts yet as I got a good schematic to go off of. I see what appears to be missing for battery cables, and all appear to be in the truck. Also got the starter tested and all is good there, so happy about that. Not sure why it was out. Ordered up the Advance Auto glow plug solenoid mentioned on here, found the part number for the starter bolts in another thread so will pick them up at the dealership tomorrow, and have my second battery on the trickle charger right now.

I'm going to get the starter, batteries, and solenoid all set in the truck first, run all the battery cables, and find homes for all the wires currently unhooked per the schematic. I'll snap a pict prior to hooking the power lead up to the battery to make sure I'm not missing anything else.

Hoping to have her ready to turn the key and see what I got by midweek!
 

richingalveston

Well-known member
1,715
120
63
Location
galveston/Texas
While your starter is out, check the pressure plate for damage. Use a wrench to turn the motor over (helps to remove the glow plugs to do this). The pressure plate (large round plate with the gear teeth that the starter turns) is known to crack or loose teeth and thus starter grinds and has issues.

My guess is the starter was out for a reason. If the starter was good then I would look at all of the other possible reasons for the starter being removed. Also if you think you need to drop the oil pan or possibly replace the rear main seal, now is the time to do it prior to putting the starter back in.

Also, get new starter bolts. Just in case someone has not told you, the starter bolts are torque to yield like the head bolts and are not to be re-used.
 

Bownut

New member
31
0
0
Location
LaCrosse/WI
Yep, new bolts were the plan as that is what I was reading in the thread on here this morning.

Thanks for the advice on the plate, will roll that around as well and check for any damage. The other things I noticed was that the speedo cable was unhooked and the eyelet was still on the starter, but the cable had been pulled out. Hard to say what was done, or in the process with these things when bought not running....but for what I paid for it, it's just all part of the gamble!


I bought it with the frame of mind that a running version would just be a bonus. I figured my old '76 plow truck would be donating it's 350, tranny, and T-case if need be. And if that does happen, the 3/4T D44 and 14BFF axles with 4.10's will go under it as well!
 

Bownut

New member
31
0
0
Location
LaCrosse/WI
Almost ready to fire the 1009 for the first time....couple last questions

So tonight I finally got some time to really dig into this thing and take care of several of the little things I've found.

First off, got the starter tested last Friday and it was just fine. Ordered up the bolts, got them this afternoon, and mounted it up tonight. Pulled the flex plate cover before putting it in and no issues with cracking of the plate. But, in digging underneath, I can tell this tranny and t-case were pulled sometime recently, which may be why the starter was out. The crossmember bolts looked recently removed, the shift module wasn't on the tranny, the linkage wasn't affixed properly, the tranny lines were loose, and the speedo gear and housing weren't in the t-case. But, the tranny and T-case were much cleaner than the rest of the underside and the plate and torque converter were very clean as well. I had spares of all those little missing parts in the shop so that is all back in place. I also noticed it was forked, but the only damage I saw was a little dent to the exhaust and the front driveshaft u-joint was popped out, which I mentioned in my initial post about bringing it home. A new joint is now in and the shaft is back in it's place
http://www.steelsoldiers.com/showthread.php?113694-Finally-got-me-a-CUCV!&highlight=

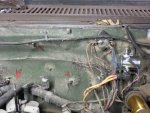
So, from there I moved back up to the engine bay, where is where my questions come in. Going off some wiring schematics and other threads on here, I installed the glow plug relay. I cleaned all the wires so you can see what goes to it and the fusible plug to make sure they all look correct. The only wire not hooked up that I see is the power wire to the relay......where does that feed from? Also, what connects to the three screws into the firewall I have the arrows pointing to? And finally, what is the connector with the purple wire hook up to that is directly centered on the firewall with the duct tape on it? THese questions pertain to picture #1 below.

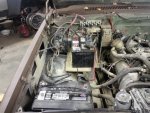
For picture #2, I just set some batteries in there for reference and painted the possitive terminals red for reference so I can make sure my power leads are correct. The wire from the front possitive battery to the back negative terminal has a smaller red wire clipped. Is that the one that normally feeds the glow plug relay, the wire I don't have located yet? Also, I assume the power wire coming up from the starter attaches to the power bus? The wire I used was in the truck and it's length looks to be right, but since there wasn't a terminal on the end of the wire anymore, I just have it sitting just off the right side of the bus bar in the pict.

But getting closer. Once I get the questions above cleared up, I'll drop the batteries in, wire them up to the bus bar, and give here a key turn....getting excited for that!
 

Attachments

Last edited by a moderator:

cliffyp

Member
328
4
18
Location
Brownsville, Texas
Looks like someone did a glow plug resistor bypass, that's the three screws you're wondering about. In stock form, 24v goes to the resistor which then only gives the glow plugs 12v. Problems arise when the resistor begins to fail and doesn't drop the voltage properly. Instead of this convoluted set up, people bypass the resistor and just send 12v straight. I can't really see anymore to help with your other questions.

Looks up some of the many threads on the resister bypass to see how it's typically wired.
 

Bownut

New member
31
0
0
Location
LaCrosse/WI
Cool, thanks for the tip. Just did a quick search and it appears that the smaller red wire that is clipped on the second batteries negative terminal may be what was feeding the glow plug relay. If that's the case, I'll splice back in and run a new wire over to it.
 

cpf240

Active member
1,479
5
38
Location
Free in Northern Idaho
The small wire that is part of the dog bone cable from the front battery positive terminal to the rear battery neg terminal feeds the 12v distribution block over next to the brake master cylinder. When doing the 12v glow plug bypass, the power for the glow plug relay is often run to that 12v distribution block, though some prefer to run it directly to the positive terminal of the front battery.
 

Recovry4x4

LLM/Member 785
Super Moderator
Steel Soldiers Supporter
34,012
1,810
113
Location
GA Mountains
I covered that missing wire in post 6. I drew an orange line in the pic. That feeds all of the 12V for the cab.
 

doghead

4 Star General /Moderator
Staff member
Super Moderator
Steel Soldiers Supporter
26,246
1,179
113
Location
NY
I merged your 2 threads.

It's best to continue one thread, as can be seen by post#19.
 
Top
AdBlock Detected

We get it, advertisements are annoying!

Sure, ad-blocking software does a great job at blocking ads, but it also blocks useful features of our website like our supporting vendors. Their ads help keep Steel Soldiers going. Please consider disabling your ad blockers for the site. Thanks!

I've Disabled AdBlock
No Thanks