- 124
- 81
- 28
- Location
- Port Angeles, WA
I don't think so. I would love a cope though.
Did I send you the cross referrence chart??? Can't remember
larry
Steel Soldiers now has a few new forums, read more about it at: New Munitions Forums!


Did I send you the cross referrence chart??? Can't remember
larry
OK....drop me a PM and I'll reply to you with the 13 pages!!I don't think so. I would love a cope though.
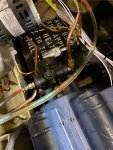
Did you access everything by taking off the top? I have one I started working on today which wont light as well. It was drained previously so I know the pump is working, It builds up to about 30psi when I purge then when it tries to light goes to about 125psi. Arc in the glass but no lighting. So Id guess my nozzle, or line to the nozzle is clogged like you found.Here are some pix of the innerts. The fuel line has to be replaced....corrosion at the brazing points.
I'd say don't even think of turning this on until you dismount the pump, take it apart and clean out the goop,
and clear the fuel line to the burner.....DON'T JUST TURN IT ON!!!
Indeed, the top must come off.Did you access everything by taking off the top? I have one I started working on today which wont light as well. It was drained previously so I know the pump is working, It builds up to about 30psi when I purge then when it tries to light goes to about 125psi. Arc in the glass but no lighting. So Id guess my nozzle, or line to the nozzle is clogged like you found.
I was wondering if you ever found a new pump? I have 5 of these and I am having problems with all 5 pumps. One the pumps I was thinking of rebuilding.... has anyone done that? Are their parts available to do this? Can you change out the pressure regulator?Turns out the pump is a loss. Seems the "preservative" put into the unit by the mfr. destroyed the pressure regulator.
all attempts to free it failed. I have to retrofit my unit with a new pump. So far, unable to find a duplicate and can't seem to
relate the numbers casted into the steel to anything. It's "over" for now.
larry
I bought several look-alike pumps on eBay. Very cheap as I remember. The regulator was a match on several and I swapped the parts out to the original and it worked perfectly. Very important to put the "cap" back on over the adjustment screw as it will seep fuel to the floor. Very little adjustment range to get the pressure you want...fractional turns are all it takes.I was wondering if you ever found a new pump? I have 5 of these and I am having problems with all 5 pumps. One the pumps I was thinking of rebuilding.... has anyone done that? Are their parts available to do this? Can you change out the pressure regulator?
Two of the others I am going to change out the filter and gasket and see what they do.
The last two are not building pressure but I cannot get them off the motor shaft. I have been heating the two bolts up with a torch, but those things are on there tight, and there is very little room to break them loose. Any ideas??
Thanks man this really helps me out!I bought several look-alike pumps on eBay. Very cheap as I remember. The regulator was a match on several and I swapped the parts out to the original and it worked perfectly. Very important to put the "cap" back on over the adjustment screw as it will seep fuel to the floor. Very little adjustment range to get the pressure you want...fractional turns are all it takes.
Maybe this weekend I'll go back to trying to make it useful....somehow I've lost my enthusiasm.
larry
There are two pumps they used on these units: one is a Suntec and the other one is a Webster pump. With that being said, Suntec bought Webster Pumps. Both pumps are obsolete. I have not been able to find EITHER pump in stock or for sale. I have attached pictures of the pumps with Model number below. Webster pump is 1R122C-4EN3. Suntec Pump is J6BC-325-3.So what pump should I be looking for on Ebay? I have one in a similar situation.


[/QUOTE]There are two pumps they used on these units: one is a Suntec and the other one is a Webster pump. With that being said, Suntec bought Webster Pumps. Both pumps are obsolete. I have not been able to find EITHER pump in stock or for sale. I have attached pictures of the pumps with Model number below. Webster pump is 1R122C-4EN3. Suntec Pump is J6BC-325-3.
I have 9 of these units. Not one of them had a bad fuel pump. 4 of them had broken couplers, 1 had a bad fuel solenoid, and 1 needed the fuel regulator pin replaced. Normally if the coupler is sheared off, it's because the oil they put into the units to preserve them is clogging up the gears. First thing to do is to inject SEAFOAM into the pump itself. The webster pump is easy just remove the top plug in the middle and inject SEAFOAM using a syringe. The Suntec pump I took off the inlet hose and injected it directly into the hose.
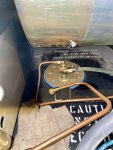
On the unit itself there should be a yellow tag. I have it attached below, it specifically states you need to flush the pump. Flushing it with diesel fuel is not enough....use SEAFOAM. DO NOT expect the pump to be able to flush out the oil, pull fresh diesel, and feed the burner.
I removed the pumps set up to an external motor and tested each pump. Picture below. My inlet line I ran into a 1 gallon jug of SEAFOAM. My burner line I ran into a jug, and I ran my overflow into another jug. This way i could test and flush all of the lines with SEAFOAM while making sure all of the fuel solenoids are in working order.
As you are flushing the lines, you will see the oil mixing with the SEAFOAM, it will look like motor oil at first and gradually turn into the color of the Seafoam. I also attached a pressure gauge on my setup. while you are purging the oil out of the pump and through the lines you should see the pressure build up to 10 to 25PSI as the oil is purged. Keep in mind I did the same thing without removing the pump and burner line. I just used the syringe and an airhose. It takes about 4 or 5 syringes of Seafoam to flush the pump and the lines. Do this untill you show pressure building up with the Seafoam. I keep stressing the SEAFOAM due to its lubrication properties. After you have pressure with the seafoam put your new fuel filter on and top it off with diesel fuel. Your pump should run great now.
The Webster Pump is definitely the better pump and easier to work on. All of my Suntec pumps had problems. The biggest problem with the Suntec pumps was removing the pumps. You cannot get a socket over the bolts holding the pump onto the motor, also they used locktight, so you have to heat up the bolts. The hardest part was removing the 2 bolts on the Suntec pumps.
You have to clear the oil out of the pump and in the burner line. I have found you can clear the burner line from the pump to the burner inlet and it should be fine. The only time you have problems past the burner line is you try starting the unit without cleaning it first. Normally the oil rests in the lowest point of the burner line.
I have had several pumps that seem like they are locked up and have sheared the coupling head off. Soak them in SEAFOAM overnight and try turning them with a wrench. I have been able to bring them all back to life.
The problems I see with these machines is the coupling shearing off, the fuel pressure screw malfunctioning, and the solenoid failing. All of these things come from the oil they used to preserve them. The biggest issue is the coupling cost $400 to $600 IF THEY HAVE THEM IN STOCK. I am currently working with a local machine shop to see if I get them made.
Also I am working with Webster pump on getting another pump they make work on these machines. I think I can get another Webster pump to work but I have to redesign the pump shaft and the coupling.....Stay tuned!
View attachment 911369View attachment 911370View attachment 911371View attachment 911372
So what pump should I be looking for on Ebay? I have one in a similar situation.
 and they eventually died.
-------------------------------------------------------------------------------------------------------------Good Saturday Morning,
I don't use the "Sun" pump. I bought several pumps that sort of looked like my Webster from eBay. None ever had the mounting holes that the original, obsolete Webster has. I used an eBay pump for the regulator parts that fit exactly into the original. That regulator was bad from the "preservative" that was in the system.
Last week I found another preservative problem and determined the L1 solenoid was not turning off completely the fuel to the nozzle.
Here's where the BIG problems started....Since L1 solenoid was only partially cutting fuel to the nozzle,
fuel continued to slowly run into the chamber when the unit was in cool-down or ventilate!!!! This led to massively hot fires when put into the heat mode as the chamber was loaded with fuel laying in the bottom. Roaring and raging fires were burning in the cool and ventilate mode with no way to stop them as it was self perpetuating. A total shut down cut the combustion air fanView attachment 911396 and they eventually died.
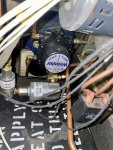
SOLVING THE PROBLEM.....since the L1 solenoid is a "3 way" unit, it's a bitch to remove with all the piping and mounts. I ordered a 120 VAC solenoid from Amazon. I installed it between the copper feed line to the nozzle and where the feed line connected. I connected the 120 leads in parallel with the L1 solenoid's feed of 120. PROBLEM SOLVED. Now the additional solenoid definitely cuts the "leaky" feed to the nozzle and the fire stops when switched to cool-down.
It appears the "preservative" they put into the fuel system damaged not only the pump but the L1 solenoid's ability to completely close off the feed to the nozzle.
The pix shows the 4 inch nipple to an elbow to the new solenoid. The nipple was inseerted into the opening that previously accomodated the feed to the nozzle. The nozzle is now connected to the output of the new solenoid which is wired in parallel with the original L1 solenoid.
It is taking time for the old junk to burn off whilst the system is now operatiing. White smoke is slowly diminishing from the exhaust,
Hope this all helps.
PS...it turns out S2 is what controls the cycling of the burner, not a timer. After the output air reaches about 160 deg. it is turned off to cool. This is documented at the top of pg. 0003 00-4 "Heating Modes"-------------------------------------------------------------------------------------------------------------
THE END (I hope)
This Saturday afternoon, I've run the ASH for hours. After a lot of white smoke, it is now running very clean...no smoke. The add'l solenoid worked correctly (see above L1 discussion). The initial smoke today was the burning off of all the crud in the chamber and the exhaust piping....it's now clean and dry, no black sludge anywhere anymore.
BIG NEWS:
It appears the TM that came with the unit is not up to date. My 140 runs on timed-cycles. It runs for 3 minutes on, shuts down for 1 minute and then fires up again! I didn't see anything about timed cycles in the TM.
There is a printed circuit board hidden behind the "box" that encloses the control panel. No reference to this modification anywhere I could find. I SUSPECT this is the circuit that is controlling the on / off
(3 on/1 off) cycle of the fire.
I hope my work helps others. These can be a dangerous beast. Be careful.
Larry
Great response Larry, I have had the same problems with 2 of the 9 heaters I bought.PS...it turns out S2 is what controls the cycling of the burner, not a timer. After the output air reaches about 160 deg. it is turned off to cool. This is documented at the top of pg. 0003 00-4 "Heating Modes"