• Steel Soldiers now has a few new forums, read more about it at: New Munitions Forums!

  • Microsoft MSN, Live, Hotmail, Outlook email users may not be receiving emails. We are working to resolve this issue. Please add support@steelsoldiers.com to your trusted contacts.


Hairba11's LED Headlight build (a.k.a. huffing solder fumes on a sunday afternoon)

hairba11

New member
66
0
0
Location
st. louis (high ridge)
didn't know if this was the best place to start this or not, Mods can move it if needed.

getting tired of changing headlights in the m-818, and didn't want to spend $$$ on production LED headlights so i decided to try making my own.

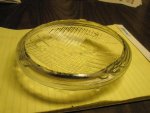
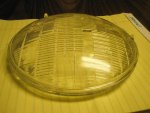
First step was cutting the back off one of the burnt out headlights.

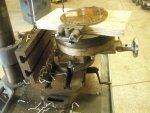
I used duct tape and taped it into a 6" plumbing cap to hold it level,
then duct taped a couple of pieces of 2x4 under the angle grinder to get it the right height.
using an 1/8" cutoff wheel I was able to cut the reflector away from the lens.


it took a little work to clean up the edges. I was wearing gloves, and a dust mask, and goggles, and a full face shield to try and keep glass dust away.

the edge that was left was roughly 6" in diameter.

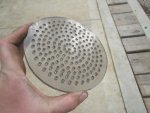
I used a compass with two sharp ends to scratch a 6" circle on some 1/4" plexiglass.

Putting a jigsaw upside down in the bench vise allowed me to control the material with both hands and get a fairly accurate circle cut.

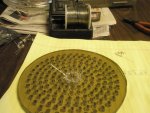
Using a rotary table and a tilt bed in the drill press I got to drilling a bunch of holes.


figuring that LED's have about a 20* viewing angle, and that headlight beams are closer to 30-35*, i drilled the first row around the outside with a 10* angle, and 10* separation on the rotary table. the next row was 5* angle, the third row will be the high beams, and they have a 7.5* angle to them. fourth row is a 2.5* angle, and the rest are flat.

when I got done I had swiss cheesed the piece of plexi.


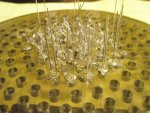
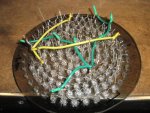
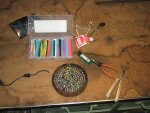
I had already ordered a bunch of LED's and resistors off the bay, and I started installing them with Shoe Goo.


using an online LED calculator, and figuring on a max voltage of 27, I am putting a series of 7 LED and a 180 Ohm 1/2 Watt resistor together. These 7 LED strings will hopefully hold up through any voltage spikes, the truck normally runs at about 25.5v to 26v.
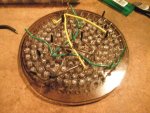


a little more done


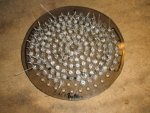
Here's an idea of what it will kinda look like when I get done.


Now I'm just out of LED's and waiting for more to come in so I can finish up this light.
Then I have the joy of doing it all over again for the second if it works the way i'm hoping.

Thanks.
 

eisenhe

New member
23
0
0
Location
Cedarburg, WI
Nice -- I hope you get the output power you're looking for. The biggest problems with LED's so far are light output and heat buildup -- hope you're using high-output LED's and hope they don't get too hot. Keep those resistors as far from the LED's as possible. It'll be fun to see how it works!
 

OPCOM

Moderator
Steel Soldiers Supporter
3,657
27
48
Location
Dallas, Texas
I think you will have heat problems with that design, but only time will tell. Are these the regular type of 20mA LED? I could not count how many, but what's the count?

It might be better to get a bunch of 5 watt surface mount LEDs perhaps 16 or 24 of them and run each at slightly less such as 4 watts for reliability. Use the circuit board top and bottom copper as heat dissipators with plenty of vias and then for regulation, run each string of 8 from a buck converter with current limiting.

High power LED also are available pre-mounted to a 10mm square aluminum base for heatsinking such as Neutral White (4100K) 10mm Square Rebel - 180 lm and http://www.philipslumileds.com/pdfs/DS61.pdf and they offer tech support.

Anyway, can't wait to see how this turns out. When you are done, can you measure the output and compare to an existing headlamp, and do a side by side picture where you shine both kinds at the garage door and take a pic?

Looks like a great project, will be interesting to see how the different angles of the LEDs contribute to the pattern.
 

hairba11

New member
66
0
0
Location
st. louis (high ridge)
yeah, regular 20ma. max voltage 3.6, nominal 3.4, running a string of 7 behind a 180 Ohm resistor. to give me about 28 volts to play with. Hopefully that helps with the heat seeing as how the truck consistently runs at 25.4v

final count in the lamp will be 170 5mm LEDs at a theoretical 55,000 mcd each.

should be nice and bright, for a while anyway.

I had thought about high power, as you said, but 16-24 of them, at $9 a piece would add up in a hurry.
as it sits i will have about $35 tied up in this one headlight instead of $180

I got in my second order of LED's and should be continuing this project shortly.

edit:

most of my LED lighting experience has been in radio controlled cars, usually not more than 4 to 10 LEDs in parallel resisted down from 5v so this is truly an experiment.

depending on how this survives, I may try again with something like 50~100 led's instead of the full 170. for this lamp, i drilled the holes about 1/2" away from each other not worrying about the total. If it melts down, I'll pick a total number, then drill holes accordingly.
 
Last edited:

panshark

Member
544
11
18
Location
Idaho Falls, ID
here's an idea if those LED's turn out to run too hot: You could mass-produce those puppies as an arctic kit upgrade package! So's you don't have to worry about that freezing rain and sleet and other buggery white stuff from freezing up on your headlights and dimming you out. You could run a couple of those out to the bed, and with a good cover on top, you might be able to mount them over some coffee cans, and have some hobo-warmers!:grin:
 

ida34

Well-known member
4,117
30
48
Location
Dexter, MI
I appreciate the write up but if you attach the files instead of putting down a URL link they will show up without having to link out. Makes looking at your hard work much easier. Just press the manage attachments and add all the files you want to be viewed.

Kenny is right. The voltage should be in the 28-28.5 volt range. Calculate you max at or near this figure. 25 is way too low. You may need to increase the voltage on your regulator. Do a search to find out how. It amounts to turning a screw in or out on the alternator.

Also, welcome to the site.
 
Last edited:

hairba11

New member
66
0
0
Location
st. louis (high ridge)
it is 25.4 at idle, it gets up to about 27 at 54mph, which is why i figured for 28v when putting the led string together.

i went ahead and uploaded pics to the site, I had tried using code, but the bboard only put up links

panshark, i could advertise it in winter to keep your blinker fluid from freezing

ah1955, those do look cool and might be easier than cutting the back off a sealed beam.

I'm going to try and get some time to work on this soon, really this time.
 

Attachments

ah1955

Member
223
1
16
Location
Lancaster County Pa.
hairba11 your build will get you close to the look of the ones that Truck Lite makes for the govt. Hopefully not at the same cost. I have not seen any pricing lately but when I first saw them in the Truck Lite catalog I checked with our supplier at work who gives us real nice pricing becouse of the volume that we buy and he said they were about (I think, been awhile) $150 I said I didn't want a case just 2 and he said that was each.Way out of my price range, so the time you have in these would be worth it. I think that the Truck Lite ones have a flat surface for the front glass, don't know if your light dispersment would be affected with the curved glass. Would like to see the finished product, keep updates comming.
 

hairba11

New member
66
0
0
Location
st. louis (high ridge)
Progress, finally.

i got to work on the light tonight. i finished up the second to last row, and with the number of comments concerned about overheating, i only put two strings of 7 in the last ring on the right and left sides. Then i went through and tied all the negatives together with brown trailer wire, all the high beam positives together with yellow, and all the low beam positives together with green wire.

I left one of each solder points uninsulated and uncut as this will be the connection point for the pigtails the originally came off the back of the bulb.

I need to figure out how to support the pigtails so the whole weight of them won't be supported by a couple of "legs" from LEDs. especially as much vibration as these lamps tend to see.

just for giggles tonight, i was working out in the expando trailer/ portable bar.
 

Attachments

nofearnohope

Active member
632
32
28
Location
College Station, TX
hairba11 your build will get you close to the look of the ones that Truck Lite makes for the govt. Hopefully not at the same cost. I have not seen any pricing lately but when I first saw them in the Truck Lite catalog I checked with our supplier at work who gives us real nice pricing becouse of the volume that we buy and he said they were about (I think, been awhile) $150 I said I didn't want a case just 2 and he said that was each.Way out of my price range, so the time you have in these would be worth it. I think that the Truck Lite ones have a flat surface for the front glass, don't know if your light dispersment would be affected with the curved glass. Would like to see the finished product, keep updates comming.
I was quoted $250 for each light by themselves or $400 with the housing. After I told the sales guy I was a private owner and not a company, he made me an offer I couldn't refuse. They do have a flat surface and will definately light up the area on low and could probably signal the International Space Station when they are on high. :D
 

hairba11

New member
66
0
0
Location
st. louis (high ridge)
I was quoted $250 for each light by themselves or $400 with the housing. After I told the sales guy I was a private owner and not a company, he made me an offer I couldn't refuse. They do have a flat surface and will definately light up the area on low and could probably signal the International Space Station when they are on high. :D

as of right now, i have bout $35 and 6 hours in this light.
its still cheaper than getting a new regular headlight from carquest.

i'm looking forward to putting power to it compared to a regular sealed beam.
 

OPCOM

Moderator
Steel Soldiers Supporter
3,657
27
48
Location
Dallas, Texas
It is more work, but you can download free proprietary printed circuit board schematic and layout software and design a board to hold all those LED leads, then have the boards made for about $50 each. That is a lot of hand-wiring for sure otherwise. If you just want to support all of it, some silicon glue applied sparingly will work and can be pulled off later if repair is needed.
 
Top
AdBlock Detected

We get it, advertisements are annoying!

Sure, ad-blocking software does a great job at blocking ads, but it also blocks useful features of our website like our supporting vendors. Their ads help keep Steel Soldiers going. Please consider disabling your ad blockers for the site. Thanks!

I've Disabled AdBlock
No Thanks