• Steel Soldiers now has a few new forums, read more about it at: New Munitions Forums!

  • Microsoft MSN, Live, Hotmail, Outlook email users may not be receiving emails. We are working to resolve this issue. Please add support@steelsoldiers.com to your trusted contacts.


Heater in a can - Now you can have your turbo and heat it too!

US6x4

Well-known member
Steel Soldiers Supporter
1,165
2,028
113
Location
Wenatchee, WA
...heat your cab, that is. Your turbo will be hot enough already :)

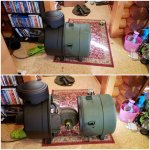
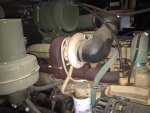
I wanted to chronicle my summer project and share my idea for an alternative heater mounting solution for M809s with a turbo installed (may work for other models also). This all started with the question of how to mount a heater if there is a turbo sitting in the heater's usual location so here is the idea in a nut shell:
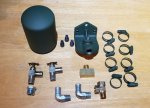
20180611_192619.jpg20180917_181233.jpg20180908_091949.jpg
If you leave these two alone together in a dark room long enough - this is what will happen.

I first found an NOS M35 winterization kit for about half-off which was too good to pass up plus it had the diverter box with the inlet on the driver side which is where the heat would come from once a turbo displaces the stock heater location. I was staring at the drive side air cleaner one day thinking about relocating it to the passenger side of my M813 and having bolt holes and large air duct holes left in the side panel of the engine compartment and I thought I might as well leave one canister and just add the extra one. I could always store quarts of oil or something in one of them. Before my heater arrived I knew its length thanks to PartTarget and had the wild thought "maybe I can fit a heater inside of an air cleaner canister...hmm..." Luckily by brother bought me an extra canister for my birthday so I soon had all the parts to get started. From the first picture you can see that it will just fit, but to verify that it would work I needed to model up all the parts. Here is how it works:
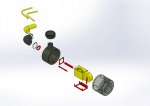
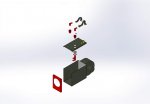
HEATER IN A CAN 1.jpgHEATER IN A CAN 2.jpg

The yellow parts are what came with the winterization kit, the OD green parts are standard air cleaner pieces, and the red parts are the parts I had to design and manufacture to make this all work together. Modifying the heater box was simple, but modifying the air canister was tricky. For one, the 4" heater duct, the 14 Ga. power wire, and both 1 1/8" O.D. coolant hoses have to exit out of the 5" air cleaner outlet. All of this hinged on being able to re-route the coolant hoses into the heater box so that they could exit from inside the back of the heater box.

20180811_080640.jpg20180713_170902.jpg
This funny looking part is responsible for that and a test fit shows that it will work! The oval part has the same perimeter dimension as a 4" thin wall tube even though it is squished down to make room for the heater hoses and power wire. Next I needed brackets to attach the heater box to the inside of the air canister.

20180723_192625.jpg20180811_080715.jpg20180811_080732.jpg20180815_191739.jpg
This bracket is purely a bolt-on piece. It bolts to the heater box which in turn bolts to the angle irons you see underneath the bracket. These angle irons have tapped blocks welded to them and will be welded to the inner cylindrical wall of the air cleaner where the air filter once resided. Now it's time for some welding.

20180811_093337.jpg20180811_102940.jpg
A lower gusset that you can barely see in the 3D model that goes between the inner and outer cylindrical shells and the weird hose outlet piece also got welded in, but I didn't get any pictures of them in the shop. Now it's time to modify the heater box which houses the heater core.

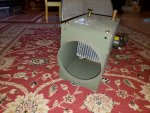
20180723_190758.jpg20180611_195408.jpg20180815_191722.jpg
A new rear panel was designed with the outlet hole in just the right spot so that the canister outlet tube, which protrudes into the canister, would slip right into the hole while the heater box bracket rested on the angle irons previously welded in. This is where the 3D model was invaluable. The flat panel also had tapped block welded into the inside of the flanges and it was flat which made the overall length 1" less than with the original rear panel as seen in the middle photo above. This heater box still needs to reroute its coolant to the inside of the box...

20180902_145302.jpg20180902_145154.jpg20180902_145143.jpg20180908_105909.jpg
90 degree hose barbs, bulkhead fittings, and formed heater hoses allow the coolant to be directed into the heater box and out the back. I made a good guess on which formed shapes to use and it turned out perfect!

It looks like I ran out of allowable uploads so part 2 will continue with final assembly and mounting of all the pieces.

Stay tuned...
 

US6x4

Well-known member
Steel Soldiers Supporter
1,165
2,028
113
Location
Wenatchee, WA
Reserved for part 2

20180911_211059.jpg20180911_212125.jpg20180911_212051.jpg
The formed hoses tuck in just in time and only required minor clearancing for the outside hose. The power wire also gets routed through a grommet and into the heater box. There is a 10' piece of wire with correct connectors that will exit with the heater hoses and connect to the power source once it is finally trimmed down and properly terminated. Now for a complete mock-up with all the plumbing...

20180917_181228.jpg20180917_181745.jpg20180917_183010.jpg20180917_183032.jpg
It's a tight fit which makes it a pain to assembly, but it also means nothing will be moving around once it's put together. Coolant will flow in and out, the heater will draw outside air from the air cleaner cap just like the engine did and hot air will exit from the back of the canister and follow the duct work which will ultimately be plumbed through the original side panel hole where the engine intake tube used to be. Lets get this mounted to the truck!

20180919_180601.jpg20180920_173309.jpg
The weight increased from 49.8 with the air filter to 69.2 with the heater so my daughter's wagon got to help out with the back and forth trips between the house and the truck. Here are some other pieces that are less sexy but still necessary to support the new heater in a can:

20180720_111600.jpg20180725_180026.jpg20180813_171439.jpg20180806_203009.jpg20180813_180438.jpg20180816_192544.jpg20180826_203236.jpg20180816_171900.jpg

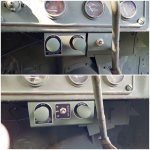
I laser cut new brackets to mirror the original underside support for the fender, bent up a piece of 1 1/2" x 0.25 wall DOM tubing, mounted them up and had them welded in place. A new triangular gusset as well as a new tube brace for the fender was also made up and installed so now the front end looks symmetrical and it also looks factory which was important for this project. I also was not happy with the brackets supplied in the heater kit so I made my own to fit in the pre-existing dash holes that would house the cables, the toggle switch, and the circuit breaker all in one. I also sourced a data plate for the toggle switch which did not come with the kit.

My turbo project won't happen until the spring so for now the heater resides on the passenger side and will get plumbed into the existing hole in the passenger side firewall from the original heater. Once the turbo is on I will move the heater in a can to the driver side and plumb the ducting into a new hole next to the steering column.

So after all this work how does an M809 look with twin breathers on it? Bad-a$$ !

20181001_111350.jpg20180903_143139.jpg20181006_091246.jpg

This truck would turn heads before and elicit all sorts of reactions like "What. the. ****. IS. that!?" or "Holy $h*t!"
But now it just looks completely mean and macho (at least to me). Guys will see it and their jaws drop moments before their faces turn green with envy and the ladies' initial reaction of surprise and brief disgust quickly turns to an unexpected arousal and mysterious curiosity about this huge lumbering beast. (At least that's the embellished version that plays out in my simple mind...haha).


*DISCLAIMER: More thought went into whether this could be done than whether this should be done. Modifications of this type may cause reproductive harm in the state of California and considerable thought should be given before staging such a modification in your wife's living room for 3 months.
 
Last edited:

162tcat

Active member
710
44
28
Location
Washington
Why didn't you just install on firewall in cab? Plenty room for a heater there and it works better when in the cab. Tucks up out of the way too. Don't get me wrong, looks like you did a nice job but the crazy amount of time, $$ and labor gave you an inferior heater. If you have this kind free time, I have some projects around the house I've been wanting to get done. I'll buy the beer!

Reserved for part 2

View attachment 744300View attachment 744301View attachment 744302
The formed hoses tuck in just in time and only required minor clearancing for the outside hose. The power wire also gets routed through a grommet and into the heater box. There is a 10' piece of wire with correct connectors that will exit with the heater hoses and connect to the power source once it is finally trimmed down and properly terminated. Now for a complete mock-up with all the plumbing...

View attachment 744305View attachment 744306View attachment 744307View attachment 744308
It's a tight fit which makes it a pain to assembly, but it also means nothing will be moving around once it's put together. Coolant will flow in and out, the heater will draw outside air from the air cleaner cap just like the engine did and hot air will exit from the back of the canister and follow the duct work which will ultimately be plumbed through the original side panel hole where the engine intake tube used to be. Lets get this mounted to the truck!

View attachment 744309View attachment 744311
The weight increased from 49.8 with the air filter to 69.2 with the heater so my daughter's wagon got to help out with the back and forth trips between the house and the truck. Here are some other pieces that are less sexy but still necessary to support the new heater in a can:

View attachment 744315View attachment 744317View attachment 744318View attachment 744320View attachment 744322View attachment 744323View attachment 744324View attachment 744325

I laser cut new brackets to mirror the original underside support for the fender, bent up a piece of 1 1/2" x 0.25 wall DOM tubing, mounted them up and had them welded in place. A new triangular gusset as well as a new tube brace for the fender was also made up and installed so now the front end looks symmetrical and it also looks factory which was important for this project. I also was not happy with the brackets supplied in the heater kit so I made my own to fit in the pre-existing dash holes that would house the cables, the toggle switch, and the circuit breaker all in one. I also sourced a data plate for the toggle switch which did not come with the kit.

My turbo project won't happen until the spring so for now the heater resides on the passenger side and will get plumbed into the existing hole in the passenger side firewall from the original heater. Once the turbo is on I will move the heater in a can to the driver side and plumb the ducting into a new hole next to the steering column.

So after all this work how does an M809 look with twin breathers on it? Bad-a$$ !

View attachment 744330View attachment 744331View attachment 744332

This truck would turn heads before and elicit all sorts of reactions like "What. the. ****. IS. that!?" or "Holy $h*t!"
But now it just looks completely mean and macho (at least to me). Guys will see it and their jaws drop moments before their faces turn green with envy and the ladies' initial reaction of surprise and brief disgust quickly turns to an unexpected arousal and mysterious curiosity about this huge lumbering beast. (At least that's the embellished version that plays out in my simple mind...haha).


*DISCLAIMER: More thought went into whether this could be done than whether this should be done. Modifications of this type may cause reproductive harm in the state of California and considerable thought should be given before staging such a modification in your wife's living room for 3 months.


Sent from my iPhone using Tapatalk
 

US6x4

Well-known member
Steel Soldiers Supporter
1,165
2,028
113
Location
Wenatchee, WA
Why didn't you just install on firewall in cab? Plenty room for a heater there and it works better when in the cab. Tucks up out of the way too.
Well, for one, I wanted to use as many military issue parts as I could. My truck previously had a heater in it which was missing when I bought it so I wanted to use all of the existing holes in the firewall and dash to put parts back to their original location. Another reason is that I enjoyed the challenge and here in eastern Washington where high teens is typically the lowest temp in winter, I wasn't concerned with the efficiency of the heater. It would have been way easier and more boring to mount this heater on the driver side inner fender as others have, but I don't always like to choose the obvious route.
 

US6x4

Well-known member
Steel Soldiers Supporter
1,165
2,028
113
Location
Wenatchee, WA
If you have this kind free time, I have some projects around the house I've been wanting to get done. I'll buy the beer!
thanks for the offer :) If it involves MVs I might take you up on that, but right now I'm thinking of a few new projects like a VIC-1 control panel for the back of the cab and maybe a cab visor with HID/IR lights integrated into it. Working at a manufacturing plant with access to laser cutters, machine shop, powder coating booths, etc. really makes anything possible so my mind starts to run wild...
 

dmetalmiki

Well-known member
5,523
2,025
113
Location
London England
Incredibly detailed, methodical, innovative and competent work there that you carried out, And on two Absolutely Immaculate looking trucks to boot.

>Admiration<
 

US6x4

Well-known member
Steel Soldiers Supporter
1,165
2,028
113
Location
Wenatchee, WA
Incredibly detailed, methodical, innovative and competent work there that you carried out, And on two Absolutely Immaculate looking trucks to boot.

>Admiration<

Thank you for the compliments, much appreciated. I would like to take credit for the M37, but that one belongs to a fellow collector in my town and it looks brand new top to bottom.
 

Jbulach

Well-known member
Steel Soldiers Supporter
2,560
1,967
113
Location
Sunman Indiana
Either turbo envy IMG_2324.jpg or... he’s trying to sell something, hopefully it includes piston squirters.
 
Last edited:

US6x4

Well-known member
Steel Soldiers Supporter
1,165
2,028
113
Location
Wenatchee, WA
Now that my turbo installation is complete this heater project is back on the front burner. I've had the heater/defroster diverter box mounted for awhile and now I have it plumbed to the engine bay after cutting a 4" hole in the firewall.

20210911_190125.jpg

20210912_074012.jpg

20210912_174459.jpg

20210912_174355.jpg

Part of hooking up this heater will include adding a coolant filter.
 

Micmada

Active member
155
206
43
Location
Florida
I was wondering, what if one ran coils around a turbo and then used the turbo heating to heat the cabin or other areas, then at the same time it would cool the turbo and give it better boost even. Heck, better could be to run alcohol coils around it to vaporize in the pistons with additional injectors in order to get additional intercooler effect.
 

US6x4

Well-known member
Steel Soldiers Supporter
1,165
2,028
113
Location
Wenatchee, WA
Today I finished plumbing ducting from the heater core to the cab and I got the wiring reconnected. Tested it out and the air blows pretty strong to the floor and "ok" to the defrost.

20210916_160415.jpg

20210921_152846.jpg

20210921_165512.jpg

Hopefully the ducting touching the resistors won't hurt anything...
 

hethead

Active member
147
216
43
Location
Seattle, WA.
I was wondering, what if one ran coils around a turbo and then used the turbo heating to heat the cabin or other areas, then at the same time it would cool the turbo and give it better boost even. Heck, better could be to run alcohol coils around it to vaporize in the pistons with additional injectors in order to get additional intercooler effect.
My car has a water-cooled turbo and that coolant is shared with the engine, which feeds the heater core... so technically, your thoughts are spot on. I don't know why all turbo compressors aren't water cooled (on water cooled engines) actually. It seems like a very effective way to help cool the intake charge.
 

US6x4

Well-known member
Steel Soldiers Supporter
1,165
2,028
113
Location
Wenatchee, WA
Parts have been accumulating for adding a coolant filter including the Napa 4019 filter base, Donaldson filter, MIL-DTL-6000D military 5/8" coolant hose, various fittings and clamps.

20210918_161538.jpg

20210929_163114.jpg

20210930_153111.jpg


I designed up an adapter plate out of 3/8" stainless to attach to the outside of the oil cooler housing and mount the filter base. I counterbored the outer 4 holes for socket head cap screws just because I hadn't used those tools before so that made it fun. The filter base holes were tapped 3/8" fine. I painted it Cummins charcoal gray and mounted it up with 1 bolt always installed for fear of the cooler coming loose. These are 3/8" N.C. x 3" long socket head cap screws with high collar lock washers.

20210924_175259.jpg

20210929_151148.jpg

20210929_151638.jpg

20210929_151806.jpg

20210929_154101.jpg
I'd say it looks right at home!

I still have some more fittings coming in and some configuring to do on my plumbing but for now I installed the base and the filter.

20211003_175631.jpg

20211003_175658.jpg
 
Last edited:

US6x4

Well-known member
Steel Soldiers Supporter
1,165
2,028
113
Location
Wenatchee, WA
20211008_063251.jpg

I think I have the bulk of the heater hose plumbing worked out. Following the instructions for the filter install and the advice of some over-the-road truckers I'm going to tee into the filter with the heater hoses so that there will be a bypass route if either the filter or heater core get clogged up.

I will probably have to add a thread or two with a 3/8" NPT tap to get the fittings clocked how I want them and I think I may swap the locations of the shutoff valve and that zinc plated 90° fitting. All I'm missing is a 90° rubber elbow.

I'm going to get an extra sacrificial filter to run before I plumb the hoses for the heater since I don't want to send rusty sludge through my brand new heater core.
 

US6x4

Well-known member
Steel Soldiers Supporter
1,165
2,028
113
Location
Wenatchee, WA
I finally drained the radiator so that I could install the shutoff valves from the coolant heater kit; one on the water manifold with the included pipe bushing and one on the oil cooler in the existing pipe bushing. A section of hose connects the supply side and on the return side it's waiting for my 90° elbow to arrive.

The sacrificial filter is installed and the ports where the heater hose will go are capped off for now.

20211012_155208.jpg

20211012_155155.jpg
 

Micmada

Active member
155
206
43
Location
Florida
I finally drained the radiator so that I could install the shutoff valves from the coolant heater kit; one on the water manifold with the included pipe bushing and one on the oil cooler in the existing pipe bushing. A section of hose connects the supply side and on the return side it's waiting for my 90° elbow to arrive.

The sacrificial filter is installed and the ports where the heater hose will go are capped off for now.

View attachment 847832

View attachment 847831
Do you need tp replace the ptg pump with a Ptg-afc punp when using a turbo? Can a ptg-afc be used with a normally aspirated? I think I blew the pulsation diaphragm dampener on my pump and was thinking of getting a ptg-afc and put in a classic cummins turbo.
 
Top
AdBlock Detected

We get it, advertisements are annoying!

Sure, ad-blocking software does a great job at blocking ads, but it also blocks useful features of our website like our supporting vendors. Their ads help keep Steel Soldiers going. Please consider disabling your ad blockers for the site. Thanks!

I've Disabled AdBlock
No Thanks