• Steel Soldiers now has a few new forums, read more about it at: New Munitions Forums!

  • Microsoft MSN, Live, Hotmail, Outlook email users may not be receiving emails. We are working to resolve this issue. Please add support@steelsoldiers.com to your trusted contacts.

Hello...new Bantam T3C owner

faw3

New member
6
0
0
Location
Woodbridge, VA.
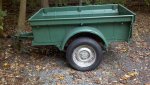
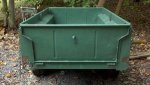
I recently got a lucky break and now have a "new to me" old trailer that I found on a oddly worded Craiglist ad. I got it home and have cleaned it up a bit. OEM name plate indicate a Bantam civilian model 3, serial in 4100 range, made in 1946. Has from what I've researched on the Bantam T3 site: OEM Fulton hitch, split 16" combat wheels, no lights (or wires) - just a left side hole on lower left for a light.

I've been checking it over and the tub sides, tailgate, hitch, axle & springs all seem fine. The bearings have no play to speak of, make no noise, are well greased, and when I towed it home 70 miles I checked often and they did not even get warm.

It seems my big challenges will be in two initial areas:

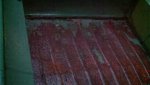
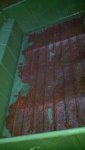
1: The OEM floor panel was covered with a wooden panel by the PO and when I got that up there is simply too much rust and holes to likely repair it...and the lower edge of the front seam of the tub to floor is simply gone for about 24" and hand sized holes in several areas. I would venture to say that 1/2 of what I have is repairable...the other half is simply too far gone. I'll be considering a new panel or other replacement...suggestions welcome.

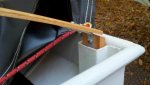
2: One tire holds air fine...one leaks around the casing of the valve stem. I ordered two new tubes. From what I have read initially...these split rims must be split to do any tire removal/tube replacement...no chance of doing a over the rim edge modern tire type removal with hand irons? The bolts for the rims look really ragged past the nuts...are new bolts/nuts available?


Frank
No. Va.
 

Attachments

Last edited:

faw3

New member
6
0
0
Location
Woodbridge, VA.
Some progress...

Well this weekend I invested some time/effort toward my new trailer and targeted two areas:

First, getting ready for a repainting. In light of the military background of this type of trailer...I "drafted" my 12yo son got him rigged with a full face respirator (which he thought was neat as ****) and a power sander. Got about 2 hours out of him and then I continued doing some sanding. I had two areas at the front of the tub where a seam had split a bit...so I welded that item off my list.

Second: I have one tire that looses air...so I went to "war" with that combat rim. Now I see another reason they call those WW-2 guys and gals "the greatest generation" - this was some real work. I was lucky that there was no bead lock/rim lock the wheel was just set up with a tube (which had gone bad). I soaked the wheel with PB Blaster several times over the last couple of days near the rim nuts and and soaked the tire rim/bead area seam with WD40. Working with two crowbars finally got one side of the tire down enough on the rim for me to just squeeze in a nice wide & flat bit on my impact hammer in to the rim seam...and that opened up the seam and they separated. Replacing the tube and the reassembly was about as easy as a tube switch on my KLR. I sanded and painted the wheel rim faces and used some anti-seize...hopefully if I ever do this again they will part ways easier.

As a novice here is an opinion: if this size combat rims are really stuck rusted together...I see no easy way to externally "force" the rims apart (absent special tools and such) based on how they nest together. Getting wild likely will damage the rim and increase the risk of injury. If I ever had a really stuck rim...I think the safest way to do this yourself is just deflate, remove 4 rim nuts and loosen the remaining 4 to the point the nut is backed of but still fully threaded, cut the tire across the body of the tire with a sawsall in 4 or so spaced places and use an impact hammer with a shallow flat bit the separate the rims by spreading them from the center seam which you can find by feel. New tube, new tire and your good to go with undamaged combat rims.

I've decided to focus on work that will preserve the trailer in a conditon as close to OEM as I can. I'll be painting it in a diffrent color scheme, but not changing any major components. I think my results will be a decent looking neat little trailer that will be a lot of fun...not a bad legacy after all! I'll get some more photos up soon.
 

faw3

New member
6
0
0
Location
Woodbridge, VA.
I've got other things now crowding me time wise...so, I'll finish up on the Bantam later in the season. The floor panel rust issue will have to wait...I'll just use the prior owners wood floor panel for now...and keep the trailer covered or in my garage. I've got a line on a couple of floor options...and now have the time to think and plan.

I've finished my initial "preservation" with a good going over, cleaning, sanding & painting. I'll post photos over on the "trailer photo" thread. I've used the trailer a bit and it tows like a dream...except in reverse! I have to practice with that short hitch set up.
 

faw3

New member
6
0
0
Location
Woodbridge, VA.
Bantam tarp bows...an easy/quick option:

I got nice black heavy tarp from "mytarp.com". They have great prices, quick shipping and the 5x7 stock flat tarp size fits the Bantam like a glove.

We have had some significant rain...and so I learned that supporting bows for the tarp are a "must have". Most of the serious Bantam folks use heavy steam bent oak and model after the OEM fittings...I am not a restorer and so...I went light and easy...

I used oak 1x3 cut to about 4.5" for the "stake pockets"; used 1/8 x 3/4 alum bar cut to 6" long for the brackets which mount the stake pocket block to the actual bow; and used 4 sectons of 48" long oak door stop trim for the bows. All from Lowes.

I drilled and set up the blocks and alum. trim using standard nut/bolts. Sanded all the wood (nice thing about the oak door stop - presanded!) Soaked the 4 cut door stop trim sections in the bathtub overnight and in the morning mounted it up, hand bent the alum. trim, and you just jamb the blocks into the stake pockets and let them sit. Once dry...your set for a double coating of linseed oil and thats it.

With the 5x7 tarp and some 3/8" rope running around...every thing is tight looking, rain proof and self draining with no puddles. I've run at highway speeds and it's on tight/no flapping.

This may help someone...just an option
 

Attachments

Top
AdBlock Detected

We get it, advertisements are annoying!

Sure, ad-blocking software does a great job at blocking ads, but it also blocks useful features of our website like our supporting vendors. Their ads help keep Steel Soldiers going. Please consider disabling your ad blockers for the site. Thanks!

I've Disabled AdBlock
No Thanks