• Steel Soldiers now has a few new forums, read more about it at: New Munitions Forums!

  • Microsoft MSN, Live, Hotmail, Outlook email users may not be receiving emails. We are working to resolve this issue. Please add support@steelsoldiers.com to your trusted contacts.


How to: Rust proof/reseal window frames

Gunfreak25

Well-known member
1,561
620
113
Location
Yuma, AZ
Each paragraph below corresponds with each picture.

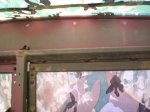
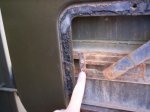
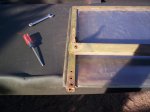
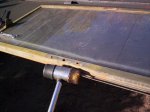
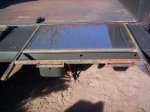
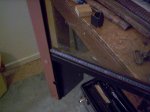
First you'll want to take down your windshield. Start by removing both flathead screws from the window locking arms.

There are 7 bolts that secure the windshield pivot to the windshield cab frame.

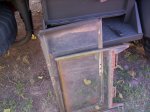
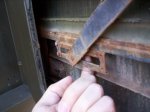
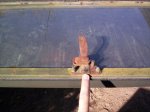
Remove all but the center most bolt. With your hand under the windshield frame, finish removing the last bolt and allow the windshield to carefully drop free. Don't let it slide down the side of the cab and onto the ground. :lol:

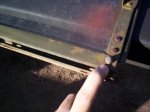
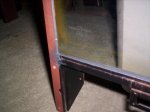
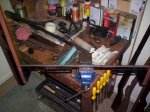
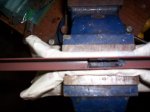
To remove the door glass, first remove the 6 sheet metal screws holding the door access panels on.

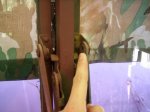
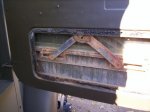
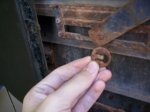
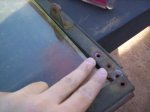
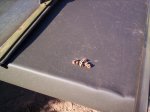
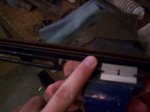
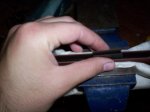
Where my finger is, there is a C clip that clips onto a peg to keep the window regulator arms attached to the glass frame slots. There are 2 of these. Do not loose them.

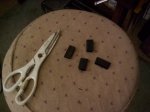
They look like this......

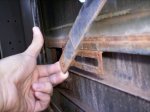
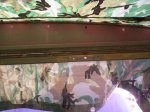
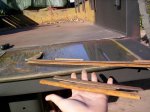
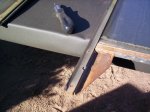
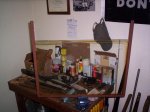
Next remove both of the window stopping lugs.

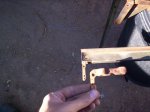
Pull the arms out of the window frame.

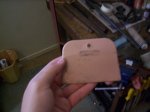
The door glass will slide right out of the top.
 

Attachments

Last edited:

Gunfreak25

Well-known member
1,561
620
113
Location
Yuma, AZ
There's a total of 4 little screws with 4 little threaded bushings that hold the bottom of the door glass frame together.

Do not loose them!

The bottom will slide off like so...

See how rusty water collects on the bottom of the frames? Save as much of the rubber sealing material as you can. More on this later.

For the windshield glass, first remove the locking handle

Now remove both the left and right bottom frame securing screws.

Use a mallet to slide the windshield pivot out of it's groove.

Remove 2 screws on both sides of the frame that hold the L brackets on.

Now the bottom frame will slide off with some wiggling. It's usually rusted on pretty good.

Remove the brackets for rust removal too of course.

Now you can clean your glass up with a razor blade or have your glass man make some new ones. Remove the old weatherstripping off the windshield glass using a thin flat blade screwdriver, it's hard stuff to remove and does not slide out of the grooves.

Wash out everything and dry thoroughly before priming. I use rusty metal primer in a spray can to soak the insides of the frame tubes while rotating them. I will have to wait 2 or 3 days to finish the post, as the primer takes time to cure.

Up next I will show how to install the glass into the rust proofed frames and how to reseal the glass to insure water never gets inside them again.
 

Attachments

Last edited:

Gunfreak25

Well-known member
1,561
620
113
Location
Yuma, AZ
The primer has cured on the frames, and the glass is ready for re installation. This is not hard to to, just tricky. This is where the old rubber glass seals come into play, cut 4 pieces for each window.

Glue the seals in place with a little of your calking, I use Latex DAP Dynaflex 230.

Press them into place and let them dry for an hour. This helps keep them in place while sliding the glass back in.

Now slide the glass in carefully. If the rubber strips slide a little that is okay. The purpose of using the little pieces of old rubber sealing is to take up all the extra space between the glass and frames. This keeps the glass from wiggling around so you can get a good seal with your calking.

Now put your bottom frame on and secure it with the 4 tiny screws. The pieces of tape on the glass show where each rubber strip was placed. If your old rubber was too cracked to use for this purpose, pieces of cardboard would work fine.

Have a bondo spatula at the ready. You can get a pack of them any any home improvement store for a few bucks.

Take a razor blade and trim out any excess rubber.

Flip the window assembly around and stick it in the vice so the bottom frame is at the bottom. This "settles" the glass into the frame since this is how the glass will sit for the rest of it's life. Lay down your first bead making sure to PUSH the calking into the gap, it doesn't take a whole lot. After awhile you can get a bead down in 20 seconds or less. After laying each bead, smooth it out with the spatula. This also pushes the calking further into the gap for a better seal.

Close up picture of the fresh bead before smoothing out.

Final picture shows the completed window assembly. Note the calking around the bottom edges of the frame as well. Let it dry 3 days before handling, then clean up any excess with a razor blade.

In few days I will post how to disassemble the door mechanisms for cleaning and regreasing.
 

Attachments

Last edited:

Gunfreak25

Well-known member
1,561
620
113
Location
Yuma, AZ
If you want to get some made ASAP.

Door glass is exactly 26 7/16 x 17 1/2 x 1/4"

Windshield glass is exactly 32 3/4 x 14 15/16 x 1/4"

I still want to post a how to on air compressor rebuilding and windshield wiper motor teardown/cleaning.
 

m1010plowboy

Well-known member
Steel Soldiers Supporter
3,791
2,308
83
Location
Edmonton, Canada
Era Correct Hardware G749

P1170024.jpgP1170022.jpgP1170018.jpgP1170021.jpgP1170026.jpg

2 year old thread and it seems like yesterday.

Bumping the windshield thread to get some input on Era Correct 'looking' Hardware.

Where do you find bolts and other hardware if you're trying to match original??

.....if the pictures show up.........
I found some hardware for the frame corners at The Bolt Supply Store and they are close butt are Robert's son instead of Standard. The crown nut is close but not as tall so I'm still shopping.

I had the option of some stainless bolts for the window frames and didn't pick them up. After reading through Gunfreak's thread again I'm thinking an upgrade around the frames might allow for easier removal in the future.

Does metal type matter? Is it worth flipping to stainless where the bolts are exposed to high moisture in the window frames?

The Bobcat stool holds the windshield frame mounting bolts 10-32x 1/2 which we're still hunting for. Page 391 TM1819 says windshield bolts are special and so far the supplier thinks so too. We'll keep looking but any input is appreciated.

Had to get a pic of pop's trick smacking the top of a smackable screw driver with a hammer as you are putting pressure on the bolt to remove it. Works like an impact and can jar the bolt loose with less damage to the head. Just a bunch of quick taps on the hammer while twisting the screw driver and they thread right out. Threading back in a few times as you're removing the bolt cleans the threads a little and can reduce thread damage.

In this scenario we broke the glass, damaged the heads and the bolts are still stuck in the frame.:)

They will soak in a 50/50 mix of acetone and trani fluid overnight and we'll try again real soon.
 

m1010plowboy

Well-known member
Steel Soldiers Supporter
3,791
2,308
83
Location
Edmonton, Canada
G749 Front windows

Just a bump and up-date on a visit to the All West Glass to build some new front windows for the M135. I asked if I could jump in the back of the shop with them on a slow day and watch how they'd do it. They were very accommodating.

Using a product called Easy Seal, they wrapped the window on the 3 sides that slide into the frame then hold it in place with black tape. Wiping Easy Seal with a little motor or trani oil makes easy seal swell and tightens it in the window frame. I ordered a roll of the stuff so we'll get supplier info up soon.

aug phone pics 14 015.jpgaug phone pics 14 018.jpg

Once in the frame the L brackets get slid in and the bottom frame holes line up like they're supposed to.

aug phone pics 14 019.jpg

The outer rubber came from M35 windows. The M35 rubbers are a little smaller so a cut and splice is required. We used 3 pieces and put the cuts away from the audience.

P8070041.jpg

We started the outer rubber on the corners and found that checking and cleaning out the frame channel first would have been a good idea. Using a dull screw-driver on the soft rubber is also a good idea.

P8070050.jpgP8070053.jpgP8070043.jpgP8070046.jpg
 

hypertex

New member
25
0
0
Location
Bullhead City, AZ
... I ordered a roll of the stuff so we'll get supplier info up soon.
Any info on the Easy Seal? Sounds like a great universal solution! Google has not been much
help finding this stuff. The UPC bar code on the product you bought can also help track down a local source for us all.

Hopefully picking up a bobbed deuce soon but it has a large crack in the driver's side glass. My first deuce and first post. Thanks!

Added: Sounds like it is "Glass Setting Tape" used for installing glass in the wing windows of classic cars. Expands with oil. Many sizes/thicknesses
 
Last edited:

m1010plowboy

Well-known member
Steel Soldiers Supporter
3,791
2,308
83
Location
Edmonton, Canada
Everseal and window seals

The M35 outside edge window rubber weatherstrips (say that 3 times fast) has that funky 'thickening' so we put the flat part against the frame. The original G749 rubber weatherstrips fit a little different so it would be nice to find a couple hundred boxes laying around.

PA300583.jpgPA300584.jpg

In the SNL G749 part manual on page 404 the original 'weatherstrips' are labelled GG-7410667 Group 1804.

Now paying attention I see the real name of the product for the window inner insertion product is "Everseal", sorry. Lots of the same product under different names and "Glass Setting Tape" is the best search term. http://www.allglassparts.com/product/401167/400082

Glassman Eric reminds us that the thickness, from 1/32" to 3/32" is very important for a good fit. Too thick no fit, too thin water in.

PA280422.jpgPA280421.jpg
 
Top
AdBlock Detected

We get it, advertisements are annoying!

Sure, ad-blocking software does a great job at blocking ads, but it also blocks useful features of our website like our supporting vendors. Their ads help keep Steel Soldiers going. Please consider disabling your ad blockers for the site. Thanks!

I've Disabled AdBlock
No Thanks