• Steel Soldiers now has a few new forums, read more about it at: New Munitions Forums!

  • Microsoft MSN, Live, Hotmail, Outlook email users may not be receiving emails. We are working to resolve this issue. Please add support@steelsoldiers.com to your trusted contacts.


Hydraulic Brake Booster Change Out

ssdvc

Well-known member
971
639
93
Location
CT
OK, got everything disconnected from the brake booster itself. She is disconnected from the pedal inside the truck and the brake fluid reservoir, brake lines, etc are all removed. I then removed the 4 15mm nuts inside the engine compartment holding that big metal mounting plate to the firewall. So I should be go to go..............or am I?

The unit won't move. I even hit it with a small sledge and no joy. Am I missing a step or two????

Help before I loose daylight.
 

ssdvc

Well-known member
971
639
93
Location
CT
HUGE THANKS !! It's out, now I just have to figure out how to get that HUGE! nut off the old booster so I can reuse that plate. I guess a hammer and chisel will work, but what a pain in the *ss !!
 

ssdvc

Well-known member
971
639
93
Location
CT
Got it !! putting it all back together now. Hope she stops using the test drive:grin::doh::D
 

ssdvc

Well-known member
971
639
93
Location
CT
OK, NO JOY as far as brakes go. I started her up, let her run for a bit, pumped the peddle a bit (nothing) shut her off, checked fluid levels then fired her back up again. The peddle won't return if I push it and there is ZERO resistance.

What the heck did I do wrong? No one thing I did notice is that the inside of the booster (facing the brake reservoir) was different than what I got from auto zone. Both were installed using a snap ring (no stake). but where the brake reservoir interfaces with the booster, that inside area was different.
 

cucvrus

Well-known member
11,263
9,554
113
Location
Jonestown Pennsylvania
I think you need to use your old push rod. Check it out. You forgot to put your old push rod in. The push rod and the sprag washer do not come with most of the boosters. Don't feel bad. I know another guy that did the same thing. No it was not me. But the guy wanted to sell me his truck for $500. because he was so mad and tired of working on it. He just got done putting an injection pump on his truck and burned out all the glow plugs trying to get it started afterwards. Report back Scott.
 
Last edited:

ssdvc

Well-known member
971
639
93
Location
CT
Thanks Rick. The unit came with a push rod, the piece that connects to brake pedal correct? It had a new "large nut" (aside from me) and used a snap ring. As for a "sprag washer", I am not master mechanic and you'll have to explain that one to me....please.

This is what the old one looks like. The new one doesn't have that star piece inside, it is just concave with an indentation in the center. Did I get the wrong booster?
 

Attachments

cucvrus

Well-known member
11,263
9,554
113
Location
Jonestown Pennsylvania
Exactly. That star piece is the sprag washer I am referring to. You need to remove that and use the pushrod that is in there and the star/sprag washer. That is the piece you do not put in. Look at the new one. You need that star/sprag in there. Report back. I know all the remanufactured ones I buy I need that piece from the old one to use on the replacement one.
 

ssdvc

Well-known member
971
639
93
Location
CT
Thanks for the explanation Rick. With your help, this site and Youtube, I will get this right !

Another question(s).
1. So, I assume I'll need to to break apart both boosters and swap internals?

2. When you say push rod, I am thinking you mean that piece in the middle of the sprag washer, not the peace that connects to the brake pedal itself, correct?

3. I will also assume that non of these parts have seals or o-rings that I would have to swap out. The seals went on the old unit, thus the need for the change out.

Hopefully the part will still be covered for warrantee issues if I break it open.
 

cucvrus

Well-known member
11,263
9,554
113
Location
Jonestown Pennsylvania
I think you can get that washer/sprag/push nut/keeper out and just push it back in after the rod. Did instructions come with it. Check back. I am relying on memory. But I have dealt with this issue a few times with others.
 

ssdvc

Well-known member
971
639
93
Location
CT
OK, slow but sure. I have attached a few pics to document this. I cold not find this mentioned, so maybe it belongs in a sticky or something, or maybe it's just common knowledge, except when it comes to my knowledge.


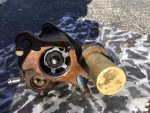
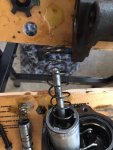
Anyway, you do need to break open the old booster. I could see no other way to get that washer out (if someone knows differently, please chime in). Note of caution: There is plenty of left over oil inside this bad boy, so have something below that can get it all, or you will have a BIG oily mess on your hands. Also, both half's are under some spring pressure. I loosened and removed the 6 bolts, but the half's stuck together (rust and time). One light whack with a hammer and BAM, she came apart. Lucky I had the unit fairly secured or it would have been all over the place, along with afore mentioned oil.


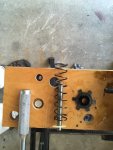
Next, I removed the sprag washer and the push rod, spring and centering piece, which I now know is between the the master cylinder and the booster. Be gentle, but that washer will come out, just twist it side ways and pull it out. Another word of caution: Take note of how those pieces are siting in the booster before you disassemble. Those pieces sit a certain way and they need to go back in properly.

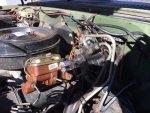
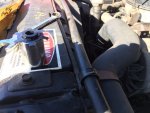
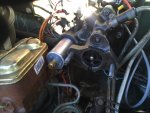
OK, as previous posts indicate, I had already installed the new booster and everything was assembled 100%. Since this is a PIA job, I was looking forward to taking everything back out to install this washer and pushrod. And guess what, you don't have to. As a matter of fact, it is my uneducated suggestion that when changing these out, go ahead and get everything buttoned up EXCEPT mounting the master cylinder to the booster. that said, this is my starting point.

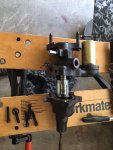
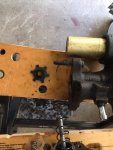
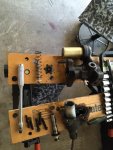
Took my parts, went to the truck to put this together. Took off the master cylinder from the booster (two bolts and no mess). Got a 15/16 1/2" socket and a small extension. Mounted the pushrod and spring assembly into the booster. Then, I placed the sprag washer on the socket, then lined it all up in the mouth of the booster and gave it all a good push. It goes in easy enough, but you have to get it a good, forceful and steady push. One last word of caution (hey, what can I say): Make sure the pressure you apply to the washer as you are putting it in is even. DO NOT cock the washer or it could get stuck, which would really suck (picture taking it all apart, or even maybe trying to find another washer if the spring steel snaps!).


Anyway, just did the op test and all is right with the world again. I really appreciate everyones help and this site. Without either, a I am sure a local mechanic would have been glad to do it ($$$$$$$$$$$$$$$).
 

Attachments

cucvrus

Well-known member
11,263
9,554
113
Location
Jonestown Pennsylvania
Scott: Did you get this truck back in the fight? Just checking up on you man. I am doing all sorts of work down here. But at the moment nothing is CUCV related. Just working. I hope all worked out.
 

ssdvc

Well-known member
971
639
93
Location
CT
Thanks for checking up Rick. Yup, I finally figured it out (I'm slow, but I get there!), buttoned it up and CAREFULLY tested the final product. And low and behold, she stops just fine !! I did manage to accidentally overfill the PS reservoir, but I corrected that and now all is good.

Now if I could only sell the non-running one, I'd be in the pink !!

How's the mule doing ??
 

cucvrus

Well-known member
11,263
9,554
113
Location
Jonestown Pennsylvania
How's the mule doing ??

Scott thank you for asking. I am thinking of giving the Mule M1009 a new look this season. So be on the look out. The gears are turning. All I have to do is get back in the play with Easter find M1008. More progress coming soon. I have lots of project NON CUCV related at the moment. And I wanted to invite you down for a Rausch Creek run Saturday April 22, 2017. It will be loads of fun. Terminus M1009 is ready to go. Take care and have a great day.
 

cucvrus

Well-known member
11,263
9,554
113
Location
Jonestown Pennsylvania
Scott since you ask I thought I would show you how I used the flat bar to make a seat mount adapter. I never drilled a hole thru the floor yet. I use the original holes. I fit form and bolt the flat bar to the floor pan and use elevator bolts to mount the seats of my choice. I hope this is helpful. I used 1/4 X 3 flat bar and truck frame radius to make the seat mounts in the Mule M1009. It could be returned to stock by unbolting the seat adapters and putting the stock seats in it. This bench seat came out of a 1994 Chevrolet Kodiak. I removed the seat frame and painted it with 383 CARC green and it has held up well. I use a ****l blower to clean out the inside of my CUCV's.

005.jpg002.jpg003.jpg004.jpg006.jpg
 
Last edited:

ssdvc

Well-known member
971
639
93
Location
CT
I am liking the bench seat, nice work. I think I may look at a 60/40 split that can recline and fold forward with heat. That could work in my 09.
 
Top
AdBlock Detected

We get it, advertisements are annoying!

Sure, ad-blocking software does a great job at blocking ads, but it also blocks useful features of our website like our supporting vendors. Their ads help keep Steel Soldiers going. Please consider disabling your ad blockers for the site. Thanks!

I've Disabled AdBlock
No Thanks