• Steel Soldiers now has a few new forums, read more about it at: New Munitions Forums!

  • Microsoft MSN, Live, Hotmail, Outlook email users may not be receiving emails. We are working to resolve this issue. Please add support@steelsoldiers.com to your trusted contacts.

Installing a hardtop

chicklin

New member
499
0
0
Location
Kansas City, MO
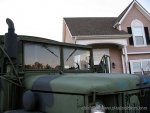
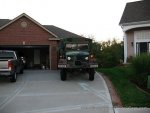
Just picked up a new hardtop. $150 delivered, pretty good deal. Has a small dent in the "brow", but nothing major.

Anyway, I want to get this thing installed and had a couple of questions.

1) Does it take any special hardware? I figured just nuts and bolts, maybe washers.
2) Can I install it over the existing soft-top hardware, or does that have to come out?
3) Any other tips or tricks? It looks like a pretty simple bolt-up and go.

Thanks!
 

Barrman

Well-known member
5,217
1,686
113
Location
Giddings, Texas
Remove the soft top and all of the soft top bows.

I assume your hard top is a factory 2 piece type, so seperate the pieces.

Use a ball peen hammer to knock the holes on both the top and bottom of the back piece away from the cab and the top of the top.

Get some kind of rubber trim to fit over both the top and bottom of the back piece. Either get rubber trim tape or use weather stripping to hold it on.

Install the back half to the cab, start all the bolts but don't tighten them down.

Get somebody to help you put the top piece on. I found going from the bed to be the easiest, but you might not. A third person inside the cab to keep you from knocking your wiper motors off is also advised.

Start all the top half bolts.

Install the bolts that hold the top to the windshield frame.

Tighten all the bolts and enjoy your new echo chamber.
 

chicklin

New member
499
0
0
Location
Kansas City, MO
Re: RE: Installing a hardtop

Barrman said:
Remove the soft top and all of the soft top bows.

I assume your hard top is a factory 2 piece type, so seperate the pieces.

Use a ball peen hammer to knock the holes on both the top and bottom of the back piece away from the cab and the top of the top.

Get some kind of rubber trim to fit over both the top and bottom of the back piece. Either get rubber trim tape or use weather stripping to hold it on.

Install the back half to the cab, start all the bolts but don't tighten them down.

Get somebody to help you put the top piece on. I found going from the bed to be the easiest, but you might not. A third person inside the cab to keep you from knocking your wiper motors off is also advised.

Start all the top half bolts.

Install the bolts that hold the top to the windshield frame.

Tighten all the bolts and enjoy your new echo chamber.
It's a two-piece top but came in one piece with all the weatherstripping still there. Do you see any problems lifting the whole thing on and bolting it in?
 

chicklin

New member
499
0
0
Location
Kansas City, MO
Re: RE: Re: RE: Installing a hardtop

SouthTexasDiesel said:
You think you could get some pictures of the install. I'll be doing the same thing in a few weeks when I get my Deuce.
Yep, I'll try and do that. My helper (dad) can be a little impatient sometimes, so waiting around to document this may not be his idea of fun :)
 

chicklin

New member
499
0
0
Location
Kansas City, MO
98hd said:
you can do it as one piece.

There is a funny little washer used on the top side of the windshield frame, other than that it is all standard stuff.
Yeah, I saw something like that. It looks like bigger bolts up there, is that right? The angle-bracket washer thingies are in there.
 

Floridianson

Well-known member
Steel Soldiers Supporter
7,404
2,487
113
Location
Interlachen Fl.
Before you tighten everything down check with the windows up for hitting the back top corner of the glass on the roof/back panel. I got a truck that had the back panel replaced and the window was rolled up all the way and I went to close the door and ran a crack in the driver window.
 

chicklin

New member
499
0
0
Location
Kansas City, MO
Well, I didn't get any pictures, but everything went well. Here was the process:

1) Remove the soft top from the frame. I found the easiest way was to slide the rear up and out and the flip it over onto the hood. Then the front should slide out pretty easily as long as the channel isn't crimped

2) Remove the frame hardware. I pulled the rear posts up out of their slots first. That gave me plenty of play to pull everything else apart. Don't forget to remove the snaps that are screwed into the side of the windshield frame.

3) Remove the rear angle plate. I have no idea what this was for, but there was an angled plate bolted to the rear of the cab. All these bolts and the plate had to come off for the top to fit correctly.

4) Set the top on the cab. I did it all as one piece. As pointed out above, it may be easier if it's in two pieces.

5) Attach the "brow" to the windshield. Put two metal screws in the sides where the snaps were and two larger metal screws (3/8" x 1", I think) in the top of the windshield where the funny angled washers are.

6) Loosen the bolts between the top and bottom pieces of the hardtop. Loosely bolt the bottom piece to the cab. Line everything up, check your windows and then tighten up the bottom and then the top.

I'm sure there are other ways to do this, but this worked for me. The only thing I have left to do is to try and push the top back up into place where someone clearly sat on it. Anybody have any tips for reinforcing the top?
 

Barrman

Well-known member
5,217
1,686
113
Location
Giddings, Texas
Glad you got it on there.

There was a thread a year or so ago about Canadien Dueces and it had pictures of how they put cargo racks on top of the hard tops. Looked pretty cool, gave more much needed storage and covers up the dent.
 

art

Active member
250
28
28
Location
Northern N.J.
The only thing I have left to do is to try and push the top back up into place where someone clearly sat on it.
It's probably too late now that you put it on already but,
Lay the Hard top on the grass and jump up and down on the dent!
It sounds silly but it works! The dent pops right out.
I also took out the ribs and straightened them out with a sheet metal pliers. New wood from Home depot.
It worked for mine.

I love my hard top!!!
 

chicklin

New member
499
0
0
Location
Kansas City, MO
art said:
The only thing I have left to do is to try and push the top back up into place where someone clearly sat on it.
It's probably too late now that you put it on already but,
Lay the Hard top on the grass and jump up and down on the dent!
It sounds silly but it works! The dent pops right out.
I also took out the ribs and straightened them out with a sheet metal pliers. New wood from Home depot.
It worked for mine.

I love my hard top!!!
I think what I'm going to do is get a 2x4 and a jack and try and push it up from the inside. We'll see how that goes.
 

chicklin

New member
499
0
0
Location
Kansas City, MO
Here are some pics of the top installed. It was originally desert tan but I put one coat of Krylon Green Camo on it. That CARC really soaks it up, so I think I'll do another coat. The one from the front is so you can see the dent. I was able to pop it up some just by standing in the cab and pushing up with my back.
 

Attachments

chicklin

New member
499
0
0
Location
Kansas City, MO
chicklin said:
pctrans said:
OR, you could lay down on the seat and push up with your feet against the ribs. Worked on mine!
Good idea, might be easier on the back.
Yep, that worked better. I've got it almost back to normal. I think the rain will at least run off of it now, which is all I really care about.
 

spentshell

Member
413
2
18
Location
Long Island NY
I used the 2x4 method it worked like a charm. Just make a tee and jack away, make sure the bolts are in good. Took about 15 minutes with cutting the wood.

Trucks looking good
 

Jakob

Member
722
5
18
Location
Louisville, KY
Looks great! Makes me want a hardtop as well, but I have some other things that need attention first. A little more paint work on yours and camo up the top a bit and it'll blend in perfect!
 

USMC6062

Member
371
1
18
Location
St Augustine, FL
If your talking about how the whole roof curves down in the center, some hard tops are made that way. I think the older ones dip down in the center and the later ones are flat on top.
 
Top