- 3,193
- 4,824
- 113
- Location
- Olympia/WA
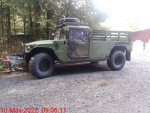
So I've kind of beaten up the bottom edge of the truck. Just because you can make it through the jeep trails doesn't mean you won't take a few hits from it.
Anyway, I decided I wanted some protection for the edge.
Talked to a friend who's business orders steel for their own needs, and he got me some at a decent price.
Ended up going with 4"x4"x3/8" angle iron for the rails. A little overkill perhaps, but the future goal is to extend it to full underbody protection so I'd rather have a little more to work with.
Anyway, project was straight forward enough.
Cut the steel into 2 8' pieces.
Measured in 8" from one end, and cut out a notch approximately 60-65 degrees. Cut a bevel on the edge for the later welding.
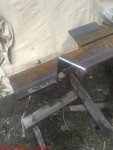
Use the oxyacetylene torch to heat up the metal, then used a 2' crescent wrench for leverage to bend it. Bending was a little slow, as it was apply steady pressure while continuing to heat the metal until it was bent far enough. Of course it doesn't bend perfectly straight, so had to whack it with a big hammer a few times to straighten it out.
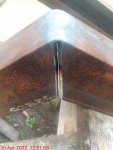
Test fit
Then ended up switching it around and making this the rear notch on the opposite side. Measured 10" forward from it, but out about 10 degree cut to follow the bottom edge of the truck. Then approx 70 inches forward from that and another 60-65 degree notch and bend.
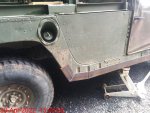
Lots of welding to fill in the notches. Probably did more grinding than welding as I'm a hobbyist not a professional and what I had just wasn't working that well on the thick metal.
cleaned the metal a little then primered it. Started marking spots to drill.
Ended up basing the holes centered on the base of the B-pillar between the braces and rivets, then measured 8" out to the next hole, and had them 1.5" down from the top edge of the rail (or 2.5" up from the bottom edge) At the back edge I juse went with where it looked good and had nothing behind it.
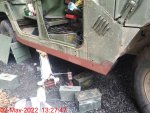
Drilled all the holes in 1/4" on the truck, then pulled the rail off and used a drill press to move them up to 3/8" and then countersink them all.
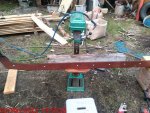
Some degreaser afterwards to remove the oil I used while drilling and countersinking.
More painting to get everything black. I had left the outside face in brown primer so I could see the spots I marked using a sharpie marker, rather than having to acquire a paint marker in a light color.
After a day for the paint to cure a bit, I used some 20 mil pipe wrap tape made of PVC as a physical barrier between the steel of the rails and the aluminum of the body. 50 foot roll is only $6 so a cheap and easy solution.
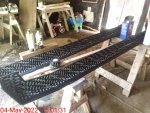
Put the jack rail in place, installed the bolts with fender washers on the inside. Bent the edge of the fender washers because they were just a little too big to fit that close to the bottom edge inside the truck. The holes I drilled are pretty much in line with the rivets holding the floor and sidewall together, so a double layer of metal to bolt through.
I also put a layer of tape on the back side of the fender washers as a barrier. Put them in the 2' crescent wrench used before for bending the rails, and smacked the washer a couple times with a hammer.
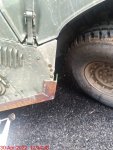
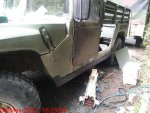
Here is the rail fully installed with the countersunk bolts. Still need to do a little paint to blend the bolt heads into the rail a little better, but I like the cleaner appearance vs the ones you see online that come with the carriage bolts. Bolts are rated for 140,000 psi; grade 8 is 150,000 psi strength, so closest I can come is they are the equivalent of grade 7. Not that it matters too much because the aluminum body is likely to give before any of the bolts would.
I did use a little bit of Lexel sealant inside the upper edge of the rail to keep water from coming down the side and getting caught in there. I'm sure water will still get in over time, and that's why the PVC tape is there.
Also in the last picture it does kind of look like my rear tire is flat, but that's just a trick of the light (it's bugging me in the picture so I just had to go check it again)
So now for a tools and materials list
oxyacetylene cutting torch
2' crescent wrench, purchased for $20 once upon a time from Harbor Freight
3 lb hammer
6 lb hammer
wirefeed welder (used flux cored wire because I don't have a MIG setup)
angle grinder with metal grinding disks, flap wheel, wire brush
Battery drill
Drill press
drill bits in 1/4" and 3/8"
countersink bit
Floor jack
4x4 wood blocks to support angle iron when working on it
driver bit for bolts
9/16" wrench
sawzall with metal cutting blade
Metal primer
flat black spray paint
2 8' 4x4x3/8" angle iron bars
1 package of 25 torx flat head screws 3/8" x 1.5"
22 grade 8 nylock nuts
22 3/8 x 2" fender washers
Link to the flat head screws I used

 www.mcmaster.com
The countersink bit. Worked decently in a drill press, but had issues when trying to use it in a handheld drill where it made elongated holes.

 www.mcmaster.com
Total cost for this project was right around $300 not counting the flux core wire or the oxygen and acetylene gas used.
Can't really give a total time it took as I wasn't keeping track, but with decent skills and tools it should take maybe a full day of actual working on shaping/welding/drilling/etc, but a couple of additional days are needed to allow the paints to dry and cure properly before doing the final install.
Anyway, I decided I wanted some protection for the edge.
Talked to a friend who's business orders steel for their own needs, and he got me some at a decent price.
Ended up going with 4"x4"x3/8" angle iron for the rails. A little overkill perhaps, but the future goal is to extend it to full underbody protection so I'd rather have a little more to work with.
Anyway, project was straight forward enough.
Cut the steel into 2 8' pieces.
Measured in 8" from one end, and cut out a notch approximately 60-65 degrees. Cut a bevel on the edge for the later welding.

Use the oxyacetylene torch to heat up the metal, then used a 2' crescent wrench for leverage to bend it. Bending was a little slow, as it was apply steady pressure while continuing to heat the metal until it was bent far enough. Of course it doesn't bend perfectly straight, so had to whack it with a big hammer a few times to straighten it out.

Test fit

Then ended up switching it around and making this the rear notch on the opposite side. Measured 10" forward from it, but out about 10 degree cut to follow the bottom edge of the truck. Then approx 70 inches forward from that and another 60-65 degree notch and bend.

Lots of welding to fill in the notches. Probably did more grinding than welding as I'm a hobbyist not a professional and what I had just wasn't working that well on the thick metal.
cleaned the metal a little then primered it. Started marking spots to drill.
Ended up basing the holes centered on the base of the B-pillar between the braces and rivets, then measured 8" out to the next hole, and had them 1.5" down from the top edge of the rail (or 2.5" up from the bottom edge) At the back edge I juse went with where it looked good and had nothing behind it.

Drilled all the holes in 1/4" on the truck, then pulled the rail off and used a drill press to move them up to 3/8" and then countersink them all.

Some degreaser afterwards to remove the oil I used while drilling and countersinking.
More painting to get everything black. I had left the outside face in brown primer so I could see the spots I marked using a sharpie marker, rather than having to acquire a paint marker in a light color.
After a day for the paint to cure a bit, I used some 20 mil pipe wrap tape made of PVC as a physical barrier between the steel of the rails and the aluminum of the body. 50 foot roll is only $6 so a cheap and easy solution.

Put the jack rail in place, installed the bolts with fender washers on the inside. Bent the edge of the fender washers because they were just a little too big to fit that close to the bottom edge inside the truck. The holes I drilled are pretty much in line with the rivets holding the floor and sidewall together, so a double layer of metal to bolt through.
I also put a layer of tape on the back side of the fender washers as a barrier. Put them in the 2' crescent wrench used before for bending the rails, and smacked the washer a couple times with a hammer.

Here is the rail fully installed with the countersunk bolts. Still need to do a little paint to blend the bolt heads into the rail a little better, but I like the cleaner appearance vs the ones you see online that come with the carriage bolts. Bolts are rated for 140,000 psi; grade 8 is 150,000 psi strength, so closest I can come is they are the equivalent of grade 7. Not that it matters too much because the aluminum body is likely to give before any of the bolts would.

I did use a little bit of Lexel sealant inside the upper edge of the rail to keep water from coming down the side and getting caught in there. I'm sure water will still get in over time, and that's why the PVC tape is there.
Also in the last picture it does kind of look like my rear tire is flat, but that's just a trick of the light (it's bugging me in the picture so I just had to go check it again)
So now for a tools and materials list
oxyacetylene cutting torch
2' crescent wrench, purchased for $20 once upon a time from Harbor Freight
3 lb hammer
6 lb hammer
wirefeed welder (used flux cored wire because I don't have a MIG setup)
angle grinder with metal grinding disks, flap wheel, wire brush
Battery drill
Drill press
drill bits in 1/4" and 3/8"
countersink bit
Floor jack
4x4 wood blocks to support angle iron when working on it
driver bit for bolts
9/16" wrench
sawzall with metal cutting blade
Metal primer
flat black spray paint
2 8' 4x4x3/8" angle iron bars
1 package of 25 torx flat head screws 3/8" x 1.5"
22 grade 8 nylock nuts
22 3/8 x 2" fender washers
Link to the flat head screws I used
McMaster-Carr
McMaster-Carr is the complete source for your plant with over 595,000 products. 98% of products ordered ship from stock and deliver same or next day.
The countersink bit. Worked decently in a drill press, but had issues when trying to use it in a handheld drill where it made elongated holes.
McMaster-Carr
McMaster-Carr is the complete source for your plant with over 595,000 products. 98% of products ordered ship from stock and deliver same or next day.
Total cost for this project was right around $300 not counting the flux core wire or the oxygen and acetylene gas used.
Can't really give a total time it took as I wasn't keeping track, but with decent skills and tools it should take maybe a full day of actual working on shaping/welding/drilling/etc, but a couple of additional days are needed to allow the paints to dry and cure properly before doing the final install.


