• Steel Soldiers now has a few new forums, read more about it at: New Munitions Forums!

  • Microsoft MSN, Live, Hotmail, Outlook email users may not be receiving emails. We are working to resolve this issue. Please add support@steelsoldiers.com to your trusted contacts.


Keith's M1078A1 Project Overland

Keith Knight

Well-known member
Steel Soldiers Supporter
699
1,461
93
Location
Wauchula, FL
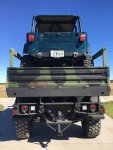
My M1078A1 built in 2003 History, Purchased from GovPlanet September 2015 as a non runner all fluids drained, no batteries and a huge hole in the front left tire.
Picked it up from Hurlburt AFB, Florida.
1078Day1.jpg

I've been working on it ever since.
I'm late at starting this project thread but I wanted to have a single place to post the different things I've done to it, so I'll start posting current progress and past progress here and post links to my other threads.

To begin they through all the drain plugs away when they drained the fluids. Which is crazy because it leaked fluids everywhere hauling it home so it had to have been leaking fluids in the motor pool. So whats the reasoning for draining the fluids? Any way after purchasing new plugs, batteries and a used tire then filling it back up with fluids.
About 30 seconds of cranking it STARTED!!!! Surprisingly ran and drove great. Despite a few idiot lights on in the dash.

I'm along ways into the build now so things won't be in chronological but I will go back when I have time and edit the first post when necessary.
Here is my latest project.
 
Last edited:

Keith Knight

Well-known member
Steel Soldiers Supporter
699
1,461
93
Location
Wauchula, FL
CRUISE CONTROL and FOG LIGHT SWITCH install.
I started off by wanting to install 3 new switches in the dash For Cruise control and fog lights and ended with removing all the dash components, steering column and side steps for painting while I had it apart.
Dashteardown.jpgDashteardown2.jpg
Here is the gage panel with 3 new holes machined into it.
Gage panel tear down.jpg
Refurbished the light switch after finding some evidence of arcing on one of the terminals. Also found some corrosion on the circuit board.
Painted everything and reassembled everything.
Dashblack1.jpgDashblack2.jpg
Cruise switches.
Cruiseswitch.jpg
Fog light switch.
Foglightswitch.jpg
Removed entire side step assembly painted and reinstalled. With the addition of rhino lining on the step/lid.
washerfluid finished.jpg
Next I need to take it to the Caterpillar shop for them to program the ECM and enable the Cruise control.
While I'm there I'm also going to have them reflash the ECM with the 330 HP program.
 
Last edited:

mkcoen

Well-known member
Steel Soldiers Supporter
5,637
380
83
Location
Spring Branch, TX
Looks great Keith! I'm not nearly that ambitious. I think I'm done with mine, other than finalizing where to mount the back up cam, for the foreseeable future. I'm going to spend between now and next spring enjoying the fun of driving it. I may break down and repaint next year but haven't decided yet.
 

Keith Knight

Well-known member
Steel Soldiers Supporter
699
1,461
93
Location
Wauchula, FL
The rocker switches are SWF switches / Britax I collected them from different places. They are used take offs from RV's.
 

Bobcat701

New member
92
1
0
Location
Autryville, NC
Excellent job, you have great skill. I have been learning a lot about mechanics ever since I got mine. I find it relaxing. Thanks' for sharing. \

Joe
 

Keith Knight

Well-known member
Steel Soldiers Supporter
699
1,461
93
Location
Wauchula, FL
I found the tab broken off of the drivers side air bag lock down the other day. Just one more repair LOL!!!
image.jpg
The broken piece is to the left in my hand, I made a new one and welded it on then primed it.
 
Last edited:

Keith Knight

Well-known member
Steel Soldiers Supporter
699
1,461
93
Location
Wauchula, FL
Thanks suprman, but I didn't do a good job explaining the picture. The broken piece is in my hand and the primed area is the part I made and welded on.
 

coachgeo

Well-known member
4,929
3,314
113
Location
North of Cincy OH
How does the other cab shock housing look? Only mention cause if it has some tweak too; then consider with both being tweaked as a possible symptom of side to side motion of the cab your not suppose to be getting.
 

Keith Knight

Well-known member
Steel Soldiers Supporter
699
1,461
93
Location
Wauchula, FL
Along with all the fluids being drained it was also missing the batteries and the battery cover. Keeping with the thought of easy servicing I wanted to use a common battery. After doing the research and some measurements I decided to go with the more common battery and used 4 of the Group 31C batteries. Here is the result. In addition the original cables wouldn't work so I made the connections using silver plated copper buss bars from McMaster.
Battery bus bar2.jpgBattery buse bar.jpgBattery cover.jpgBattery hold down.jpgBattery tray.jpg
 

Keith Knight

Well-known member
Steel Soldiers Supporter
699
1,461
93
Location
Wauchula, FL
Finally had a chance to engineer and build a set of aluminum ramps for loading my jeeps into the back of my M1078A1. Here some pictures.
Its a 1995 jeep YJ on 37" tires. The total height is 11' 8". When loaded it lowered the M1078 by 1 7/8". The Jeep weighs close to 5,000lbs.
Jeep on ramp.jpgJeep on ramp front.jpgJeep in FMTV.jpgRamp veiw.jpg
The Ramps are 12' long and roll into the bed.
Ramp wheel1.jpgRamps in FMTV.jpgJeep with closed tailgate.jpg
 

Attachments

Last edited:
Top
AdBlock Detected

We get it, advertisements are annoying!

Sure, ad-blocking software does a great job at blocking ads, but it also blocks useful features of our website like our supporting vendors. Their ads help keep Steel Soldiers going. Please consider disabling your ad blockers for the site. Thanks!

I've Disabled AdBlock
No Thanks