


ActionStarCBRxx
Member
- 69
- 1
- 6
- Location
- Hurst Texas
King Pin & U Joint - Just Finished a Rebuild
I found it a little difficult to get the information I needed for a "king pin" rebuild and the "u joint" rebuild on the front axles. The website was helpful as always looking at old posts... but "front u joints" and "king pin" were the terms being used.... but the ironic thing is that there are not any rebuild instructions for "king pin" or the "u joints" of the front axles in the TM's (20 and 34) .
I was not smart enough to use "kingpin" as one word search... or smart enough to search for "universal joint" so I am putting this together for other newbies like me to reference in the future that shows each section in the TM's.
I found a post by RND-Motorsports that posted this link to Pirate 4x4.com. This was very helpful! Pirate4x4.Com - Extreme Four Wheel Drive
So if you need to rebuild your front "universal joints" here are the sections in the TM's
Front Axle Shaft (U Joints) * “Universal Joint” is the proper name when referencing in TM's*
TM9-2320-289-20 –
Chapter 7 Brake pad and caliper replacement
Chapter 8 Front locking hub removed (8.3)
Chapter 8 Rotor and wheel bearing maintenance (8.4)
Chapter 6 Front Axle Spindle and wheel bearing replacement (section 6.7)
TM9-2320-289-34 –
Chapter 6 Front Axle Shaft Maintenance (6.4)
*** Steering Knuckle and Arm Maintenance *** (Kingpin)
TM9-2320-289-20 –
Chapter 7 Brake pad and caliper replacement
Chapter 8 Front locking hub removed (8.3)
Chapter 8 Rotor and wheel bearing maintenance (8.4)
Chapter 6 Front Axle Spindle and wheel bearing replacement (section 6.7)
TM9-2320-289-34 –
Chapter 6 Front Axle Shaft Maintenance (6.4)
TM9-2320-289-20 –
Chapter 8 Connecting Rod Replacement (8-10)
Chapter 8 Tie rod maintenance (removal 8-13)
TM9-2320-289-34 –
Chapter 6 Steering Knuckle and Arm Maintenance (6.11)
Here are a few pictures of my rebuild. The cost was around $600. This included the replacement of the upper and lower kingpin. Lowers being the roller bearings and the upper being the plastic cones. This also included the connecting rods, tie rods and tie-rod shock absorber (steering shock) and the adjusting sleeves. I also bought 5 lug bolts to replace as well.
I bought the parts at Napa and O'Reilly's. I bought new grease as well. I already had high performance Napa grease but was low on that so I while at O'Reilly's I bought the Lucas brand... but when I got home and compared it to the Napa high performance wheel bearing grease... the Napa was a little sticker and stiffer than the Lucas. When I pulled the front axle shafts and took them to have the "universal joints" replaced, the owner told me that they use Royal Purple. So at my next trip back to Napa, I bought that grease as well. (all grease was in tubes... not tubs) The Royal Purple was definitely more "stickier" than the Napa grease.
The tool that you absolutely must have for these two tasks is the nut wrench for removing the "Adjusting Nuts" to get the wheel bearing out. I bought one at Napa for a little over $15.00. The TM references this number (Nut wrench, J-26878-A).
The next tool that was extremely helpful was an assortment of tie-rod and pitman arm pullers. It was called "5 Piece Front End Service Tool Set. ($79.99). I think I spent more time at Harbor Freight than I did actually using the tools... they work that well!
IF your going to pull the rear wheel bearings out then you will need pullers for that.
IF you are going to replace the lug bolts, you will need a press to push those out. If your using one of the small stand presses from Harbor Freight or Northern Tool... they work find for pushing the studs out... but not so good for pushing them back in. The base is not big enough for the rotors/hub to sit in evenly.
I think I spent more time cleaning/prepping/priming/painting then I did for the actual repair.
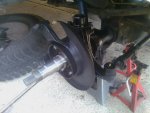
Here are a few photos of everything coming together.
I found it a little difficult to get the information I needed for a "king pin" rebuild and the "u joint" rebuild on the front axles. The website was helpful as always looking at old posts... but "front u joints" and "king pin" were the terms being used.... but the ironic thing is that there are not any rebuild instructions for "king pin" or the "u joints" of the front axles in the TM's (20 and 34) .
I was not smart enough to use "kingpin" as one word search... or smart enough to search for "universal joint" so I am putting this together for other newbies like me to reference in the future that shows each section in the TM's.
I found a post by RND-Motorsports that posted this link to Pirate 4x4.com. This was very helpful! Pirate4x4.Com - Extreme Four Wheel Drive
So if you need to rebuild your front "universal joints" here are the sections in the TM's
Front Axle Shaft (U Joints) * “Universal Joint” is the proper name when referencing in TM's*
TM9-2320-289-20 –
Chapter 7 Brake pad and caliper replacement
Chapter 8 Front locking hub removed (8.3)
Chapter 8 Rotor and wheel bearing maintenance (8.4)
Chapter 6 Front Axle Spindle and wheel bearing replacement (section 6.7)
TM9-2320-289-34 –
Chapter 6 Front Axle Shaft Maintenance (6.4)
*** Steering Knuckle and Arm Maintenance *** (Kingpin)
TM9-2320-289-20 –
Chapter 7 Brake pad and caliper replacement
Chapter 8 Front locking hub removed (8.3)
Chapter 8 Rotor and wheel bearing maintenance (8.4)
Chapter 6 Front Axle Spindle and wheel bearing replacement (section 6.7)
TM9-2320-289-34 –
Chapter 6 Front Axle Shaft Maintenance (6.4)
TM9-2320-289-20 –
Chapter 8 Connecting Rod Replacement (8-10)
Chapter 8 Tie rod maintenance (removal 8-13)
TM9-2320-289-34 –
Chapter 6 Steering Knuckle and Arm Maintenance (6.11)
Here are a few pictures of my rebuild. The cost was around $600. This included the replacement of the upper and lower kingpin. Lowers being the roller bearings and the upper being the plastic cones. This also included the connecting rods, tie rods and tie-rod shock absorber (steering shock) and the adjusting sleeves. I also bought 5 lug bolts to replace as well.
I bought the parts at Napa and O'Reilly's. I bought new grease as well. I already had high performance Napa grease but was low on that so I while at O'Reilly's I bought the Lucas brand... but when I got home and compared it to the Napa high performance wheel bearing grease... the Napa was a little sticker and stiffer than the Lucas. When I pulled the front axle shafts and took them to have the "universal joints" replaced, the owner told me that they use Royal Purple. So at my next trip back to Napa, I bought that grease as well. (all grease was in tubes... not tubs) The Royal Purple was definitely more "stickier" than the Napa grease.
The tool that you absolutely must have for these two tasks is the nut wrench for removing the "Adjusting Nuts" to get the wheel bearing out. I bought one at Napa for a little over $15.00. The TM references this number (Nut wrench, J-26878-A).
The next tool that was extremely helpful was an assortment of tie-rod and pitman arm pullers. It was called "5 Piece Front End Service Tool Set. ($79.99). I think I spent more time at Harbor Freight than I did actually using the tools... they work that well!
IF your going to pull the rear wheel bearings out then you will need pullers for that.
IF you are going to replace the lug bolts, you will need a press to push those out. If your using one of the small stand presses from Harbor Freight or Northern Tool... they work find for pushing the studs out... but not so good for pushing them back in. The base is not big enough for the rotors/hub to sit in evenly.
I think I spent more time cleaning/prepping/priming/painting then I did for the actual repair.
Here are a few photos of everything coming together.
Attachments
-
 45.4 KB Views: 66
 -
 60.8 KB Views: 53
Last edited: