• Steel Soldiers now has a few new forums, read more about it at: New Munitions Forums!

  • Microsoft MSN, Live, Hotmail, Outlook email users may not be receiving emails. We are working to resolve this issue. Please add support@steelsoldiers.com to your trusted contacts.


Light switch modification

Stretch44875

Super Jr. Moderator
Super Moderator
Steel Soldiers Supporter
2,958
28
48
Location
Tiro, Ohio
I've never been happy with the 3 lever switches. Seems like they like to pop the circuit breaker at the worst times, leaving me without lights. Usually when I am towing at night on an interstate with the flashers on. Not a fun time.

I've tried about 4 switches so far and they still pop, no matter what truck I am using. I think the breakers get weak. Even carry spares. In defense of the switches, none of them are new, usually I get them at swap meets, probably after someone else abused them.

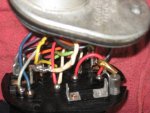
So I decided to take apart the switches and remove/jumper the breakers. Then I am installing a inline fuse holder with a breaker in the harness. I can use fuses also, and don't have to replace the switch when the breaker goes bad. Also going to use a current meter and see what kind of amps I am using.

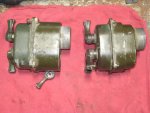
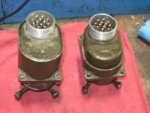
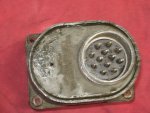
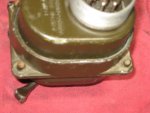
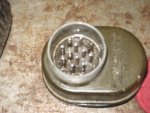
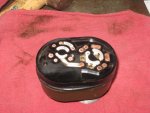
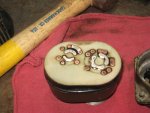
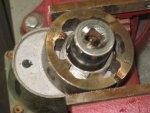
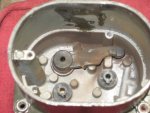
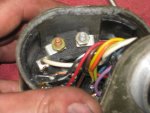
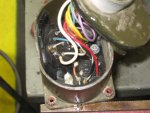
I took apart 4 light switches. 2 were almost identical, one was similar, and the last one was completely different. Here is a pic of the 2 styles I was dealing with. 3 out of 4 breakers had melted contacts.

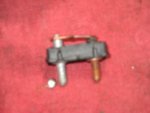
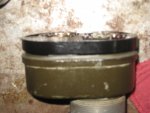
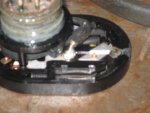
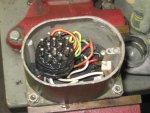
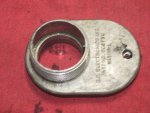
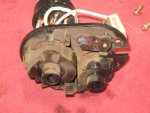
Also a pic of the fuse holder with breaker, and a circuit breaker from inside the switch. Only one switch had a removable breaker.
 

Attachments

Last edited:

73m819

Rock = older than dirt , GA. MAFIA , Dirty
Steel Soldiers Supporter
In Memorial
12,196
314
0
Location
gainesville, ga.
I think CRANETRUCK did a wireing work around to brakers to fix this problem
 

Stretch44875

Super Jr. Moderator
Super Moderator
Steel Soldiers Supporter
2,958
28
48
Location
Tiro, Ohio
Here is the first switch I took apart. It has a wire ring on the back that holds the two halves together. Hardest part is pushing the electrical plug out of the rear housing. Plenty of oil, a pick to work the oil around the rubber, and a socket to push it out. The wire ring is pretty easy to get out with a pick. Be sure the lever side of the switch is facing down, otherwise you will have all kinds of springs and contacts fall out.

Cleaned up the contacts and applied new di-electric grease. Cut the wire to the breaker and soldered it to the other side.

I used a little grease to make the white plastic stay on the contact side, then put it in the other half. Couple of little C-clamps to squeeze it together, then install the wire. Getting the rubber squeezed back in the rear housing can be fun.
 

Attachments

Stretch44875

Super Jr. Moderator
Super Moderator
Steel Soldiers Supporter
2,958
28
48
Location
Tiro, Ohio
Here's the other switches. They are all the same case, the guts are a little different. To take them apart there is a little screw under some rubber caulk. Then you have to hold the electrical connecter and tap the housing off. I used a 1-3/4 -18 thread die on the connector, then clamped it in a vise to tap off the housing. A old connector nut would work also. Didn't want to clamp on the threads and ding them.

One of these was an older switch, it had a removeable breaker in it. The other two was part of the board. Those two were nice, everything was spade connectors inside, just a matter of moving a wire. Other one I clipped the wire and soldered.

These are also nice, you don't have to worry about springs and contacts flying out. Just be sure to put both switches in the off postion, this locks the contacts where they can't come apart. Also I pushed out the electrical plug, but did not need to. Plenty of wire to work with if you leave the plug in. Three screws inside hold the board and switches in. Don't even need to pull them if you don't want to. I did just to check the contacts. All the contacts in the switches were decent.

You can see the one where it smoked the breaker.
 

Attachments

Last edited:

doghead

4 Star General /Moderator
Staff member
Super Moderator
Steel Soldiers Supporter
26,247
1,168
113
Location
NY
I think CRANETRUCK did a wireing work around to brakers to fix this problem

Yes, I think I recall that and his choice/method was to use the output of the light switch, to energize a relay that switched the high load of the lights.

A good way to go, also.
 

Stretch44875

Super Jr. Moderator
Super Moderator
Steel Soldiers Supporter
2,958
28
48
Location
Tiro, Ohio
I thought about Cranetrtucks idea. I didn't want to do the extra wiring to install a relay, and a mil-spec 24volt one at that. And it's a good thing I took these apart, with the breakers being bad. Not sure they would have worked even without the headlight load.
 

Blackmagic94

Member
468
9
18
Location
Oro Valley/AZ
Is this common, I was driving the other night and left the turn signal on and all of sudden the all the lights including the head lamps went out and of course it was pitch black, then i turned the switch off, waited 20 seconds and the turned back on.
 

ZiggyO

Well-known member
Steel Soldiers Supporter
608
427
63
Location
Nebraska
Hello all,


I also had some problems with the breaker in the three lever switch. On my wrecker, (73m819 posted a pic of it in another thread), I have extra taillights mounted high on the convoy light poles to serve as additional tail/brake/signal lights for better visibility at the rear of the vehicle. This was a mod that was done while the vehicle was still in service-- packard "t"s were used off the regular taillights and extra wiring run to the poles. I found that when towing a trailer with the headlights on for extended periods, the breaker would blow shortly after switching on the high beams. I ended up doing something similar to Cranetruck where I added a relay to control the power to the headlights and another to control the running lights-- both are activated by the headlight switch. I figure this way I am taking the brunt of the load off the breaker in the switch as well as prolonging the life of the contacts within the switch. The relays were standard 24v SPDT units rated at 30 amps each (this is what I had laying around) -- I wired them appropriately into the system using standard relay sockets and ran a dedicated fused line directly to the battery box.........


Ziggy
 
Last edited:

doghead

4 Star General /Moderator
Staff member
Super Moderator
Steel Soldiers Supporter
26,247
1,168
113
Location
NY
Common, sort of. Simplest solution is to buy a new switch.
 

Recovry4x4

LLM/Member 785
Super Moderator
Steel Soldiers Supporter
34,014
1,814
113
Location
GA Mountains
Bjorn's name should read Craneredundanttruck. He engineers a way to bypass/ override most intricate circuits just in case of a SHTF situation. I should be taking more notes.
 

Stretch44875

Super Jr. Moderator
Super Moderator
Steel Soldiers Supporter
2,958
28
48
Location
Tiro, Ohio
Original breaker will reset after it cools off.

None of the switches had bad contacts. Very little wear, and I did not see any sign of arcing.

I imagine if I wasn't so cheap, a new switch would fix the problem. Just seems like the breakers go bad with age.

Hopefully I will never need a light switch again after this.
 

ZiggyO

Well-known member
Steel Soldiers Supporter
608
427
63
Location
Nebraska
Trust me, nothing wrong with cheap (as long as its cheap done right)..... It frees up funds that can be spent on more toys :)


Ziggy
 

cranetruck

Moderator
Super Moderator
Steel Soldiers Supporter
10,350
74
48
Location
Meadows of Dan, Virginia
Guys, filament type lights will have what's called an "inrush current", which can be 5 (five) times or more the rated current. Relay contacts should be selected, taking this into consideration. Properly specified relays or contacts should have the "lamp load" listed.

An overly sensitive CB may be triggered by the inrush current.
Toyed with the idea of always having a small current applied to the lights to keep the filaments warm, thus preventing the high inrush, but went the relay route instead...

Funny post Kenny, there is actually a double redundancy in my relay circuit if you include the manual override. :)
 
Top
AdBlock Detected

We get it, advertisements are annoying!

Sure, ad-blocking software does a great job at blocking ads, but it also blocks useful features of our website like our supporting vendors. Their ads help keep Steel Soldiers going. Please consider disabling your ad blockers for the site. Thanks!

I've Disabled AdBlock
No Thanks