• Steel Soldiers now has a few new forums, read more about it at: New Munitions Forums!

  • Microsoft MSN, Live, Hotmail, Outlook email users may not be receiving emails. We are working to resolve this issue. Please add support@steelsoldiers.com to your trusted contacts.


Looking for wiring diag for Pos Term, Neg Term, Suppressor

v12venator

Member
59
30
18
Location
Raeford, NC
I sure am learning many things from this. First off I should have taken a photo BEFORE I took it to the shop.

If you see the second bolt where it is damaged, I think there were two wires there. I think they moved them to another bolt. It looks like the two wires that were on the second bolt were moved to the last bolt as I seem to recall them being rather large wires. Would that make any sense?
So long as all the wires that are supposed to go to the top bar are attached to the top bar and wires supposed to be attached to the bottom bar are attached to the bottom bar where the circuit can close, it's really semantics about what wire goes to what post. To be fair, unless you have other MVs and a NATO slave cable, you probably won't ever use that as a means to jump start the vehicle and those two wires are extraneous to the operation of your M1009 and can safely be removed from that circuit if you wish.

Are you SURE about that? From the pic i suspect that wire on #5 post is the primary cable from the back battery & if so i really don't believe it should be hooked to the ground bar.

BG: It's not much of an overall pic, but if you paid a shop too much money for that cabling as part of the repairs, then there is def a bubbagump involved, but it's NOT the owner of the truck.
It very well could be the main from the rear battery, but as you said, it's not much of an overall picture so we really can't tell. Seeing as though this is a CUCV, however, we can always reference the CUCV charging circuit wiring diagram in the -20 TM and paint an even better picture.

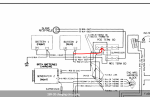
Didn't have this on my phone earlier, bubbagump, but this is a good guide as to how the wiring for your batteries and bus bars should be in your M1009. This and many other wiring diagrams for your truck can be found in the appedices of the TMs linked to earler from Marcus. They are available in PDF format for most document viewers to handle.

289-20 charging circuit.png

Granted, with the damage done by the shop to your top bus bar, you will have to adjust your wire placement on the posts of your bus bars to close that circuit and be able to start your truck whenever you please.
 

bubbagump

New member
9
3
3
Location
Nashville Tn
The biggest question for me is why I don't here that click on and click off of the glow plugs now and why they seem to stay on for twice the time. Could that have anything to do with what was moved around?

Looking at the diagram it looks like the two wires on the second bolt were moved to the 4th bolt. I'm not sure if there was something on the first bolt where the nut is now missing.
 

v12venator

Member
59
30
18
Location
Raeford, NC
It's possible that their fix fiasco has messed up your glow plug relay on the firewall, engine bay side. If that is your new problem, a new relay/solenoid like that shouldn't be hard to find, as any parts store should have fender mounted solenoids like that in stock. I know that for mine, I don't ever really remember hearing a relay click and the truck usually takes about 30 seconds to prime the glow plugs before I fire it up after the WAIT light goes out. A better user to ask would be cucvrus, since he's more knowledgeable about the glow plug circuits and has been doing this a while.
 

cucvrus

Well-known member
11,274
9,601
113
Location
Jonestown Pennsylvania
Just a quick observation and a bit of advise. PB Blaster/WD40/CRC is not the best lube for a permanent lube. Use a squirt can with good old motor oil and use grease on items that need lubed. A little grease and motor oil go a long way. Disconnect that hood cable and hoist it up over night and drip a few drops of oil down that cable sleeve and work it back and forth. Do that a few times and let it set overnight. Hook it up and you will be overjoyed at how easy the hood release works. Grease the latch mechanism with oil and grease. I do the same thing to heater control cables. These slide like a breeze. How many times have you seen bunched and bent cables on the old HVAC systems? A little squirt can of motor oil last for years. The aerosol lubes evaporate in a few hours. An oil can and a grease brush can do a lot to get that old stiff CUCV gliding and sliding along again. Clean up excess as you go. And keep it clean. Be Safe Take Care.
 

Badwheel

New member
4
1
3
Location
Michigan
Hello...I am new to the world of 1009...I bought an '86 fire truck and, as mentioned, with old fire trucks the wiring has been violated to add equipment and further violated to remove it. The vehicle started with new batteries but the GEN 1 light stayed on. I pulled both alternators and had them rebuilt, just cause. GEN1 light still stayed/s on. I noticed the wiring to the battery has one anomaly as compared the wiring diagram. I marked it on the pic attached. Question to the brain trust... Should I move that lead back from the positive bar to the neg. terminal of the rear battery?
 

Attachments

Top
AdBlock Detected

We get it, advertisements are annoying!

Sure, ad-blocking software does a great job at blocking ads, but it also blocks useful features of our website like our supporting vendors. Their ads help keep Steel Soldiers going. Please consider disabling your ad blockers for the site. Thanks!

I've Disabled AdBlock
No Thanks