Steel Soldiers now has a few new forums, read more about it at: New Munitions Forums!
Microsoft MSN, Live, Hotmail, Outlook email users may not be receiving emails. We are working to resolve this issue. Please add support@steelsoldiers.com to your trusted contacts.
You do have all three data plates. Don't know if they should be brass or not. Could be old reproduction plates. My old M100 had the hole in the frame for the recpticle but had the newer style wiring harness. And most of the M100s had the chains removed. There was a debate about the chains sometime back(on g503?) and I think it boiled down to what the state laws were if the chains were removed or if they had to stay. I'll hit my buddy up and see if he has any pics of his trailers he has had. I remember one of his m100s had a USA stencil and numbers. Also I would check over on G503 and see if anyone there can give you any advice.
Yeah, I've asked on the G and Willysmjeeps. No definite answers on either. I think that since my M38a1 is Army, I will just mark it the same. I have documented everything that I could uncover on the tub and frame in case the next owner wants to do more in depth research and do something different. I WOULD like to go back with the original tub number if I can though. I appreciate your input.
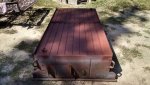
I got off work this morning and decided to take advantage of the 68deg morning weather. I started by cutting the turned down edges of the new floor off on three sides. I left the turned up edges on the front. I used a side grinder with a cutoff wheel on it instead of the plasma cutter. I removed the metal flash with a grinding wheel and removed the paint around the edges where I was going to weld with a flap wheel. I sprayed weld thru primer on the bare metal edges.
I ended up having to trim one end to make the floor fit. I also had to notch the ledge of the old floor to accommodate the new floor hat channel. I used sheet metal screws about every 8" to hold the floor tight to the old ledge and new front metal so that I could flip the tub over and plug weld a ton of spot welds to hold it securely. I was able to get the gap around the edge very close to the side of the tub, so no seam sealer will be necessary.Once the bottom plug welds were done (78 of them - every 3"), I removed the screws from underneath. I ground down the plug welds and sprayed everything with the weld thru primer one more time. I am planning on flipping it over and weld up the screw holes on the inside tomorrow. I have almost decided to use my spare M100 chassis frame instead of repairing this one - it is in decent condition. If I do that I will be able to sand it down and get it painted tomorrow also.
Yes it has! Too bad that TS Erika is going to bring a BUNCH of rain in a couple of days. Hopefully I can get this thing done over the next couple of times off. Maybe next year I will be able to bring the M38a1 and the M100 to the Denton rally instead of the deuce.
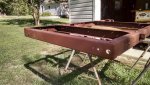
I've been doing a little bit of work on the trailer tub and frame this week. Up until now, I removed the rear crossmember and had some channel bent at a local fab shop. I fabbed the channel into a crossmember with the end tabs and all of the holes matching the original. Today I sanded down the frame and primed it. I also primed the bottom of the tub and new crossmember. Lastly, I bolted (carriage bolt instead of rivet) and welded the new crossmember in. The last few days of work can be seen along with the writeup on my blog http://wilfreeman.wordpress.com .
Tomorrow's plan is to spray some OD on the frame and tub bottom and mate them together if the paint dries in time. The next time I'm off I can put the tub/frame back on the running gear.
Finally! Had a nice day today (70deg, sunny, OFF WORK) to get out to the shop to work on the M100. I got the last little bit of welding done on the under side and got the welds covered with primer. Lastly, I got the drawbar/casting and landing leg and running gear installed. Still have a few welds left on the inside and front panel. Then I can sand her down and throw a coat of OD on the whole thing - underneath, inside and outside. Lastly will be installing the wiring, lights and new tire/tubes.
Thanks! It's not perfect because I'm not a great welder (more of a grinder) and not a perfectionist, but it's definitely going to be better than it was - only a judge will know!
This site uses cookies to help personalise content, tailor your experience and to keep you logged in if you register.
By continuing to use this site, you are consenting to our use of cookies.