

Roboskid
Member
- 43
- 0
- 6
- Location
- GRAND JUNCTION, CO
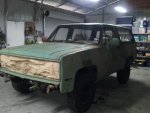
Well the M1009 that I bought from K9Vic awhile back was in great shape mechanically and looked okay. There were a few things that need to be done to her. My Brother Dman69 was driving her to Lonestar MVPA club events as he did not a have a MV of his own. Well I have 3 MVs with M37B1 being the one I always take to shows and events. The vehicle was pretty much staying with him 99 percent of the time.
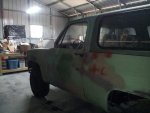
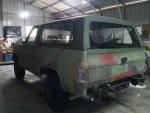
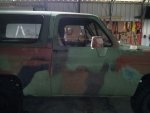
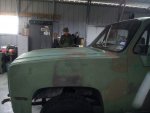
We made a upgrade plan and started collecting parts. My rear window never closed properly as the top of the tailgate had a big dent in it and would not let the window raise all the way up. Surface rust was starting to form in several places. The hood had couple of dents in it. At some time in its past life something had been mounted on the roof as there were 3 holes drilled in there. If the tail gate was open and the rear end of the truck was facing down hill the rear window would partially roll out on its own. We had to insure that window crank was in the stored position to keep that from happening. Also if you were driving and crank came out of stored position the window would roll down. So all that window weight was being held in place by the cam on the crank. We all know that the weakness of the rear window is the cam which always breaks.
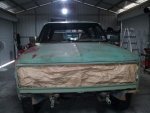
Well when Pawnshop's M1009 "Pinky" was totaled she became an organ donor so that other M1009s could live happy useful lives. I acquired a complete tailgate from Pawnshop. Let me tell you removing said tailgate was no fun and took some doing. Time came for tailgate repair. Our first thought was to just switch out tailgates but that was a going to be work. So we decided to repair mine. We tried to pull the dent in the top of the gate by using a dent puller. It was a cheap AutoZone one that didn't work, not enough mass to pull the dent.
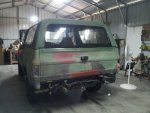
Plan B...Remove the window and regulator which was dangerous because it was broken and wanted to unwind as the weight of the glass was removed. We drilled a hole in the center of dent. Made a "T" out of 1/4 inch square stock and round stock. Inserted the T from inside then welded a chain link to the bottom of the T. Attached a come along to a tree and to the T. Out came the torch, heated the dent area and pulled it out with the come along. Cut off link remove T and weld up hole. A little filler, sanding, primer and paint, looks much better. Clean and grease regulator from Pinky, Clean window from Pinky, was better looking than mine as well. Window rolls up and down nice and smooth and works as it should. One project down.
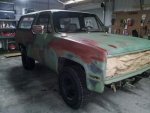
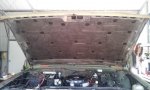
Next came removing parts for complete repaint. Brush guard, grill, lights you guys get the point. Pull dent from hood and weld up holes in roof, stop rust. Sand, filler and primer repairs. Very little filler was used. Bang several dents out of bumpers and fix pintel which would not rotate. Pintel now rotates nice and smooth. Two down
A few days latter my other Brother Jhyatt7 came over and helped me install the OEM hood insulation and we did some more paint prep work. He also helped me earlier in the year install a the spin on Fuel Filter conversion that we both got from Gimpyrob. He also has a M1009 we put one on his as well.
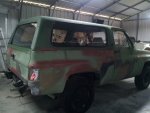
Time for Rapco Carc Green. Converted my shop into a paint booth and painted base color with the help of Dman69. Let paint cure for a week inside of the shop. Easter weekend arrives, tons of family at my place. Monday start Nato 3 color camouflage. Used Rapco rattle can brown and Rustoleum high heat flat black BBQ. Right trigger finger still hurts from all the rattle can use. Project finished.
Worked out a deal with Dman69, M1009 is now his. Hate to see her go but she is staying in the family and can drive her anytime I want.


We made a upgrade plan and started collecting parts. My rear window never closed properly as the top of the tailgate had a big dent in it and would not let the window raise all the way up. Surface rust was starting to form in several places. The hood had couple of dents in it. At some time in its past life something had been mounted on the roof as there were 3 holes drilled in there. If the tail gate was open and the rear end of the truck was facing down hill the rear window would partially roll out on its own. We had to insure that window crank was in the stored position to keep that from happening. Also if you were driving and crank came out of stored position the window would roll down. So all that window weight was being held in place by the cam on the crank. We all know that the weakness of the rear window is the cam which always breaks.
Well when Pawnshop's M1009 "Pinky" was totaled she became an organ donor so that other M1009s could live happy useful lives. I acquired a complete tailgate from Pawnshop. Let me tell you removing said tailgate was no fun and took some doing. Time came for tailgate repair. Our first thought was to just switch out tailgates but that was a going to be work. So we decided to repair mine. We tried to pull the dent in the top of the gate by using a dent puller. It was a cheap AutoZone one that didn't work, not enough mass to pull the dent.
Plan B...Remove the window and regulator which was dangerous because it was broken and wanted to unwind as the weight of the glass was removed. We drilled a hole in the center of dent. Made a "T" out of 1/4 inch square stock and round stock. Inserted the T from inside then welded a chain link to the bottom of the T. Attached a come along to a tree and to the T. Out came the torch, heated the dent area and pulled it out with the come along. Cut off link remove T and weld up hole. A little filler, sanding, primer and paint, looks much better. Clean and grease regulator from Pinky, Clean window from Pinky, was better looking than mine as well. Window rolls up and down nice and smooth and works as it should. One project down.
Next came removing parts for complete repaint. Brush guard, grill, lights you guys get the point. Pull dent from hood and weld up holes in roof, stop rust. Sand, filler and primer repairs. Very little filler was used. Bang several dents out of bumpers and fix pintel which would not rotate. Pintel now rotates nice and smooth. Two down
A few days latter my other Brother Jhyatt7 came over and helped me install the OEM hood insulation and we did some more paint prep work. He also helped me earlier in the year install a the spin on Fuel Filter conversion that we both got from Gimpyrob. He also has a M1009 we put one on his as well.
Time for Rapco Carc Green. Converted my shop into a paint booth and painted base color with the help of Dman69. Let paint cure for a week inside of the shop. Easter weekend arrives, tons of family at my place. Monday start Nato 3 color camouflage. Used Rapco rattle can brown and Rustoleum high heat flat black BBQ. Right trigger finger still hurts from all the rattle can use. Project finished.
Worked out a deal with Dman69, M1009 is now his. Hate to see her go but she is staying in the family and can drive her anytime I want.
Attachments
-
 46.9 KB Views: 47
 -
 40.8 KB Views: 46
 -
 44.7 KB Views: 48
 -
 48.2 KB Views: 44
 -
 41.7 KB Views: 43
 -
 35 KB Views: 44
 -
 46.6 KB Views: 45
 -
 49.1 KB Views: 41
 -
 35.8 KB Views: 43
 -
 43.7 KB Views: 48


