• Steel Soldiers now has a few new forums, read more about it at: New Munitions Forums!

  • Microsoft MSN, Live, Hotmail, Outlook email users may not be receiving emails. We are working to resolve this issue. Please add support@steelsoldiers.com to your trusted contacts.

M1009 Speedometer Cable Replacement?

HelluvaEngineer

Active member
208
86
28
Location
Atlanta, GA
Does anyone have any recommendations for part numbers for replacing the speedometer cable and the gear on the transfer case? I am running 33's with stock differential gears.
Edit: this is an M1009.
 
Last edited:

HelluvaEngineer

Active member
208
86
28
Location
Atlanta, GA
What are you working on???
I rebuilt some stuff in the gauge cluster, including a new speedo. I lubricated the cable, reconnected it, then took a test drive. The needle was bouncing then stopped completely. When I inspected the cable, it was knotted up at the xfer case side, and it was really difficult to remove. I'd like to replace the cable assembly and put a new gear in the xfer case while I'm there.
 

Barrman

Well-known member
5,378
2,049
113
Location
Giddings, Texas
I think the what are you working on question was referring to the CUCV model. They all had the same set of gears inside the tail shaft. But, the M1009 trucks got a fancy little reduction box to go between the tail shaft and the speedometer cable because of the different axle ratio they have. You didn’t mention that so my guess is you are not working on a M1009.

Unfortunately I only have experience with a M1009 set up. Adding 33 x 12.5 tires to a M1009 makes the speedometer and odometer 10% slow. The federal standard as I understand it is an allowable error of 3-5%. Each step of the gear changes in the speedometer drive system is also 3-5%. Which means 1 step gets you technically legal and 2 steps gets you theoretically right on.

But, do you have the stock drive and driven gears in your transfer case and how accurate is your speedometer? I would suggest you get the new cable assembly and drive the truck. Use GPS or interstate mile markers and a stop watch to figure out how far off you are. Also figure out what color gears you have inside while doing the cable install. If your plastic drive gear that the cable slips into looks or feels rounded. I have had good success with wrapping the cable with a small bit of aluminum foil to make it a non slip tight fit.
 

Sharecropper

Well-known member
Steel Soldiers Supporter
1,866
1,079
113
Location
Paris KY
I think the what are you working on question was referring to the CUCV model. They all had the same set of gears inside the tail shaft. But, the M1009 trucks got a fancy little reduction box to go between the tail shaft and the speedometer cable because of the different axle ratio they have. You didn’t mention that so my guess is you are not working on a M1009.

Unfortunately I only have experience with a M1009 set up. Adding 33 x 12.5 tires to a M1009 makes the speedometer and odometer 10% slow. The federal standard as I understand it is an allowable error of 3-5%. Each step of the gear changes in the speedometer drive system is also 3-5%. Which means 1 step gets you technically legal and 2 steps gets you theoretically right on.

But, do you have the stock drive and driven gears in your transfer case and how accurate is your speedometer? I would suggest you get the new cable assembly and drive the truck. Use GPS or interstate mile markers and a stop watch to figure out how far off you are. Also figure out what color gears you have inside while doing the cable install. If your plastic drive gear that the cable slips into looks or feels rounded. I have had good success with wrapping the cable with a small bit of aluminum foil to make it a non slip tight fit.
Ditto what Barrman said. The OEM driven gear GM installed in the CUCV NP208 transfer cases was the 41-tooth yellow gear, GM part #1362195. To speed-up the speedometer reading when driving, the tooth count of the driven gear should be reduced; similarly, to slow the speedometer reading when driving, the tooth count of the driven gear should be increased. Each tooth on the driven gear added or subtracted will result in approximately 2 MPH reading on the speedometer. But take note - if you need to speed-up the speedometer reading, you will also need to use a different sleeve for the driven gear. The OEM CUCV sleeve is a GM1362077, which is for driven gears of 40 to 45 teeth only; if you need to reduce the tooth count lower than 40, you will also need to use a GM1362076 sleeve which will accommodate driven gears with tooth counts of 36 to 39. All of these GM part numbers are readily available on Ebay.

To determine the exact required driven-gear tooth count of your specific application, do the math as explained in the link in my thread above. It works and will get you within 1 MPH of absolute accuracy at 60 MPH.
 

HelluvaEngineer

Active member
208
86
28
Location
Atlanta, GA
Apologies.
It's an M1009 and it does have a reduction box on the side of the xfer case. I missed the intent of the original reply.
Just assumed I had mentioned M1009.

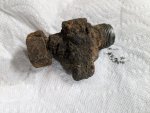
signal-2025-05-05-164913_003.jpegsignal-2025-05-05-164913_004.jpeg
 

HelluvaEngineer

Active member
208
86
28
Location
Atlanta, GA
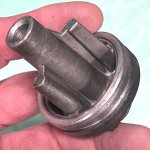
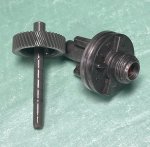
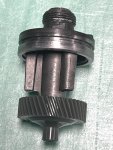
See above. There is some kind of horrific graphite lubricant gunk in the reduction box that is likely 40 years old. I'm considering pulling off that unit, disassembling it, and throwing it in my ultrasonic cleaner. At this point I'm not focused on an accurate speedo, but my questions now are:
  1. What is the correct lubricating procedure for the reducer?
  2. Are different gears even available if I decide to go that route?
Thanks for all of the replies and apologies for not mentioning the vehicle upfront.
 

HelluvaEngineer

Active member
208
86
28
Location
Atlanta, GA
Referencing https://www.steelsoldiers.com/threads/speedometer-adapter-assy-6-m1009.70087/

I've been bouncing this off of ChatGPT trying to get the current part numbers, most of which are wrong. What I find interesting is that it made the recommendation of just removing the adapter box and getting the correct gear. It is suggesting a 40 took gear, but I have not confirmed. Given the mentions of that adapter failing, this seems like a good idea. Does anyone have experience with this? Part of the CGPT convo:


Your M1009 (like all CUCV trucks) has a VSS (Vehicle Speed Sensor) ratio adapter box mounted between the transfer case and the speedometer cable.
This metal box is what you're calling the reduction box — and yes, it absolutely affects the calculation. Let’s break this down:


⚙ What is that box?

It’s a ratio adapter — essentially a small gearbox that spins the cable faster or slower to correct for axle ratio and tire size from the factory.


  • On the M1009, this adapter corrects for:
    • 3.08 gears
    • ~31.7" stock tires

The ratio is usually stamped on the box itself — something like DRIVE 16 / DRIVEN 21 (or similar), which equals 0.76:1 reduction
(The output spins slower than input)


❓ Does it still work with 33” tires?

Well…
Since your tire diameter increased, the original ratio adapter will now be over-correcting, making your speedometer read even slower than it should.


Example:
Larger tires = speedo already reads slow
Ratio box slowing it further = speedo reads even more inaccurate
🛠 So what should you do?

You have 2 options:


OptionWhat you doResult
1. Remove ratio boxDelete the adapter and run cable straight to transfer caseSimplest fix, less clutter, recalibrate with correct gear
2. Keep box, recalibrate driven gearLeave box, but calculate new driven gear to counteract box ratioMore complicated, keeps VSS signal if you care about it

Most guys on SteelSoldiers just delete the box (since it's not connected to anything critical on an '84 M1009).
The VSS was for cruise control and diagnostic purposes, which you likely don't use.


⚙ How to delete the ratio box cleanly

  • Remove box
  • Connect speedo cable direct to transfer case adapter
    — You may need a female-female speedo cable coupler (or a longer cable) depending on routing

If you delete the box, my earlier suggestion of the 40T driven gear (TCI 880028) is spot on
✅ Summary

  • Yes, your ratio box affects things — it overcorrects now with 33s
  • Best move? Delete box + install correct driven gear (40T Green)
  • Result: Cleaner, simpler setup, speedometer very close to correct
 

HelluvaEngineer

Active member
208
86
28
Location
Atlanta, GA
After spending too much time on this, I think it's all rubbish. I don't think the M1009 can delete the reducer. The lowest we can go, I believe, is 34 teeth which will indicate 73 mph at 60 mph actual.
 

Sharecropper

Well-known member
Steel Soldiers Supporter
1,866
1,079
113
Location
Paris KY
After spending too much time on this, I think it's all rubbish. I don't think the M1009 can delete the reducer. The lowest we can go, I believe, is 34 teeth which will indicate 73 mph at 60 mph actual.
It’s not rubbish, it’s science. First, clean the dang area so you can see what the heck you are doing. Then take the blasted reducer off and throw the thing in the trash. Then get a new speedometer cable and a new driven gear and put it all back together. I have both parts here so if you can’t find them, hail I’ll ship you mine. If I was there I would have the issue resolved faster than a fat kid eating a cupcake.
Seriously, I’ve done this many times and once you understand the science, the solution will be evident. But I believe you are going in the wrong direction regarding tooth count- to lower the speedometer reading, you must increase the tooth count of the driven gear. I’ll be happy to help you resolve the issue but you mustn’t give up. If I were you, the first thing I would do is clean the area and take a pair of channel-locks and unscrew the reducer from the sleeve. Do that for me please, and then post some photos and I will guide you through the entire process. We must get the reducer off and then the sleeve out of its hole by removing the 10mm bolt which holds the sleeve retainer on. The sleeve is simply held in its hole by an O-ring around the entire perimeter of the sleeve. Once the hole is open, we then need to shine a light into the hole to verify the health and color of the drive gear. After that, if you will jack up one wheel and measure the circumference in the middle of the tire, I will calculate which driven gear you will need. Heck I’ll even get the new gear and sleeve for you. Then all you have to do is grease the O-ring on the sleeve and twist it into place, and replace the retainer and 10mm bolt which holds everything in place. Grease the square end of the new speedometer cable, insert it into the square hole in the sleeve, and screw it to the sleeve tightly. C’mon man, don’t give up on this. I’ve got too much time invested in this thread. I’m 74 and may not have much time left after 8 surgeries and 2 heart attacks. When I get back to my shop in the morning I will post some photos so you can see what I am talking about. Geez.
 

Sharecropper

Well-known member
Steel Soldiers Supporter
1,866
1,079
113
Location
Paris KY
OK, here goes -

This first photograph shows what the installed assembly should look like when it is clean and without the reducer. You will see that the sleeve has the raised numbers 40, 41, 42, & 43, which indicates that this particular sleeve is for driven gears with those tooth-counts, however it will also work with 44 & 45 tooth-count driven gears. Our CUCV's were delivered from GM with a yellow 41 tooth-count driven gear, which can be changed, and a Gray 15-tooth drive gear in the NP208 transfer case, which cannot be changed short of disassembling the case. Note the 10mm bolt holding the thin steel retainer which holds the sleeve in the hole.

IMG_1242.jpg

These next two photographs show what the sleeve looks like by itself and without a driven gear installed. Note the recess around the perimeter which is for an O-ring to seal it in the round hole of the transfer case.

IMG_1244.jpg IMG_1246.jpg

These photographs show what the driven gear looks like laying beside the sleeve and also by itself.

IMG_1243.jpg IMG_1247.jpg

And finally, this photograph shows the assembled sleeve and driven gear together. When inserted into the hole on the transfer case, the driven gear must engage with the teeth of the drive gear in the case.

IMG_1248.jpg

Based on your photos, your speedometer cable and driven gear is toast and should be discarded. Before you go to the expense of acquiring new replacements, we need to make sure the DRIVE gear in the transfer case has not been damaged. So please clean the area and remove the sleeve, and get your camera up high enough to take a photo of the drive gear inside the case. If it is indeed damaged, the only way to repair the damage is to disassemble the transfer case and install a new drive gear. So that is the first step in getting this issue resolved.

And I will also take this opportunity to say that you started this thread and asked for assistance. If you subsequently elect to disregard my assistance in this issue, I will refrain from offering any future assistance to HelluvaEngineer. By the way, what kind of engineer are you anyway?

Respectfully, Mike Gresham, Paris, Kentucky
 

HelluvaEngineer

Active member
208
86
28
Location
Atlanta, GA
@Sharecropper please don't be offended. I really appreciate the guidance and the high rez pics. We are apparently going through monsoon season here in GA and it's been slow going taking parts off since my truck is parked outside. I also run a business and have events with my kids so I have narrow opportunities to work on things at the moment.

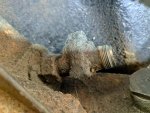
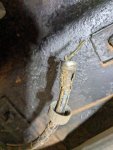
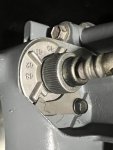
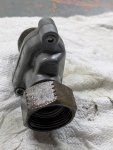
Anyway, I finally coated the transfer case in oven cleaner then attacked it with a pressure washer so that I could see what I was working on. I removed the cable and the adapter as well. The housing is a little stuck but I think I will get that out tomorrow and review the gears.

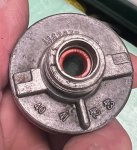
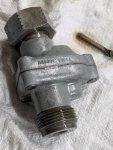
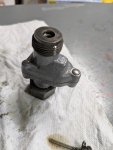
The adapter looked rough, but after 10 cycles in my ultrasonic gun cleaner I got it looking pretty presentable. It spins freely but I may have messed up the internal lubrication. I saw some graphite lube coming out of it initially, but that might have just been the cable.

signal-2025-05-14-174109_002.jpeg
signal-2025-05-14-174109_003.jpeg
signal-2025-05-14-174109_004.jpeg
signal-2025-05-14-174109_005.jpeg

I can barely read it but that looks like a Stewart Warner insignia to me. I'm tempted to run with it if the gears look OK. I'll follow up soon with an update.

To answer your other question, I have an ME degree from GA Tech, but I'm currently the president of a company that does software and database work. I was also born in Lexington, so don't be too rough on me.

I will post an update once I get that gear removed. I'm ordering a new cable from NAPA now. Thanks again for the help.
 

Attachments

Sharecropper

Well-known member
Steel Soldiers Supporter
1,866
1,079
113
Location
Paris KY
@Sharecropper please don't be offended. I really appreciate the guidance and the high rez pics. We are apparently going through monsoon season here in GA and it's been slow going taking parts off since my truck is parked outside. I also run a business and have events with my kids so I have narrow opportunities to work on things at the moment.

Anyway, I finally coated the transfer case in oven cleaner then attacked it with a pressure washer so that I could see what I was working on. I removed the cable and the adapter as well. The housing is a little stuck but I think I will get that out tomorrow and review the gears.

The adapter looked rough, but after 10 cycles in my ultrasonic gun cleaner I got it looking pretty presentable. It spins freely but I may have messed up the internal lubrication. I saw some graphite lube coming out of it initially, but that might have just been the cable.

View attachment 946696
View attachment 946697
View attachment 946698
View attachment 946699

I can barely read it but that looks like a Stewart Warner insignia to me. I'm tempted to run with it if the gears look OK. I'll follow up soon with an update.

To answer your other question, I have an ME degree from GA Tech, but I'm currently the president of a company that does software and database work. I was also born in Lexington, so don't be too rough on me.

I will post an update once I get that gear removed. I'm ordering a new cable from NAPA now. Thanks again for the help.
Wow what a coincidence. You were born in Lexington KY and moved to Atlanta? I was born in Atlanta and moved to Paris, KY, just N.E. of Lexington. Actually I was born at Emory University Hospital in Decatur and was raised in Powder Springs in Cobb County. Went to McEachern High School, Class of '69. Moved up here in '88. I bleed blue now. I know the Ga Tech campus well. Best thing about Ga Tech? Right across the freeway from The Varsity. Gosh, how many chili dogs I have eaten there in my life?

Back to the subject - the reason GM used the reducer on all M1009's was so that they could use the same drive gear in all NP208's, regardless of whether the transfer case went in a truck or blazer, due to the fact that the blazers had the higher rear axle ratio. Are you running all stock OEM equipment, or are you running an overdrive unit? If you are running all stock OEM equipment and will provide your center-of-tire diameter, I will calculate the gear you need for accurate speedometer output. I have an extra new sleeve in my spare parts bin and several new driven gears. Verify the color of the drive gear in the transfer case and I will send you a new sleeve and the correct driven gear. If your transfer case is original to the truck, it should have the gray drive gear. PM me and I will send you my contact information.
 

HelluvaEngineer

Active member
208
86
28
Location
Atlanta, GA
Wow what a coincidence. You were born in Lexington KY and moved to Atlanta? I was born in Atlanta and moved to Paris, KY, just N.E. of Lexington. Actually I was born at Emory University Hospital in Decatur and was raised in Powder Springs in Cobb County.
... If you are running all stock OEM equipment and will provide your center-of-tire diameter, I will calculate the gear you need for accurate speedometer output.
Yes. My Dad went to UK and my Mom was at one of the community colleges in Paducah, where my Dad grew up. We moved around shortly after I was born but I landed in ATL in 1993 to go to school, then got married to a woman who was born and raised in Alpharetta. I lived in the Smyrna area for a few years (right next to the historic covered bridge), so not too far from where you were. Now we are up in Cherokee County, on the river.

When I was at Tech, my freshman dorm was Smith, the one closest to the Varsity, so I burned out on it pretty quickly. We were right there at the bridge so it was an easy walk. A fun fact is that when I was in that dorm I was in one of the double rooms, so I had 3 roommates. All of them dropped out / got kicked out. That was back in the day when the retention rate was really low. It's like 95% now.

Anyway, I just did a quick measurement with a tape and the diameter at the center is actually pretty darn close to 33", which I guess gives it a circumference of 103.7". Everything is stock. No gear changes. I'd prefer to not take the xfer case apart and I'm not looking for extreme accuracy. I've driven this thing for a few years now with no speedo. I'm open to using the adapter again, but I have no idea how to lubricate it with it being sealed. A new cable is on the way and I'll get the driven gear out this weekend.

Thanks again for the help.
 
Top