ChrisABQ07
Member
- 49
- 6
- 8
- Location
- Belen, NM
I scored a complete set of fiberglass racks for my M101A3 over July 4th down in El Paso, TX. The donor trailer was GL out of Fort Bliss -- already in private hands. The seller has a heavy machinery business and had several Army cranes, a few M101A2s and M105s, and a M1102 scattered through his back lot.
After I got the racks on my M116A2 for the trip home, I noticed I had 2 left racks because the bow storage pockets were in the same position, on the left front. No big deal, I figured. I'll fix it later. The set was too good to pass up and my old racks were warped wood.
Well, to make a long story short, it took a few days to come up with a workable solution. It seems that taking off the top rail was not as easy as it looked. The screws didn't budge, but simply spun the whole spacer. I finally used a dremel and cutting wheel to carefully remove the 10 screw heads from the top fiberglass rail. Then I punched the spacer / backing piece through the stakes. I also took off the bow pockets the same way. Those spacer / backing pieces were trashed, so I had to find another way to install the rail.
I finally decided to use what I had or could get locally:
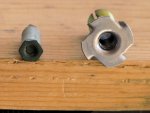
(10) Tee nuts (1/4"-20 [4 prong] 7/16" barrel length, 5/16" barrel width),
1 foot of all thread lamp pipe (3/8" OD, 1/4" ID)
(10) 1/4"-20 x 1" Phillips head screws,
(10) 1/4" flat washers,
medium thread lock,
and about 20 thin cutting wheels for the dremel. (Not a steady-hand day!)
Top Rail to Stakes
I drilled the stake hole out to 5/16" so the Tee nuts would fit
I cut all of the prongs off of the Tee nuts
I cut the all thread to approx 5/8" lengths (10 pieces) - Use a vice for better control!
- I cut a slit through the entire length of the all thread so I could widen it to 5/16" to go over the OD of the Tee nut
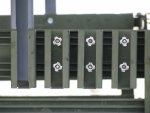
I pushed a Tee nut though each stake hole (from the outside) and pressed an all thread sleeve over the Tee nut barrel (on the inside) with a C clamp. Repeated for each stake hole (10 holes total)
Replaced top rail in the correct position for bow pockets on right front.
Installed 1/4" washers and screws with thread lock and tightened.
I priced the Tee nuts, screws, washers, and hex nuts (another part of the project) at Home Depot and it came out to way too much. The T nuts were $1.18 each... I ordered 100 of each of the above from AllensFasteners.com for about $26 + $7 for shipping. The all thread lamp pipe kit was $7 at Home Depot.
Tomorrow I do the bow pockets and install the new racks.


After I got the racks on my M116A2 for the trip home, I noticed I had 2 left racks because the bow storage pockets were in the same position, on the left front. No big deal, I figured. I'll fix it later. The set was too good to pass up and my old racks were warped wood.
Well, to make a long story short, it took a few days to come up with a workable solution. It seems that taking off the top rail was not as easy as it looked. The screws didn't budge, but simply spun the whole spacer. I finally used a dremel and cutting wheel to carefully remove the 10 screw heads from the top fiberglass rail. Then I punched the spacer / backing piece through the stakes. I also took off the bow pockets the same way. Those spacer / backing pieces were trashed, so I had to find another way to install the rail.
I finally decided to use what I had or could get locally:
(10) Tee nuts (1/4"-20 [4 prong] 7/16" barrel length, 5/16" barrel width),
1 foot of all thread lamp pipe (3/8" OD, 1/4" ID)
(10) 1/4"-20 x 1" Phillips head screws,
(10) 1/4" flat washers,
medium thread lock,
and about 20 thin cutting wheels for the dremel. (Not a steady-hand day!)
Top Rail to Stakes
I drilled the stake hole out to 5/16" so the Tee nuts would fit
I cut all of the prongs off of the Tee nuts
I cut the all thread to approx 5/8" lengths (10 pieces) - Use a vice for better control!
- I cut a slit through the entire length of the all thread so I could widen it to 5/16" to go over the OD of the Tee nut
I pushed a Tee nut though each stake hole (from the outside) and pressed an all thread sleeve over the Tee nut barrel (on the inside) with a C clamp. Repeated for each stake hole (10 holes total)
Replaced top rail in the correct position for bow pockets on right front.
Installed 1/4" washers and screws with thread lock and tightened.
I priced the Tee nuts, screws, washers, and hex nuts (another part of the project) at Home Depot and it came out to way too much. The T nuts were $1.18 each... I ordered 100 of each of the above from AllensFasteners.com for about $26 + $7 for shipping. The all thread lamp pipe kit was $7 at Home Depot.
Tomorrow I do the bow pockets and install the new racks.